[This article originally appeared in the April 2022 issue of Photoshop User, the Magazine for Lightroom and Photoshop Users. To learn more about Photoshop User and to sign up to read the latest issue for free, click here.]
By Dave Clayton
If you’ve been following my tutorials, you’ll know I love retro/vintage effects and anything typographical. So this issue we’re going to look at some type-warping techniques in Photoshop to give your images and designs that little extra. So many Photoshop users don’t realize how much they can do with type, and how easy it is to stylize it with the built-in effects. So get Photoshop fired up and let’s start creating some fun type designs!
WARP FACTOR 1
Thanks to Photoshop’s wonderful versatility, we can warp text in several different ways. In this first method, we’re going to warp it manually.
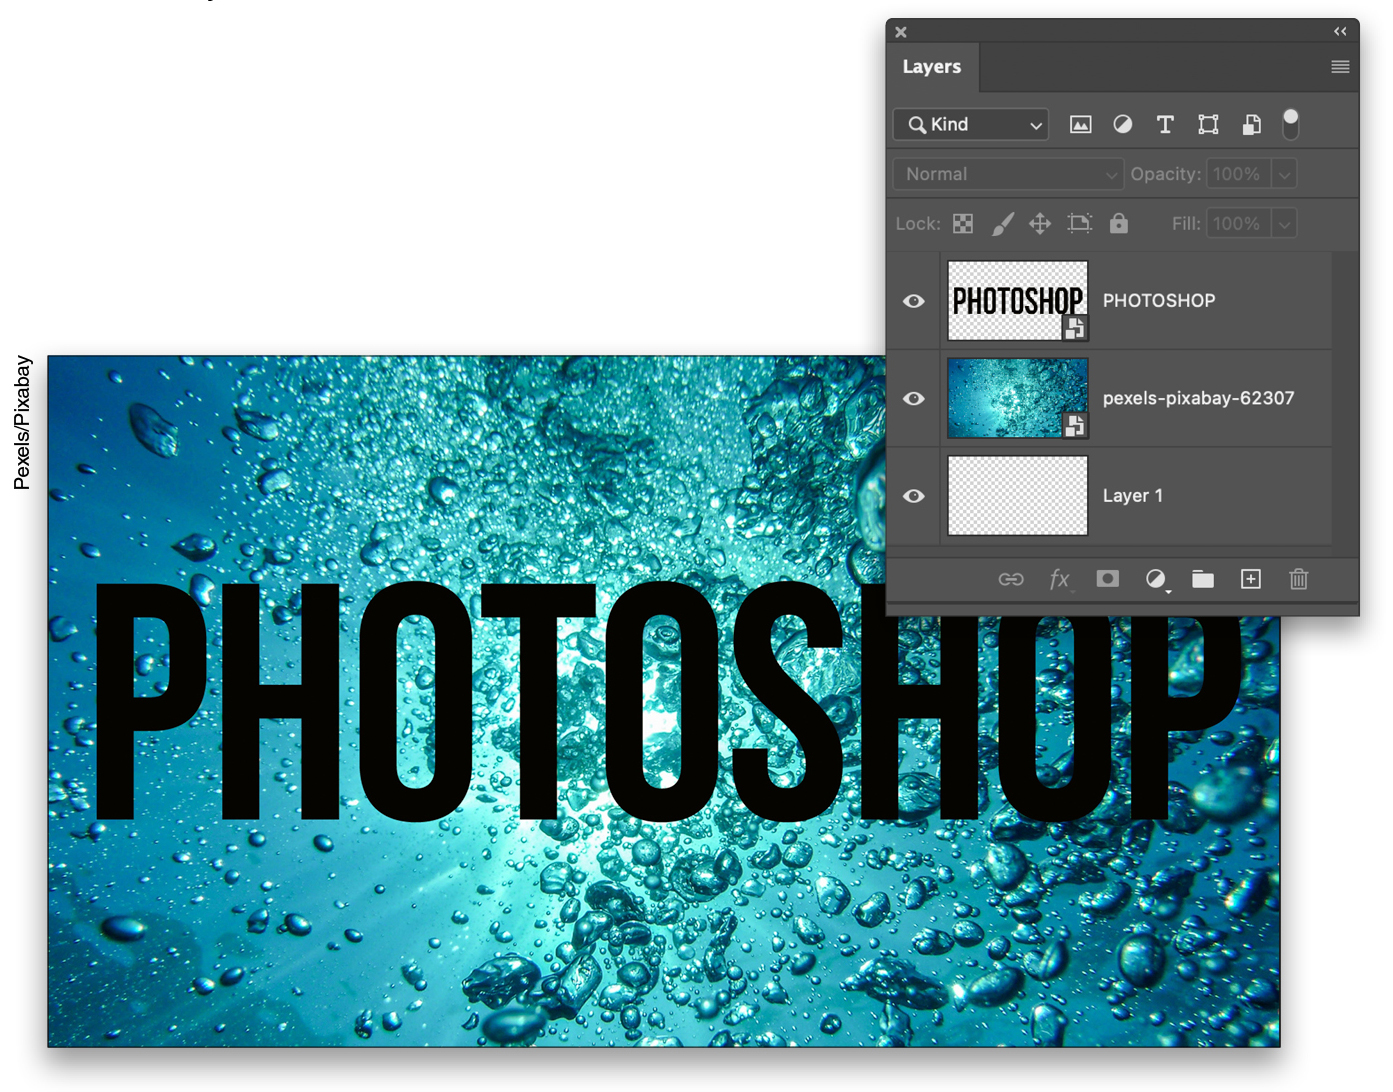
STEP ONE: CREATE NEW DOCUMENT
Start a new document (File>New) that’s 1920×1080 px at 300 ppi and RGB Color (just for the purpose of this tutorial; if you wish to print, select a print output size and CMYK Color). Click Create.
STEP TWO: ADD TYPE
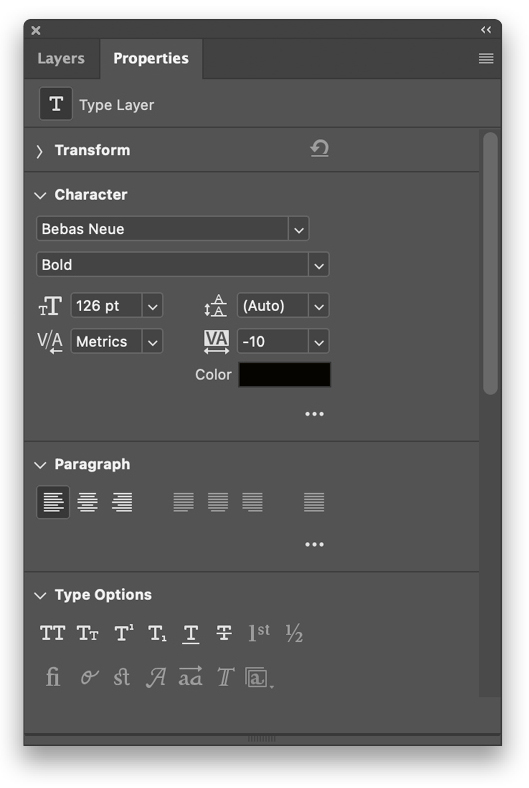
Grab the Type tool (T), press D to set your Foreground color to black, click in your document, and type the word “PHOTOSHOP” in Bebas Neue Bold (available from Adobe Fonts with your CC subscription by going to Type>More from Adobe Fonts), or any bold font you have on your system, at 126 pt. You can also adjust the tracking to bring the letters a little closer if you wish by selecting them with the Type tool and using the tracking setting (space between letters) in the Properties panel (Window>Properties). We’ve set tracking to –10. Tip: With the letters selected, hold the Option (PC: Alt) key and tap the Left or Right Arrow key on your keyboard to change the tracking. Press Enter to commit the type.
STEP THREE: PREPARE FOR WARP
Right-click the type layer in the Layers panel and select Convert to Smart Object. You can’t use warp on live text using this method but you can on a smart object, enabling you to edit the type at any time by opening the smart object.
STEP FOUR: ADD BACKGROUND IMAGE
Ideally, you’re warping the text for a specific reason, such as to fit a particular shape or to make a really funky design for a sticker or logo. In this example, we’re going to replicate the style of the famous Nirvana album, Nevermind, where the word “Nevermind” was warped to mimic being under water. So, using a free image from pexels.com that you can find here, go to File>Place Embedded, navigate to the downloaded image, and click Place. Use the bounding box to resize the water image to fill the canvas, and press Enter to commit it. Drag it below the type layer in the Layers panel.
STEP FIVE: BEGIN WARPING
With the type layer selected in the Layers panel, either press Command-T (PC: Ctrl-T) to activate Free Transform, Right-click inside the bounding box, and choose Warp, or you can go directly to Edit>Transform>Warp. You’ll see the bounding box has a small node at each corner, and each node has two warp control handles that move independently of each other.
Now, using the handles and clicking-and-dragging anywhere within the type, start to pull and push it around to reshape the word. The warp control is very powerful, giving you full control over your type as if it were putty. (Warning: Like anything in Photoshop, if you push the warp too far, you’ll start to see some pixelation problems, but done judiciously, it’s a great tool.) Once you’re happy with warp, click the Commit Transform checkmark in the top Options Bar or just press Enter on the keyboard.
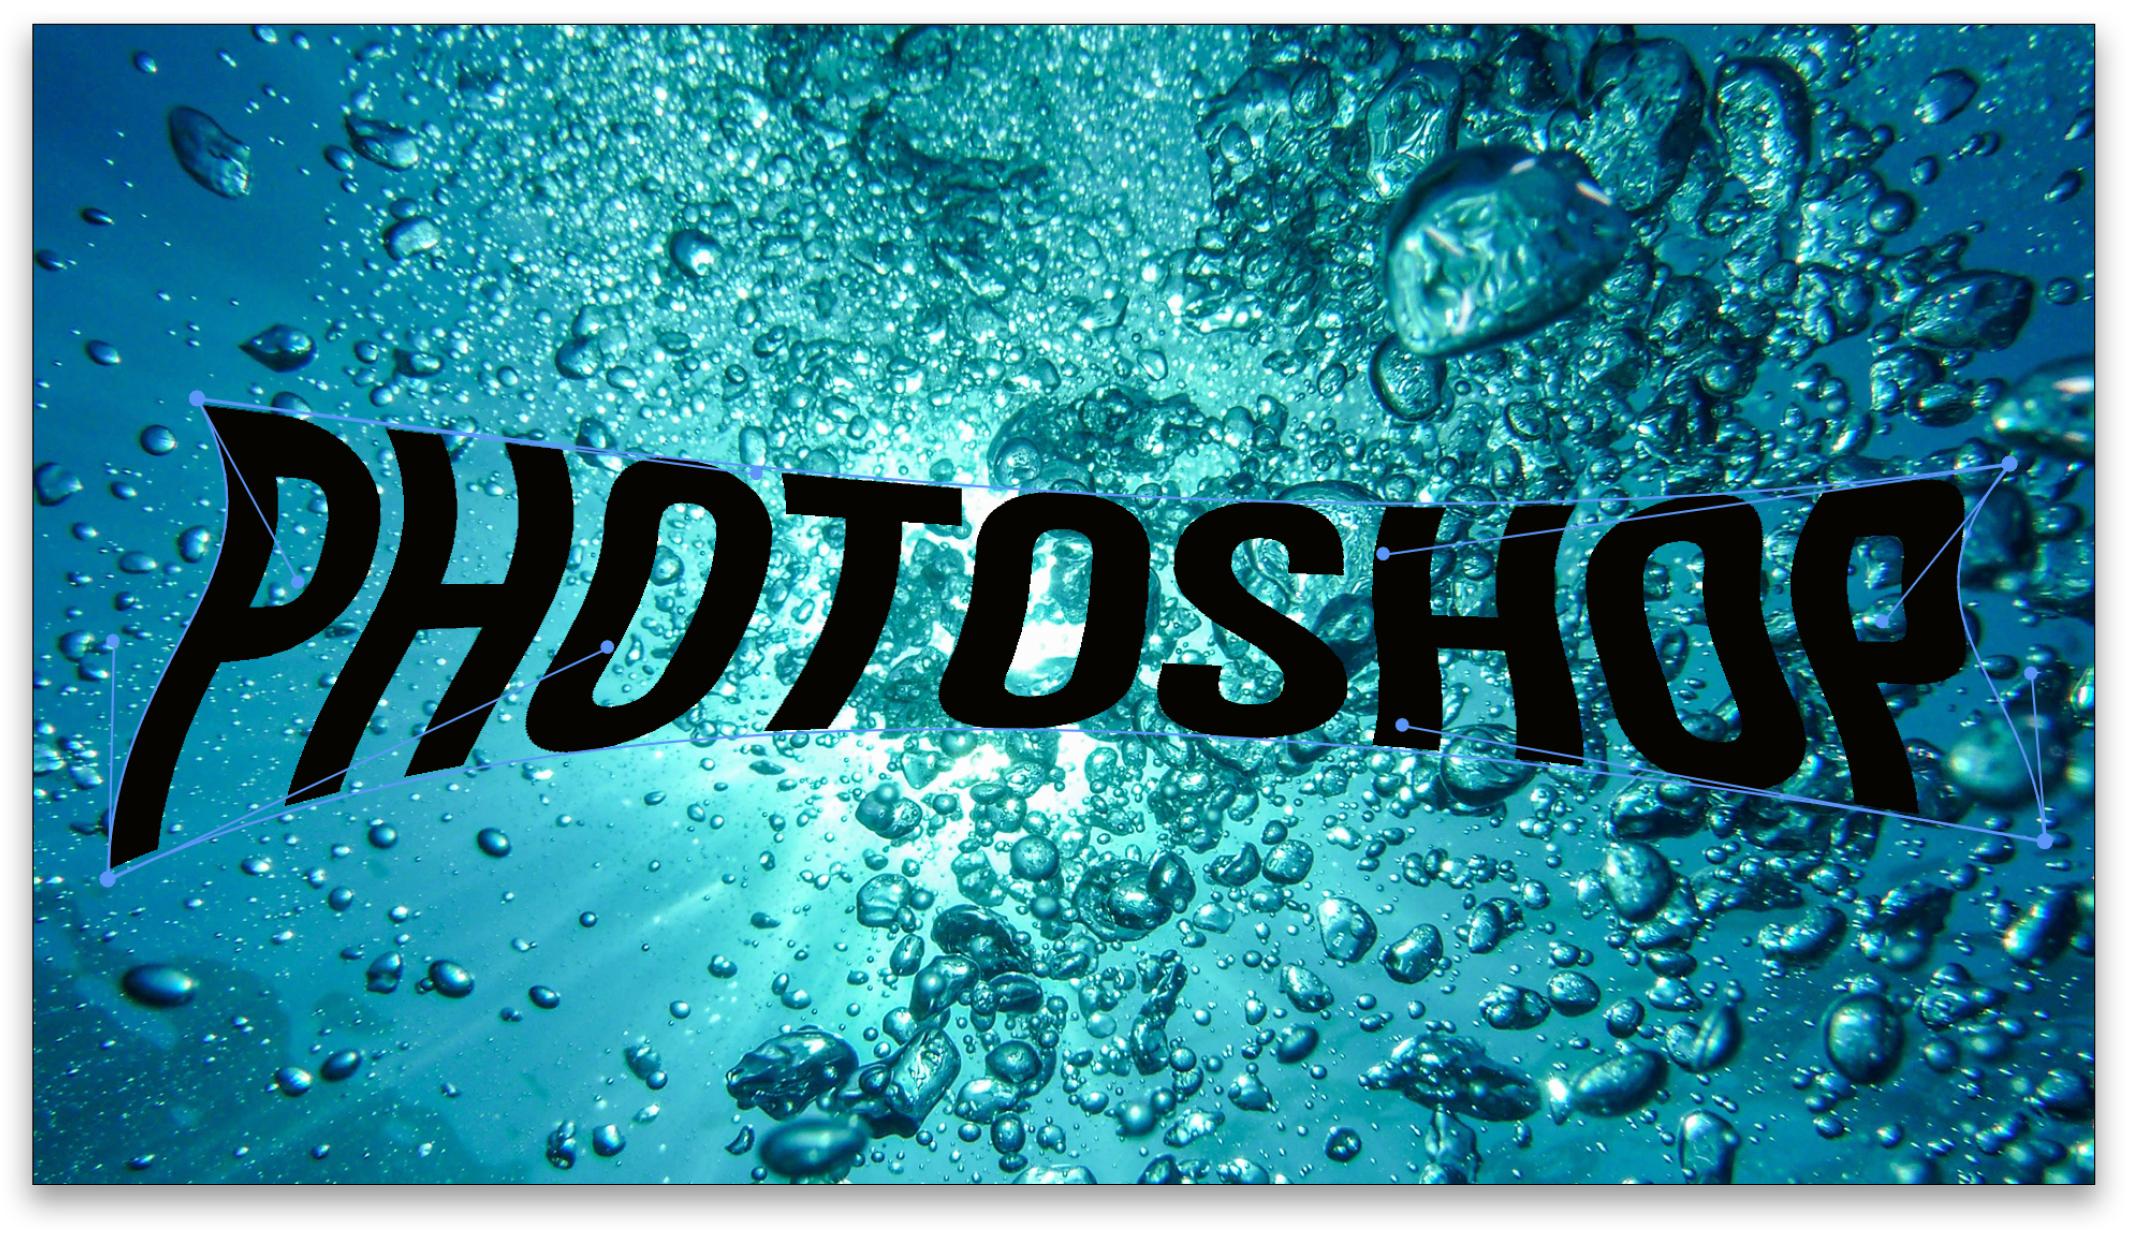
Even though you’ve now committed the warp, you can always go back and refine it. Just activate the Warp command again and you can continue to reshape the word right from where you left off. That’s how to warp manually.
STEP SIX: ADD EFFECTS
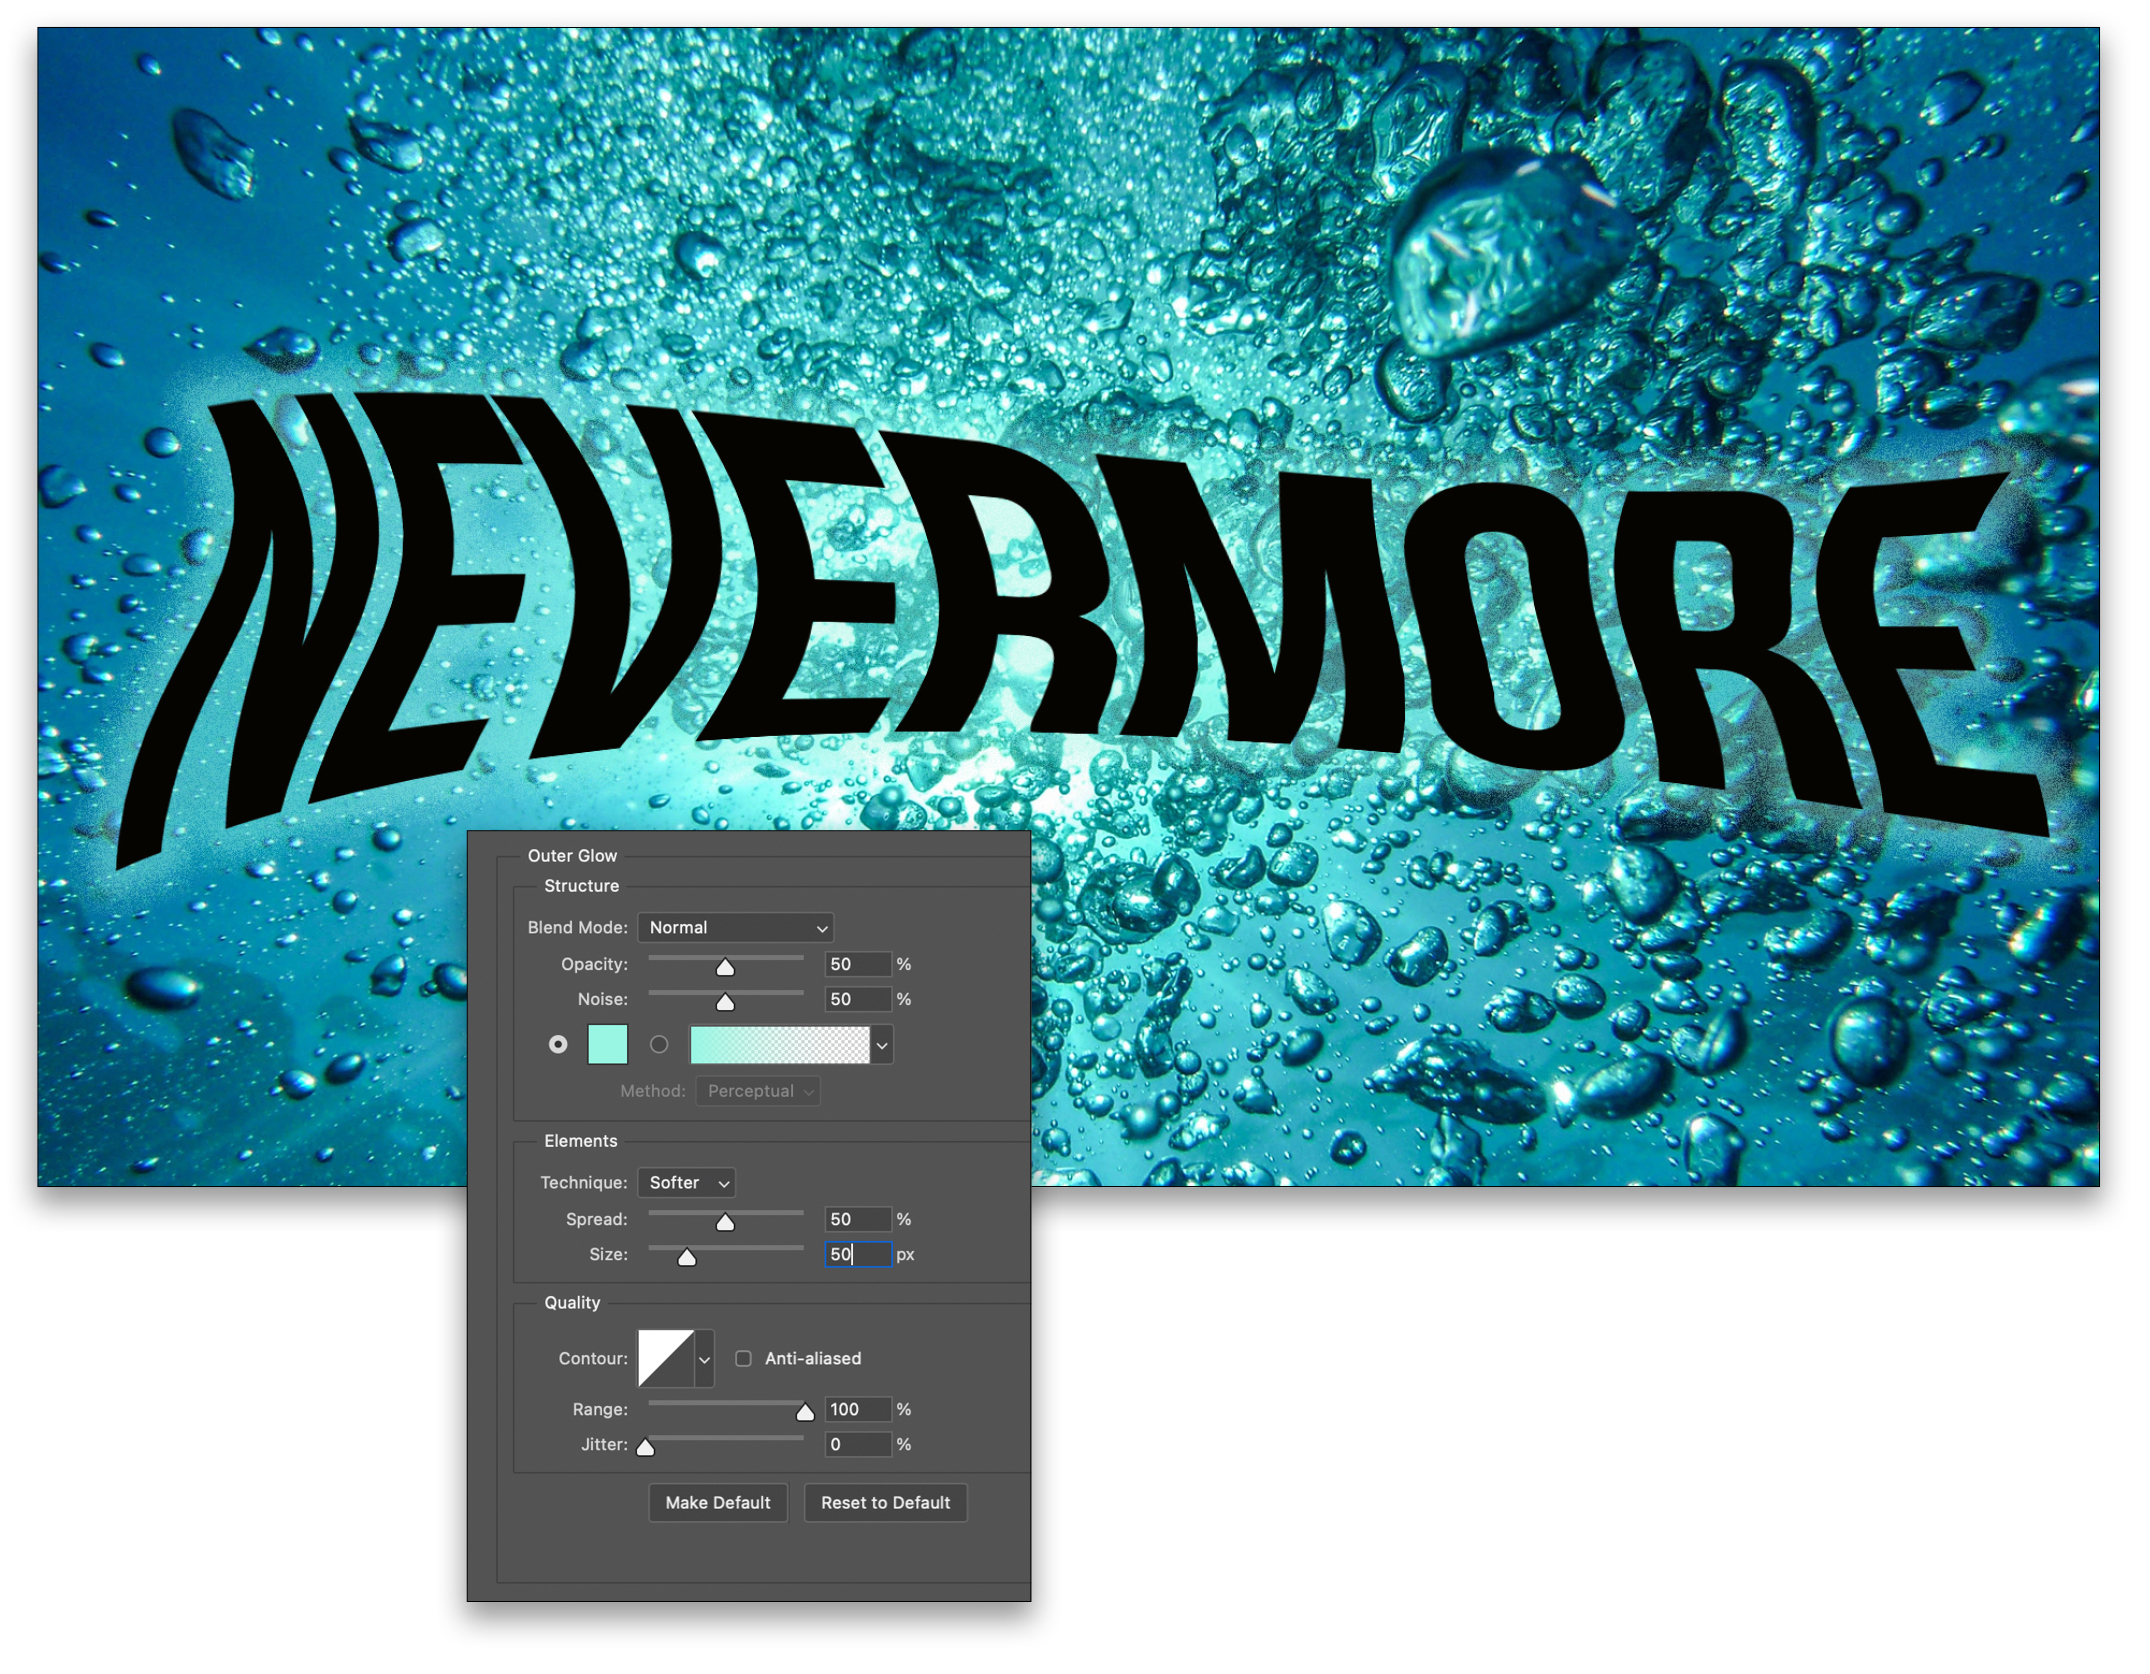
What if you wanted to keep this warp, but change the word? Just double-click on the type layer’s thumbnail in the Layers panel to open the smart object in a separate file, change the word using the Type tool, and then save the file and close it. Note: If your new word is longer than your original word you may need to change its tracking or size so it still fits inside the smart object. In this example, we changed the word to “NEVERMORE.”
To finish, we’ll add a subtle outer glow layer style. With the type layer active, click on the ƒx icon at the bottom of the Layers panel and select Outer Glow. In the Layer Style dialog, use the following settings and then click OK.
- Blend Mode: Normal
- Opacity: 50%
- Noise: 50%
Click the gradient thumbnail, double-click the left color stop below the gradient ramp, click on a light-green color in the water to sample it, click OK to close the Color Picker, and click OK to close the Gradient Editor. - Technique: Softer
- Spread: 50%
- Size: 50 px
- Range: 100%
- Jitter: 0%
- Leave everything else at their defaults.
WARP FACTOR 2
Now let’s take a look at another method for warping text. This time we’re going to use one of the built-in warp effects to make a banner ribbon for a logo or crest.
STEP ONE: NEW DOCUMENT
Start another new document (File>New) that’s once again 1920×1080 px at 300 ppi and RGB Color. Using the Type tool, type the word “PHOTOSHOP,” again using Bebas Neue Bold (or any bold font you have on your system) set to black. Set the font size a little smaller this time at 80 pt.
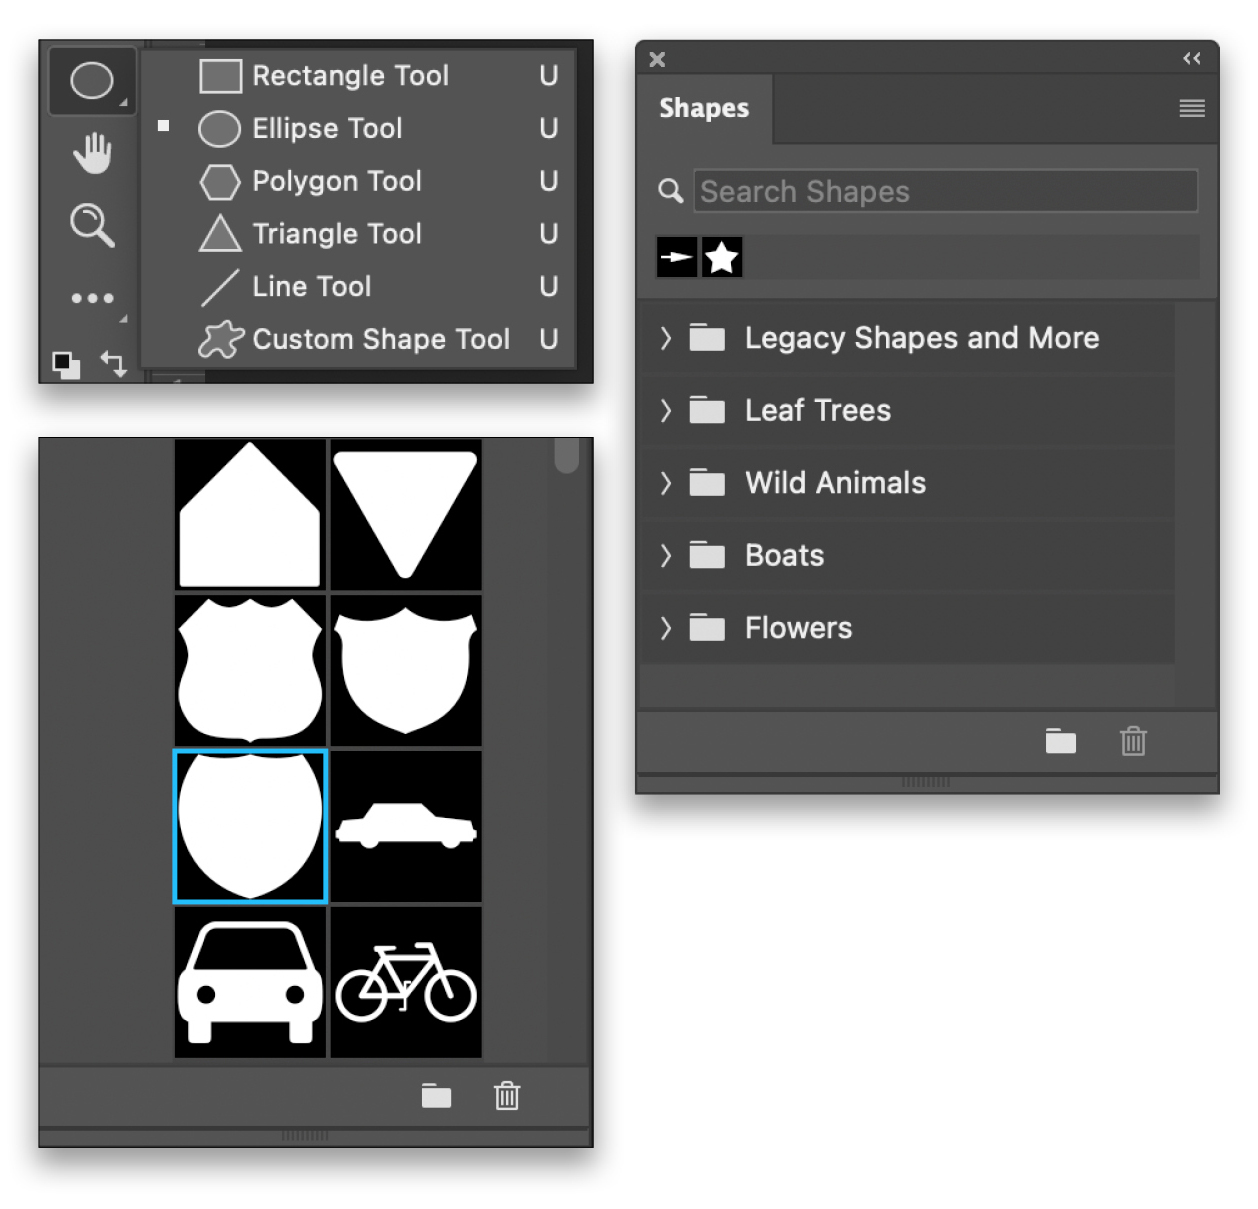
STEP TWO: ADD CUSTOM SHAPE
To begin our design, we’re going to use a custom shape for one of our elements. Before we do that, however, click the Eye icons next to both the type layer and Background layer in the Layers panel to hide them for now so we can see what we’re doing without distraction.
To access custom shapes, click-and-hold on the Rectangle tool (U) in the Toolbar and, at the bottom of the stack of flyout tools, you’ll see a blob, which is the Custom Shape tool. Once selected, go up to the Options Bar and make sure the Tool Mode is set to Shape. Now you could use the Custom Shape Picker to select your custom shape while you’re here in the Options Bar, but we’re going to use the Shapes panel instead by going to Window>Shapes.
The reason we’re using the Shapes panel is that we’re going to use an older shape that’s no longer visible by default in the Custom Shape Picker because newer versions of Photoshop decided to hide those old custom shapes. So, if you don’t see a set (folder) in the Shapes panel called “Legacy Shapes and More,” just click on the flyout menu at the top right of the panel and select Legacy Shapes and More, which will automatically add this set to the list.
Expand that set, then expand the All Legacy Default Shapes set, followed by the Symbols set. Select the crest shape as shown, which is Sign 6.
Holding the Shift key, click-and-drag in your document to draw a crest that’s around 672×678 px. Then, in the Properties panel (Window>Properties), set the Fill to No Color, and change the Stroke to black at 50 px.

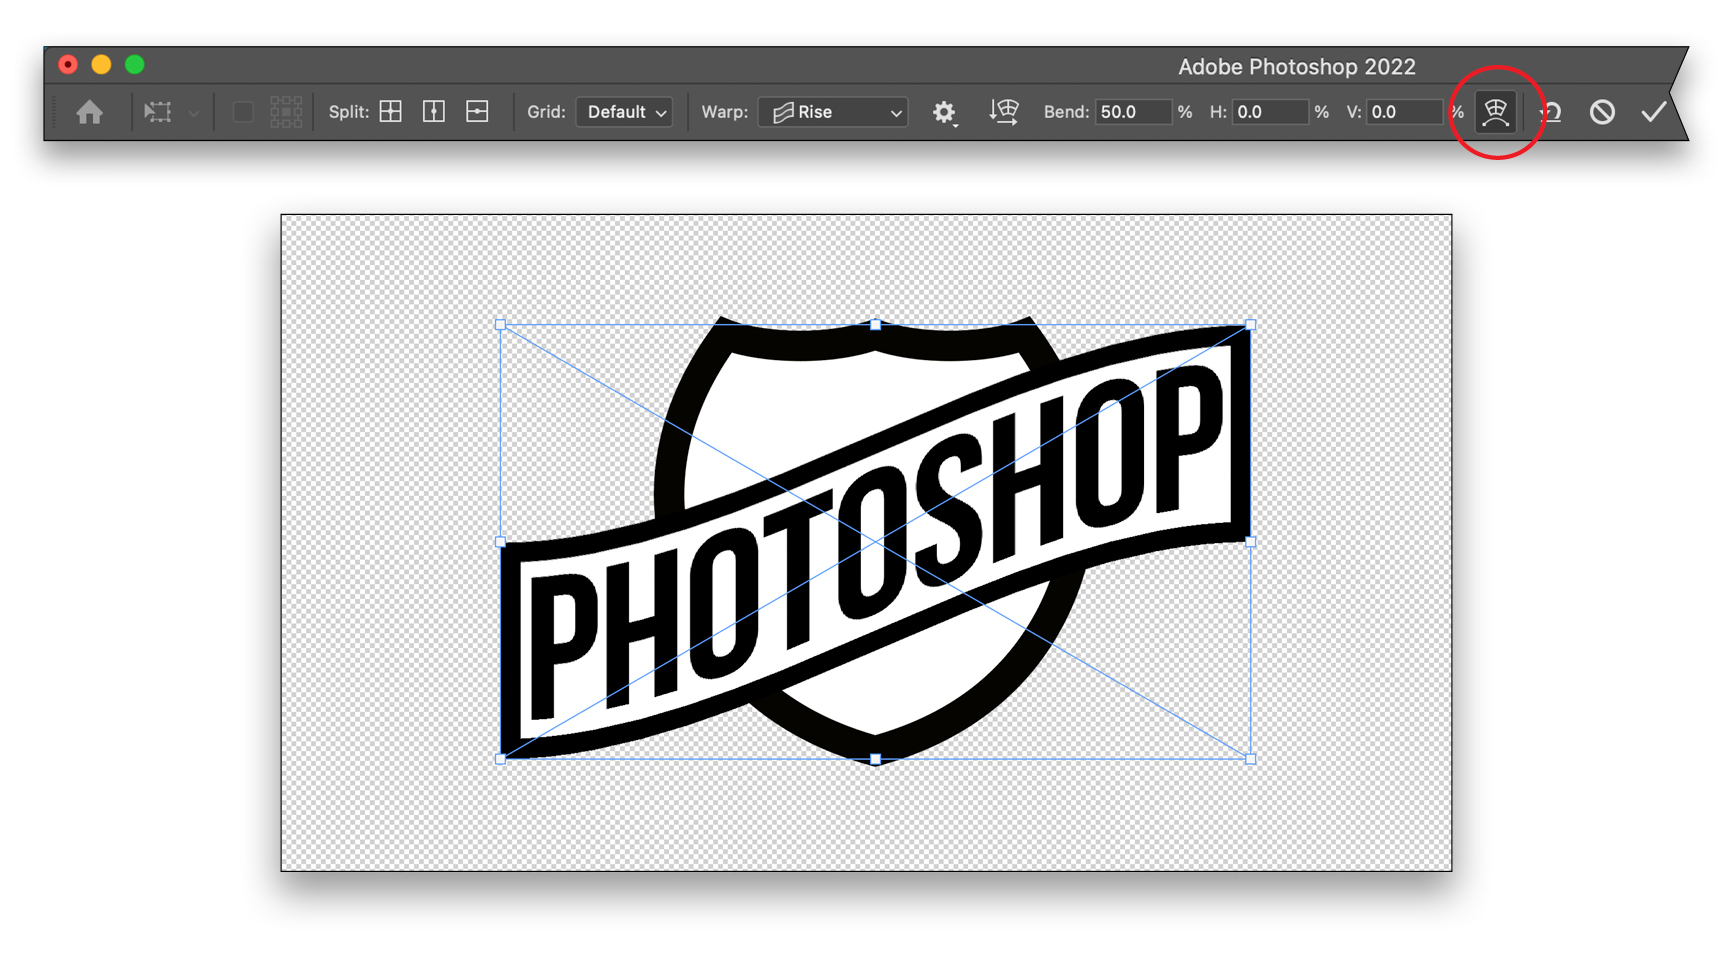
STEP THREE: WARP THE TYPE
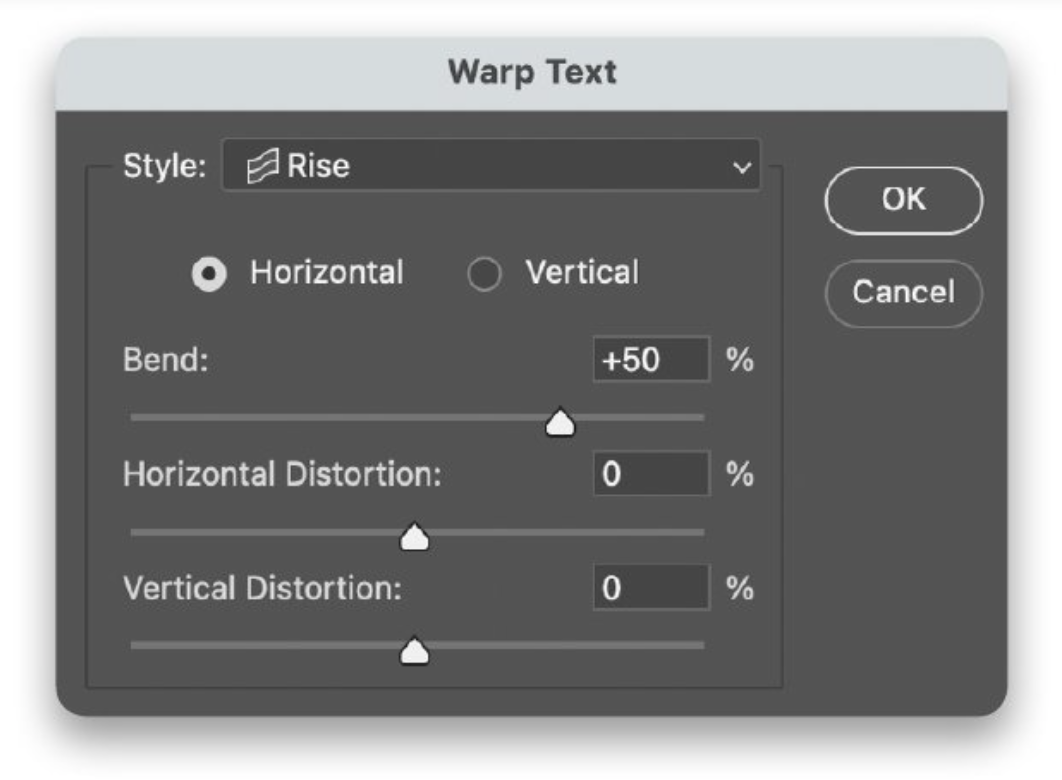
Now make your PHOTOSHOP type visible again by clicking where its Eye icon used to be in the Layers panel, and make sure it’s the topmost layer in the layer stack. If you just want to warp the type itself, double-click the type layer’s thumbnail in the Layers panel to select all the text, and then in the Options Bar, you’ll see an icon for Create Warped Text (it’s a T sitting on a curve). Click that icon to activate the Warp Text dialog.
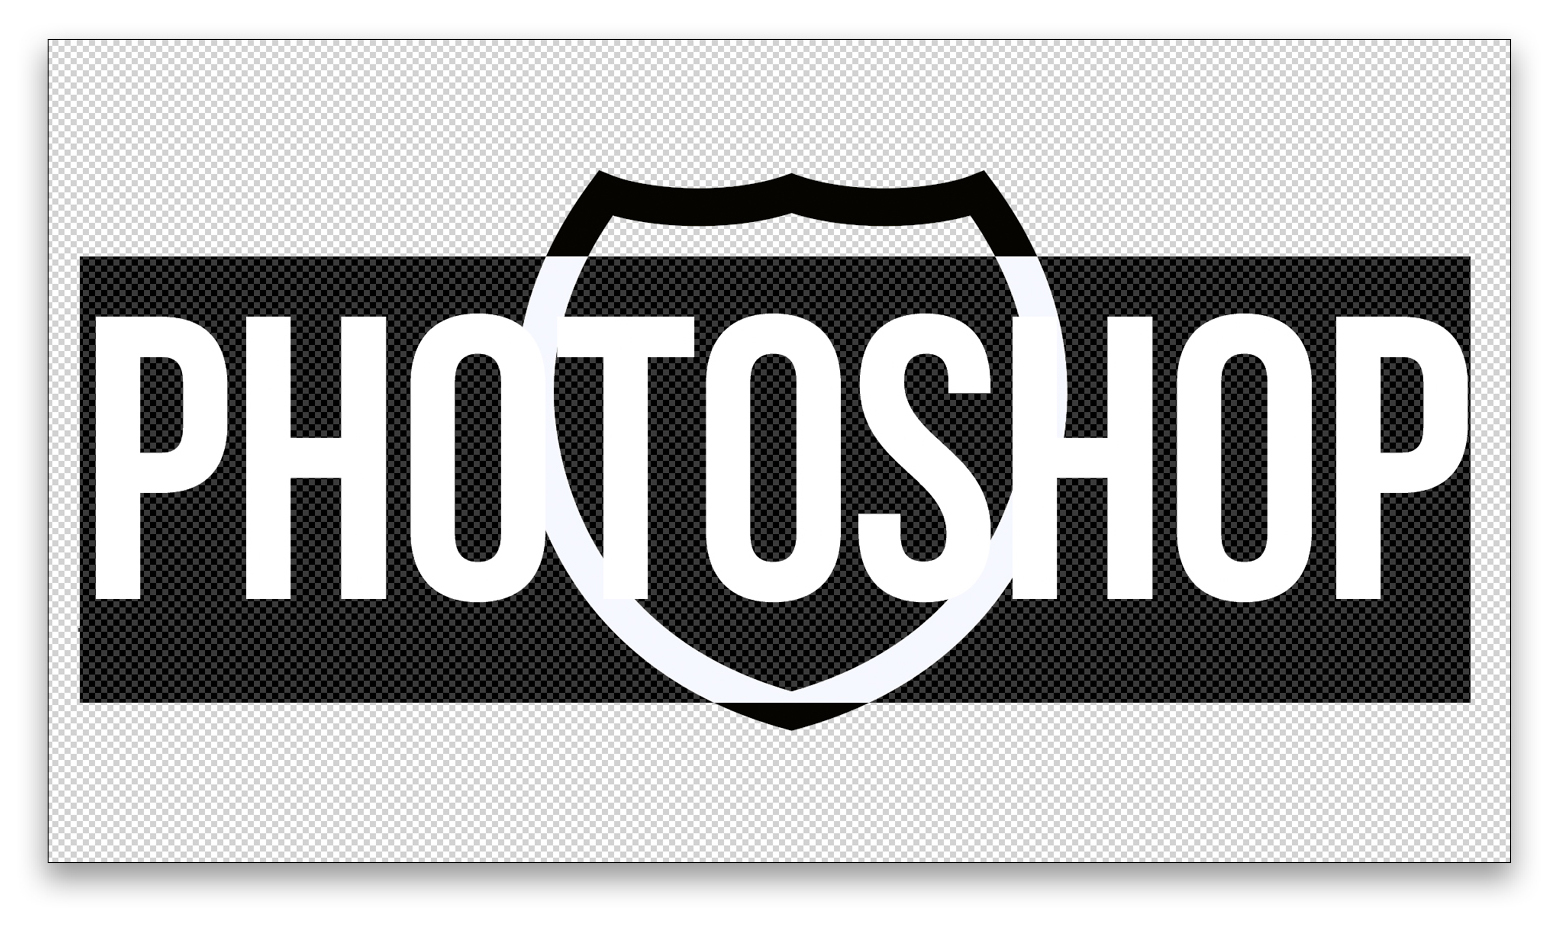

From the Style drop-down menu, select Rise, set the Bend value to 50%, and click OK. Use the Move tool to drag the type into position. Even though the text now has a wave, it’s still live type.
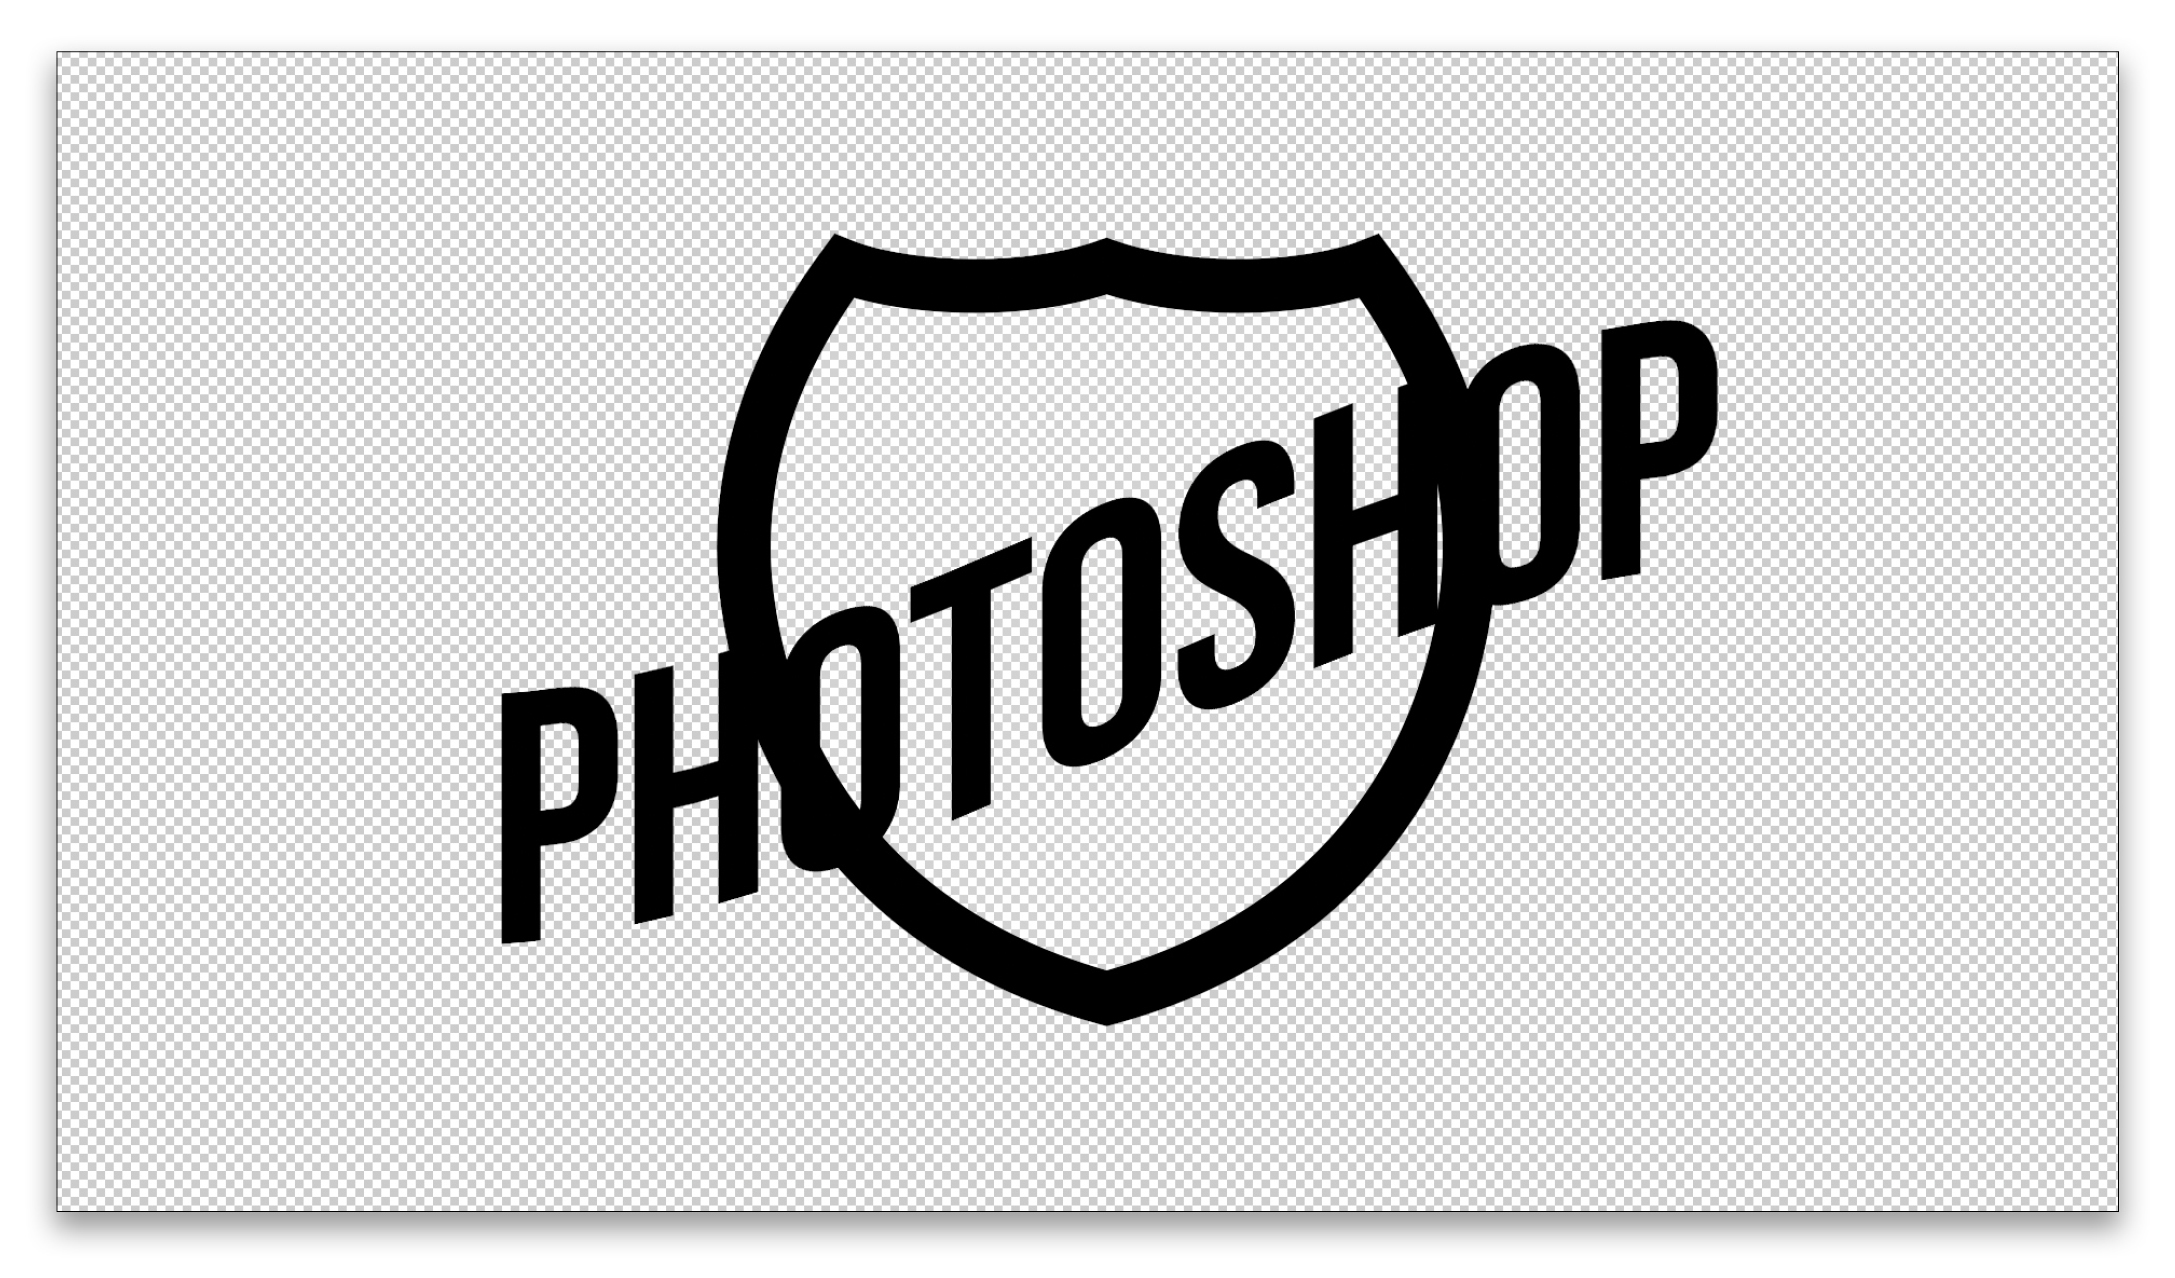
This design still needs something else, however, so this is where we’ll try something a little different. Let’s try creating a rectangular shape around the type first and then warping the type and a shape at the same time, so press Command-Z (PC: Ctrl-Z) to undo the warped text before moving on to the next step.
STEP FOUR: WARP THE TYPE & SHAPE
Select the Rectangle tool (U) and draw a rectangle around the type. This will be our ribbon. Move it below the type layer in the Layers panel but above the crest layer. In the Properties panel, set its Fill to white and Stroke to black at 50 pt. Also, click on the Sign 6 layer in the Layers panel, and then set its Fill to white in the Properties panel.
Click on the type layer and then Shift-click the Rectangle layer so they’re both selected in the Layers panel. Right-click on either layer and select Convert to Smart Object, which will combine both layers into a single smart object.
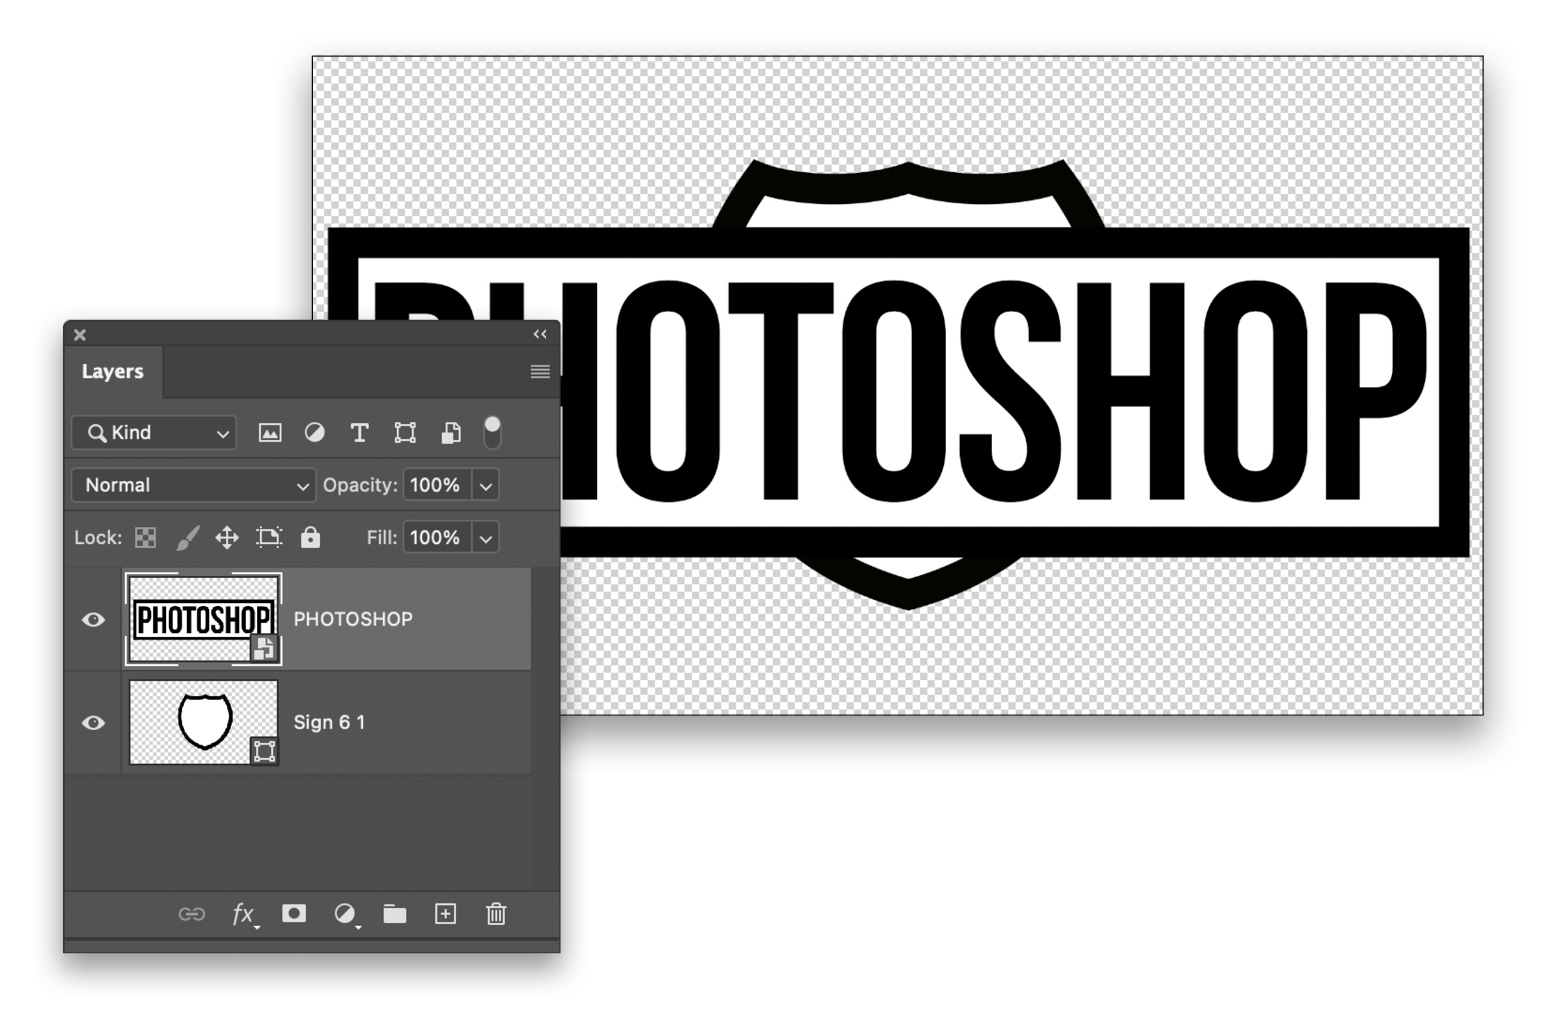
Press Command-T (PC: Ctrl-T) for Free Transform and, up in the Options Bar, you’ll now see a similar icon to the Create Warped Text, except this time it’s a small grid shape sitting on a curve. Click this icon to activate the control for warp.
To the left of this icon in the Options Bar, click the drop-down menu for Warp, select Rise, and set the Bend value to 50 to match the previous wave of the type, but this time it will warp the smart object instead. Click the checkmark in the Options Bar, or press Enter to commit the warp. Use the Move tool to position the banner.
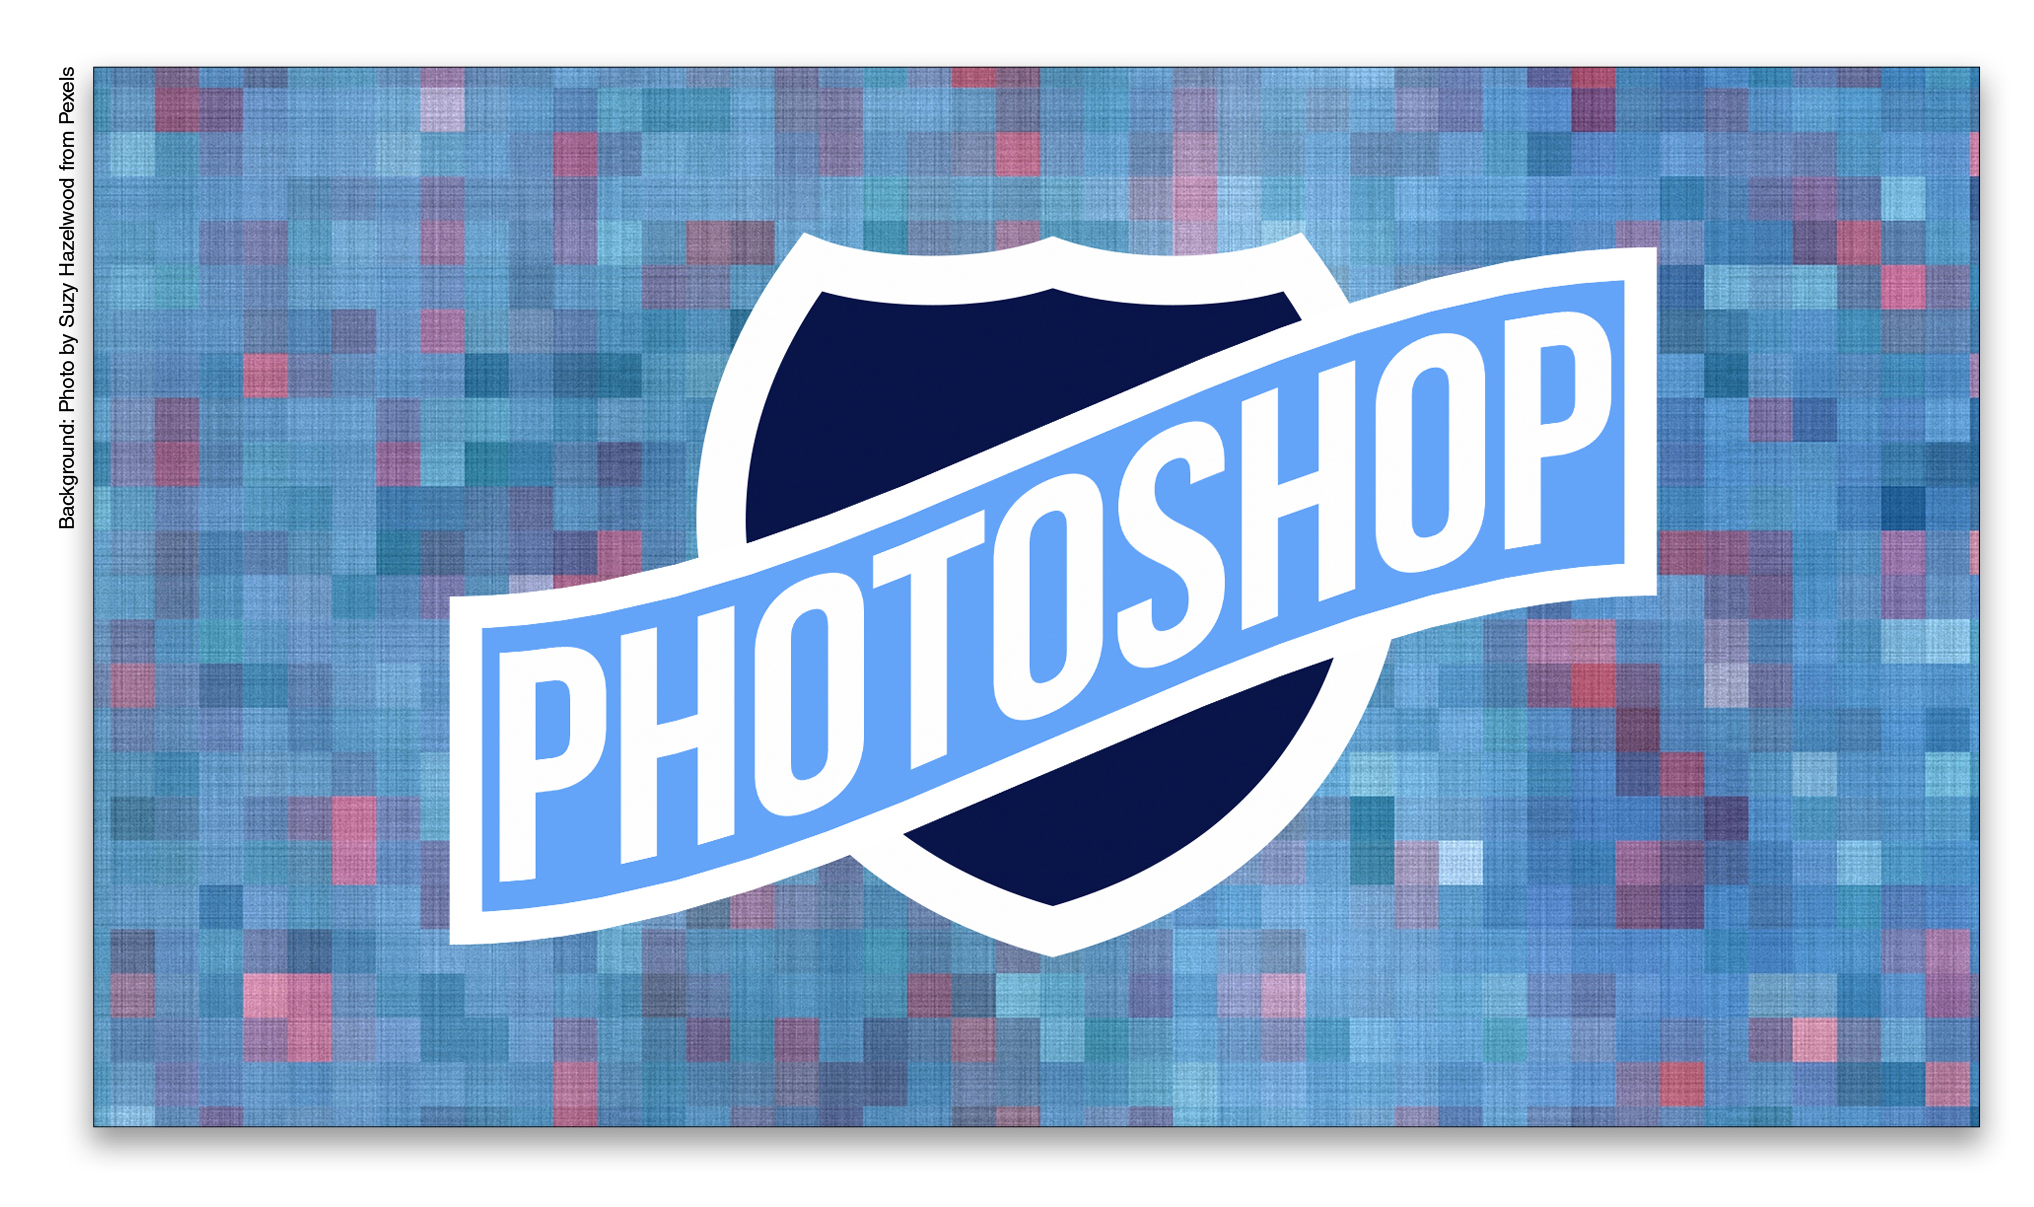
Once you’ve mastered warping text and shapes, you can then drop in backgrounds; change the colors of the Fill and Stroke of the shapes, as well as the text; and add effects to the shapes to give the design more impact. And it’s all completely editable.
WARP FACTOR 3
In this last example we’re going to use Perspective Warp to create a folded effect.
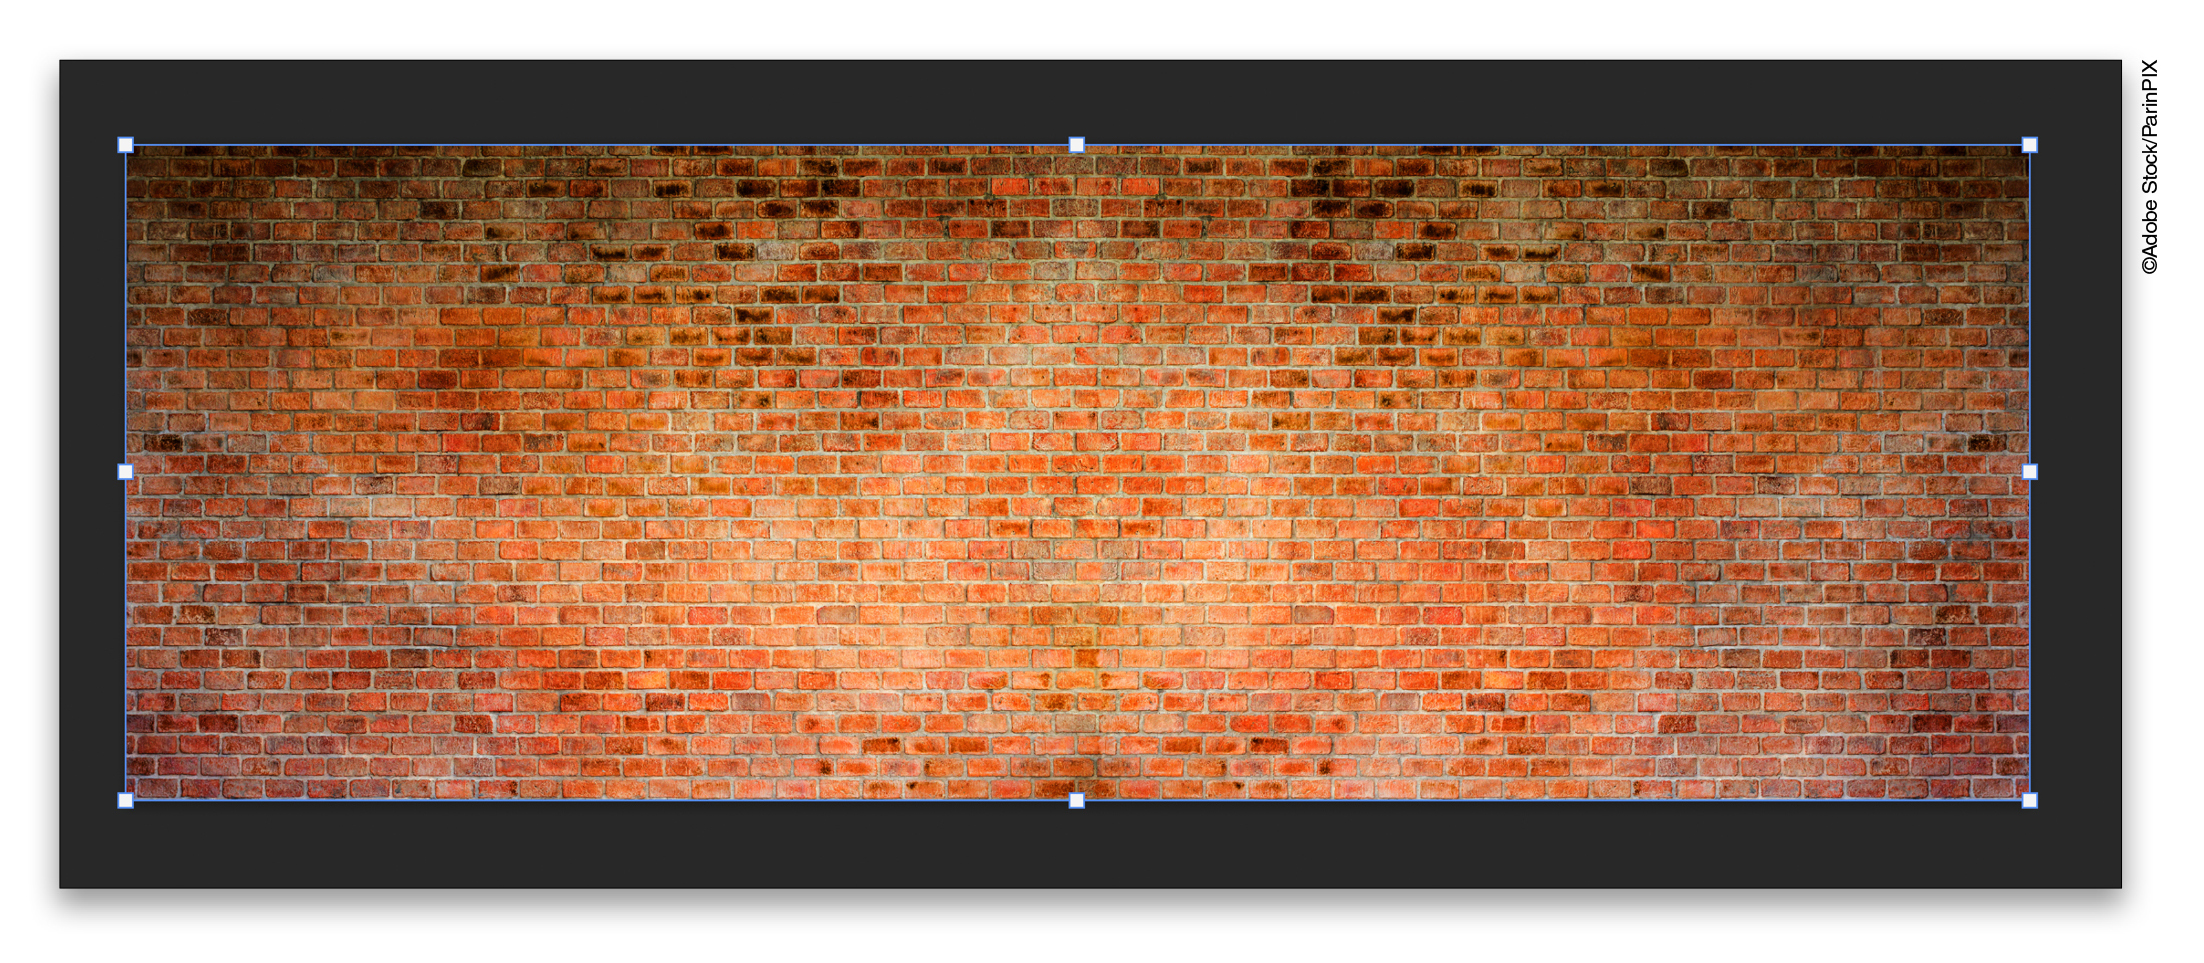
STEP ONE: ADD BACKGROUND
Start another new document that’s once again 1920×1080 px at 300 ppi and RGB Color. This is going to be another combined warp, but this time we’ll use Perspective Warp on an image and type. Of course, you can do this on just the type using the same method. I downloaded an Adobe Stock image of a brick wall, which is simple enough to find online or you can shoot your own (you can find the image we’re using by clicking here). Place this image into your new file and size it to fill the image.
STEP TWO: ADD TYPE
Next, click on the Foreground color swatch near the bottom of the Toolbar, set the color to #ffedc9, and click OK to close the Color Picker. Grab the Type tool and type the words “PHOTOSHOP WARP” at 35 pt in the font of your choice. Press Command-J (PC: Ctrl-J) multiple times to duplicate the type layer, and use the Move tool to stack them in two columns as shown here until the text fills most of the frame. With the top type layer active, Shift-click the image layer to select all the type layers and the image layer. Right-click on one of the selected layers and choose Convert to Smart Object.
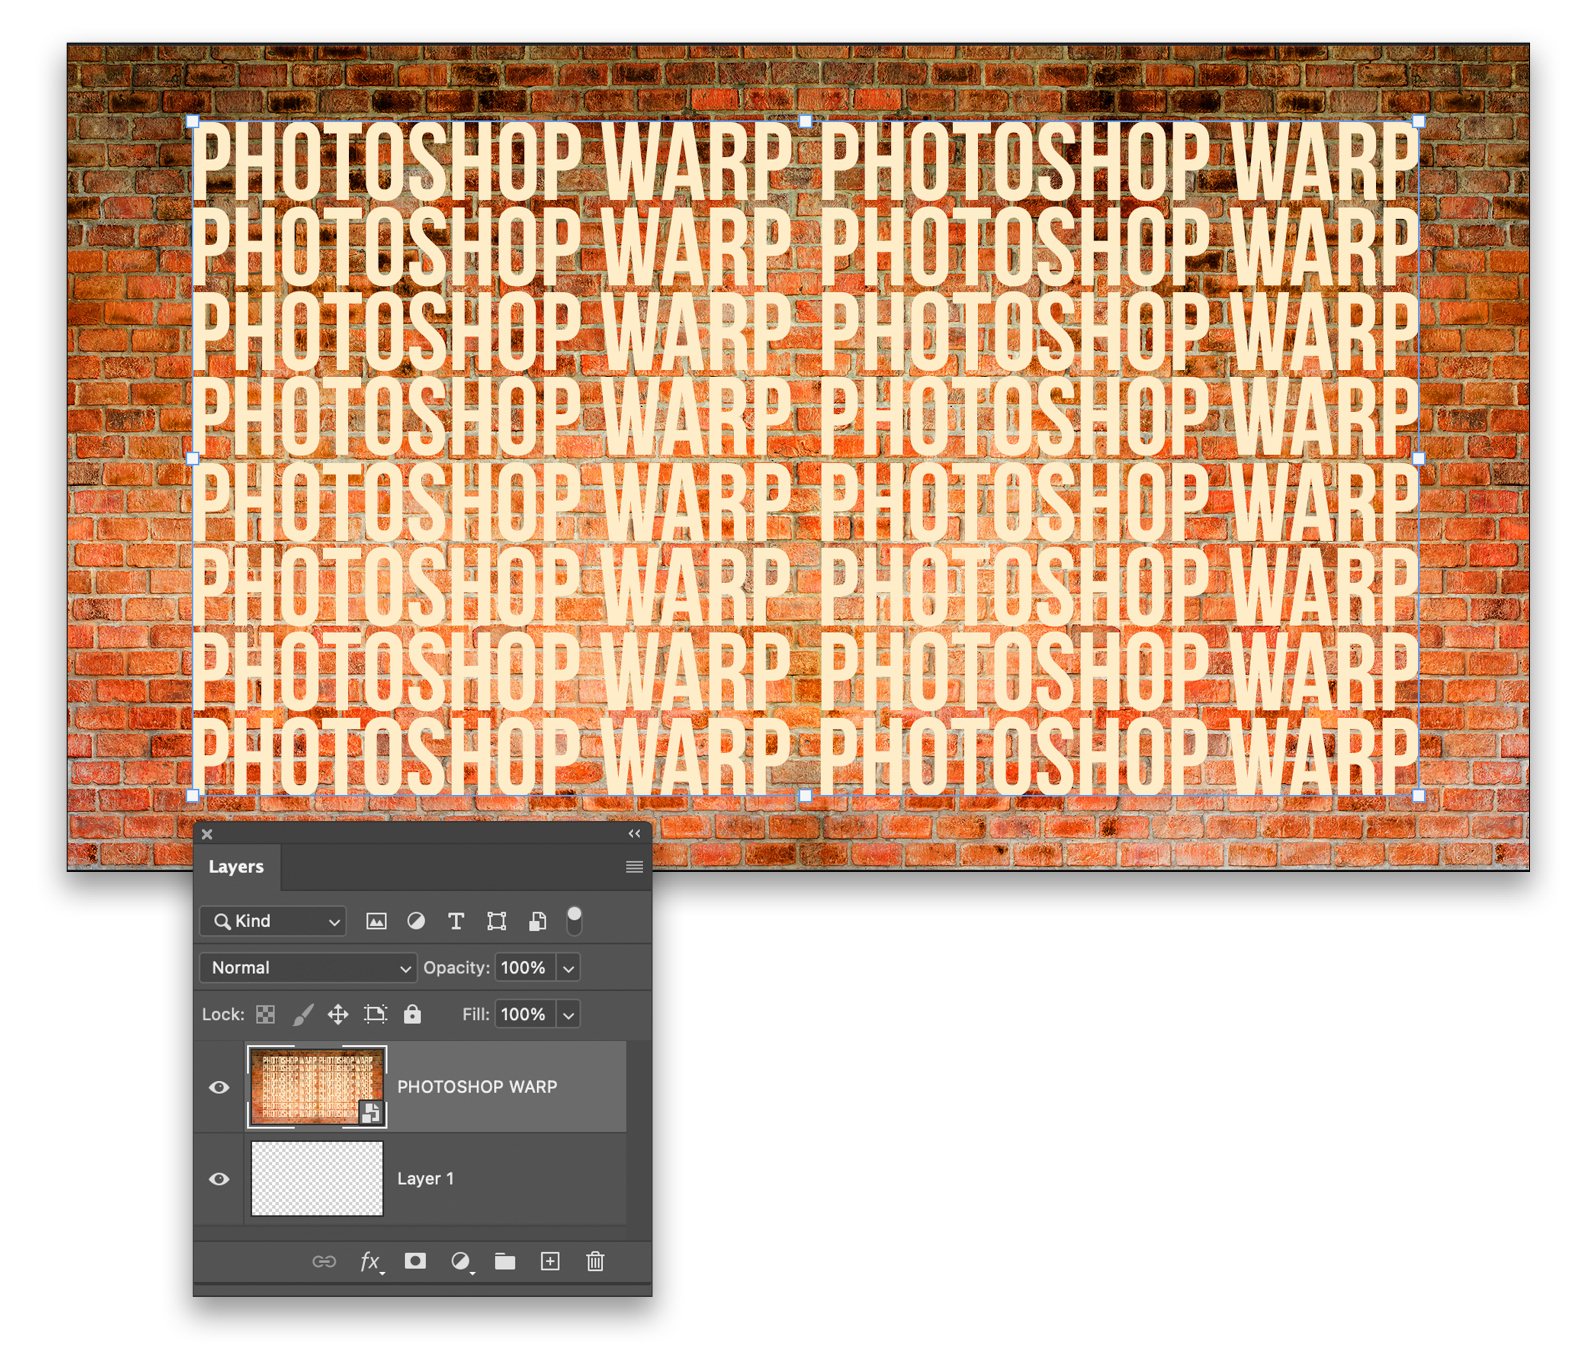
STEP THREE: SET UP THE WARP
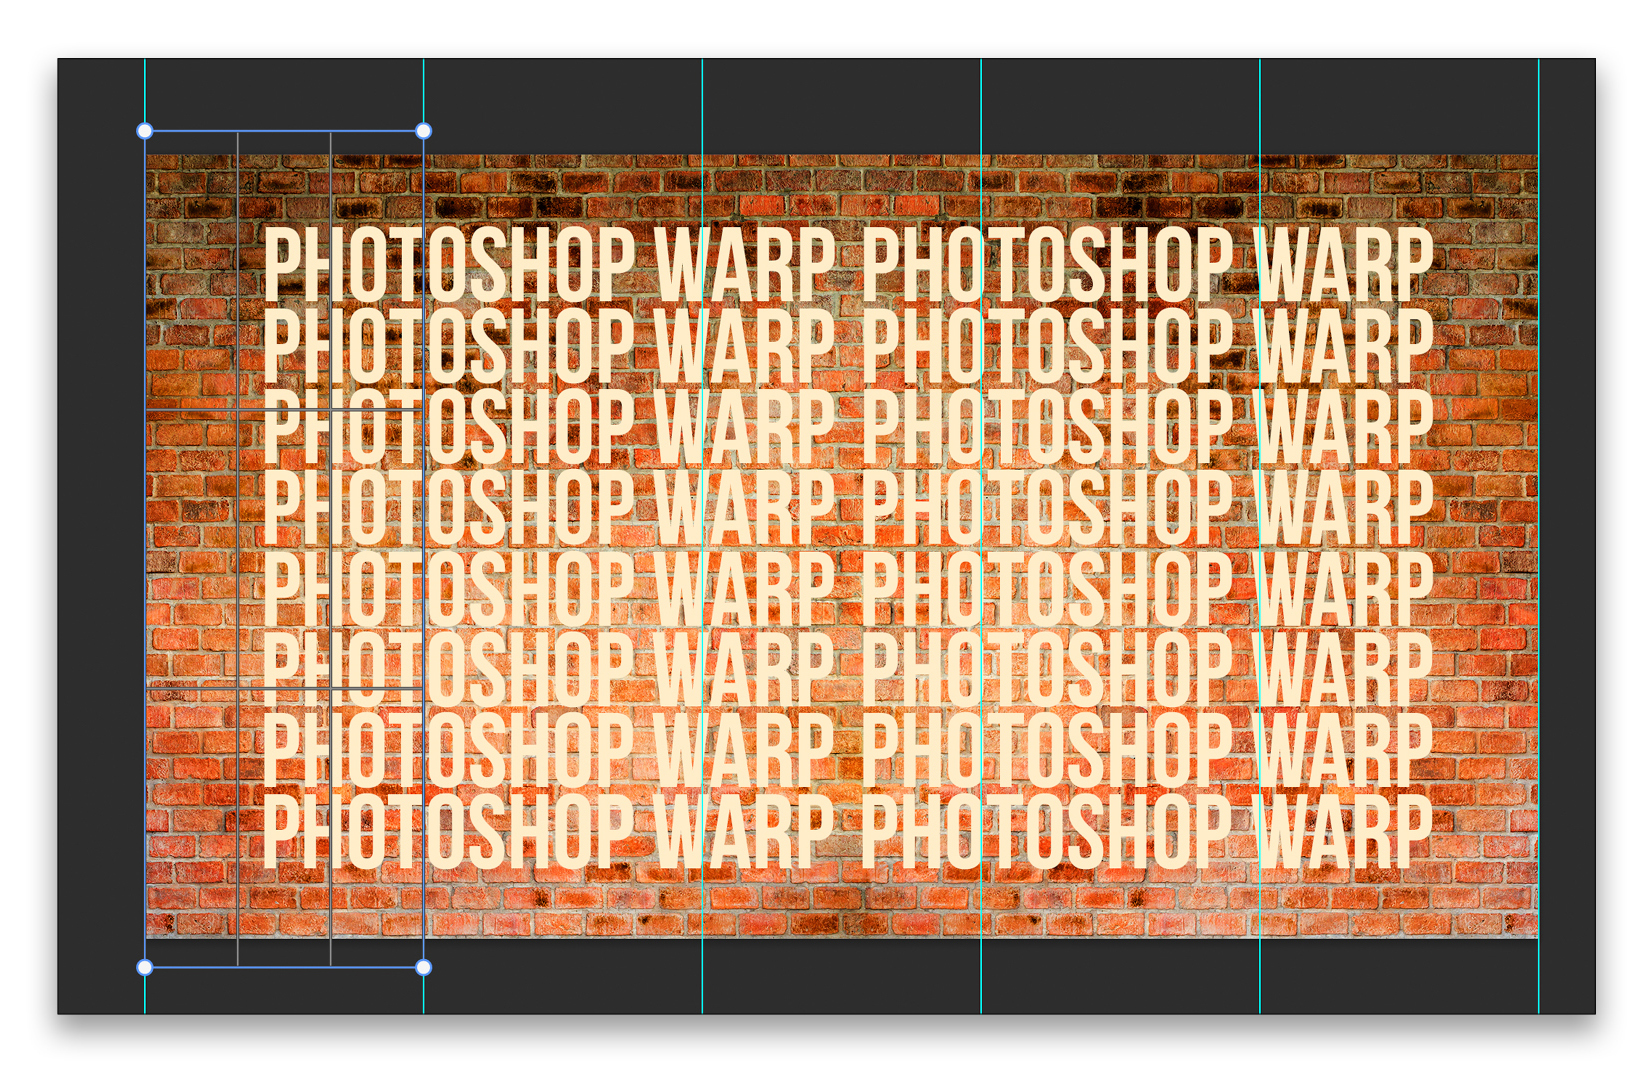
Before we begin creating the warp, let’s set up some guides to help us. Go to View>New Guide
Layout and, in the New Guide Layout dialog, set Columns to 5 (you can use more if needed). Make sure everything else is turned off or set to 0, and click OK.
With the smart object layer active in the Layers panel, go to Edit>Perspective Warp (you’ll see a little pop-up window with instructions on defining planes).
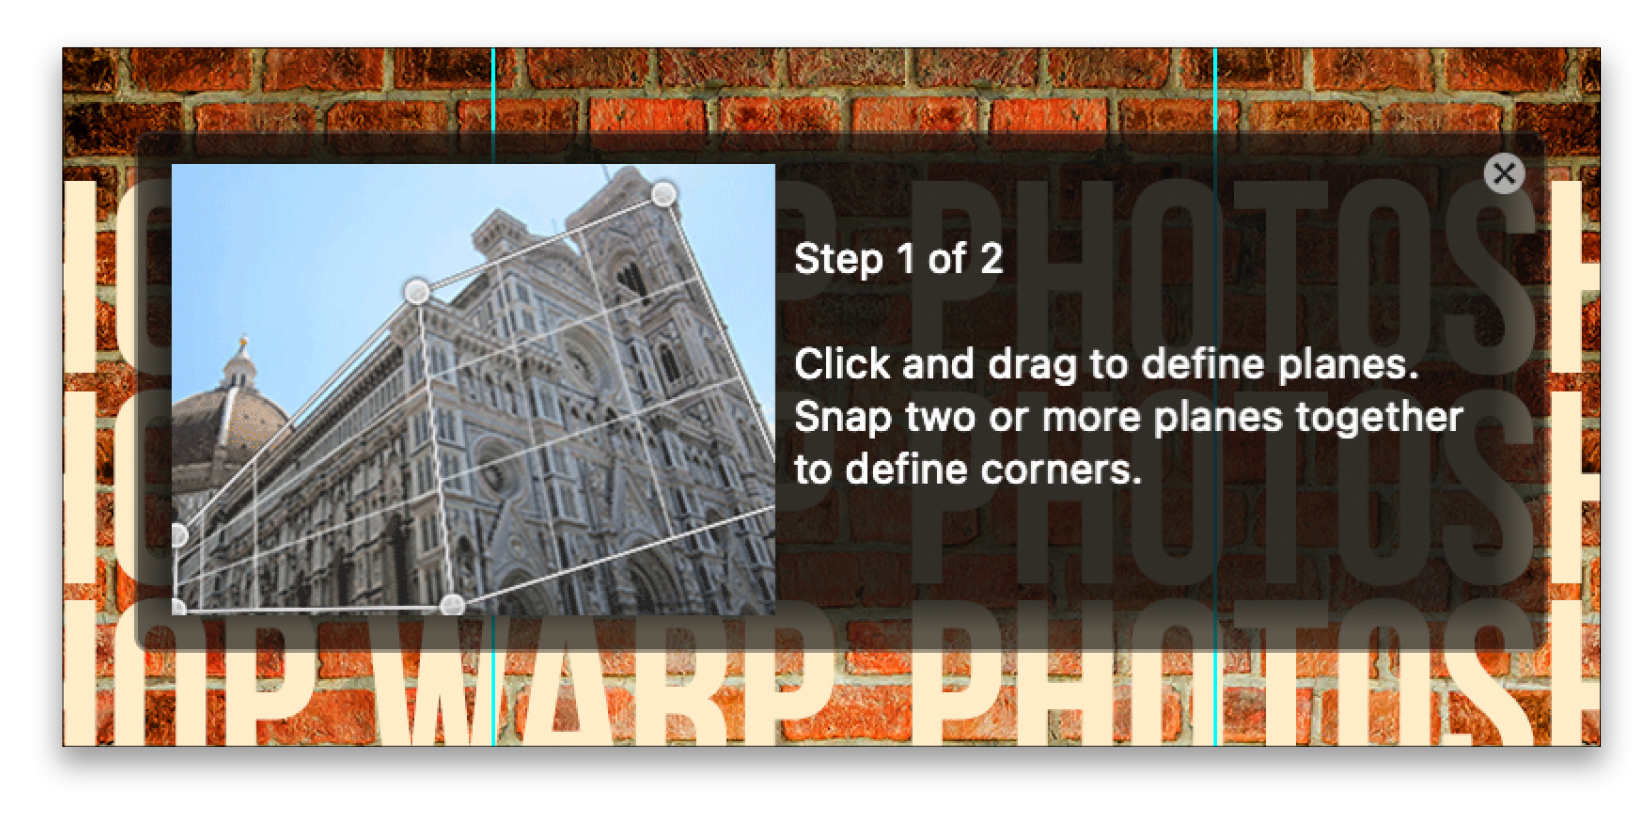
Now click-and-drag out the first warp plane starting at the far left guide just above the top of the canvas down below the canvas to the second guide (it should snap to the guides). Then click at the third guide just above the canvas at the same approximate height as the first warp plane, and drag down and to the left to the bottom right point on the original warp grid. This will snap the new grid to the first grid.
Repeat this three more times so that you have five warp planes that are all connected.

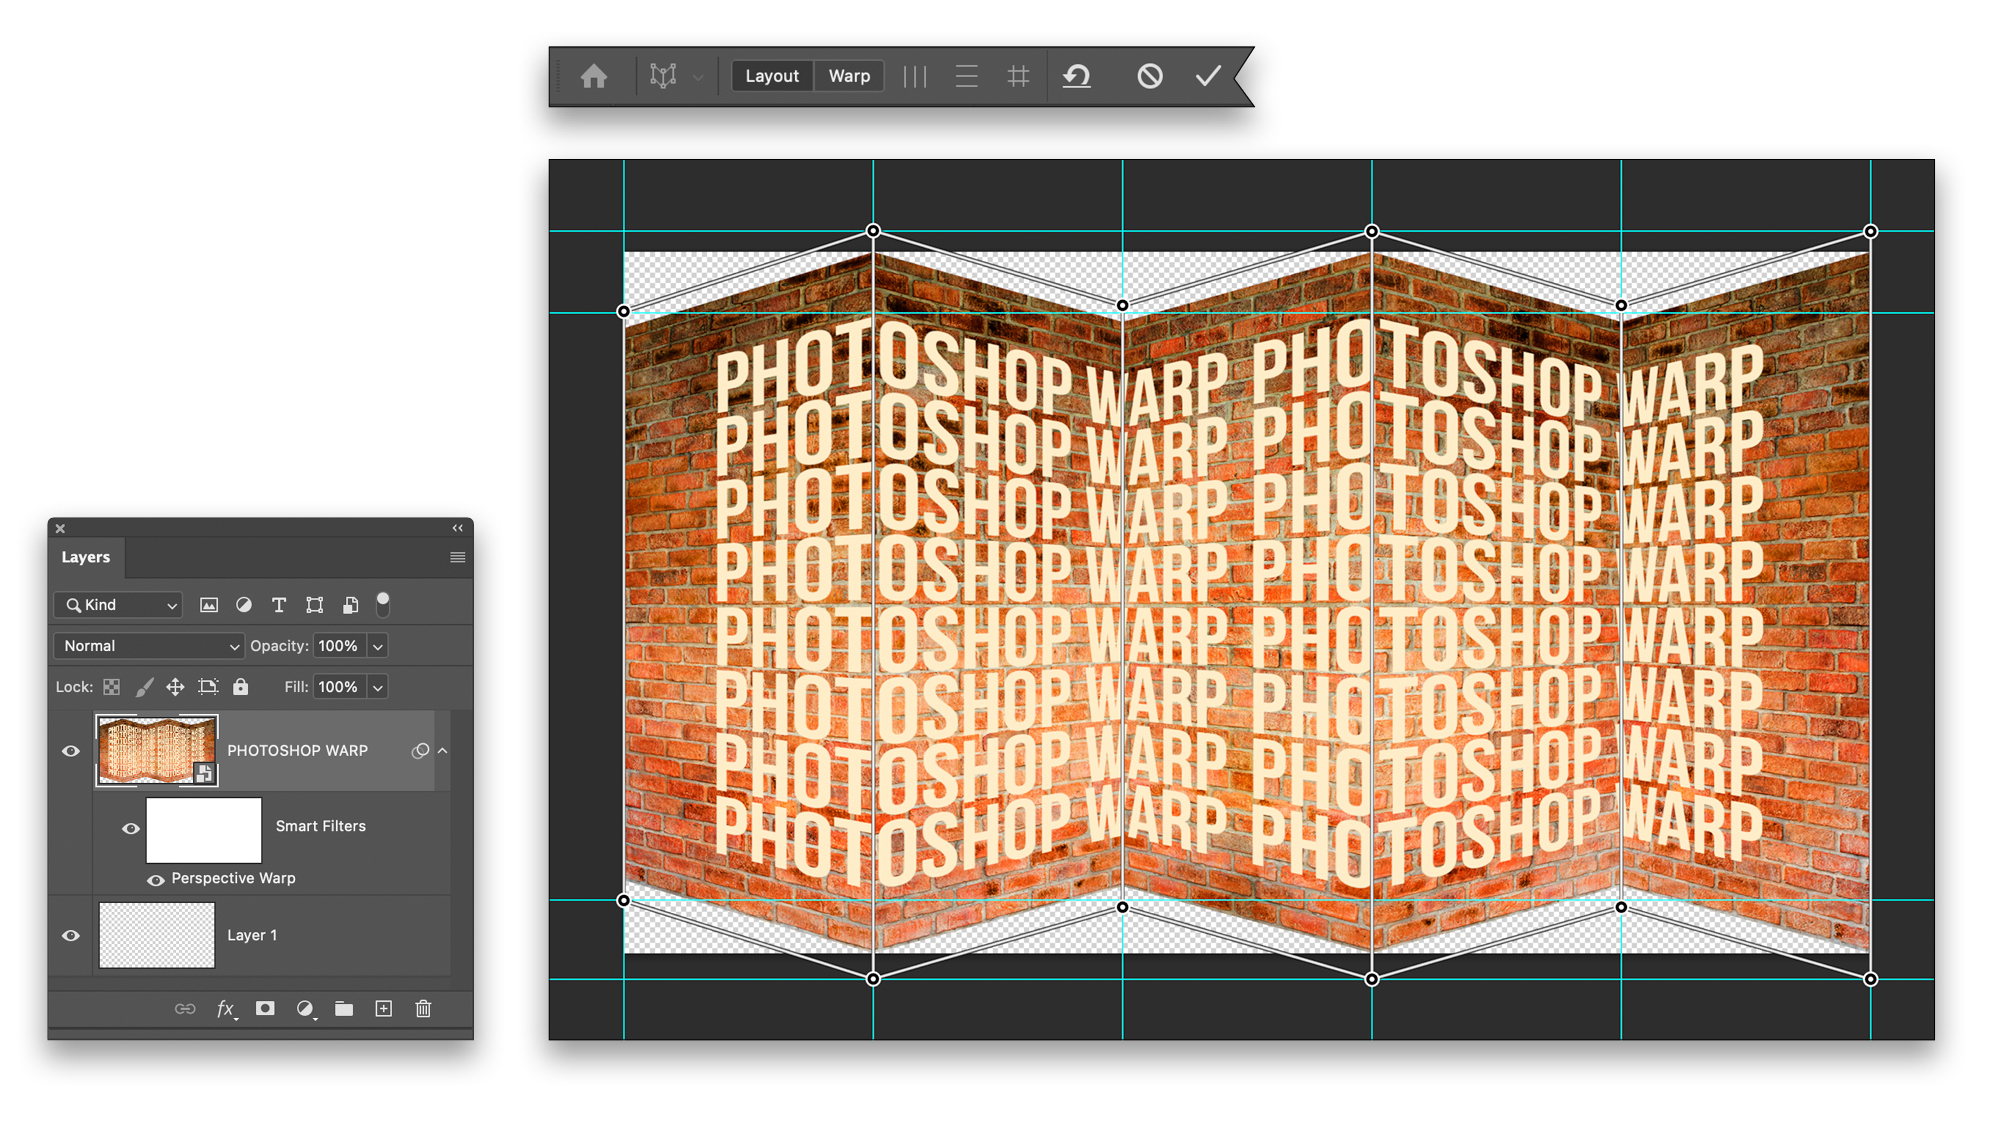
STEP FOUR: WARP THE CORNERS
Go up to the left side of the Options Bar and click Warp, which enables the perspective control. You can now click-and-drag control points to distort both the text and wall to make corners. Click-and-drag every other point as shown here to make zigzag patterns at both the top and bottom of the image to get a realistic perspective warp. You can set manual horizontal guides to help line up the perspective by pressing Command-R (PC: Ctrl-R) to show the rulers and dragging down guides from the top ruler. Press Enter or click the checkmark in the Options Bar to commit the warp.
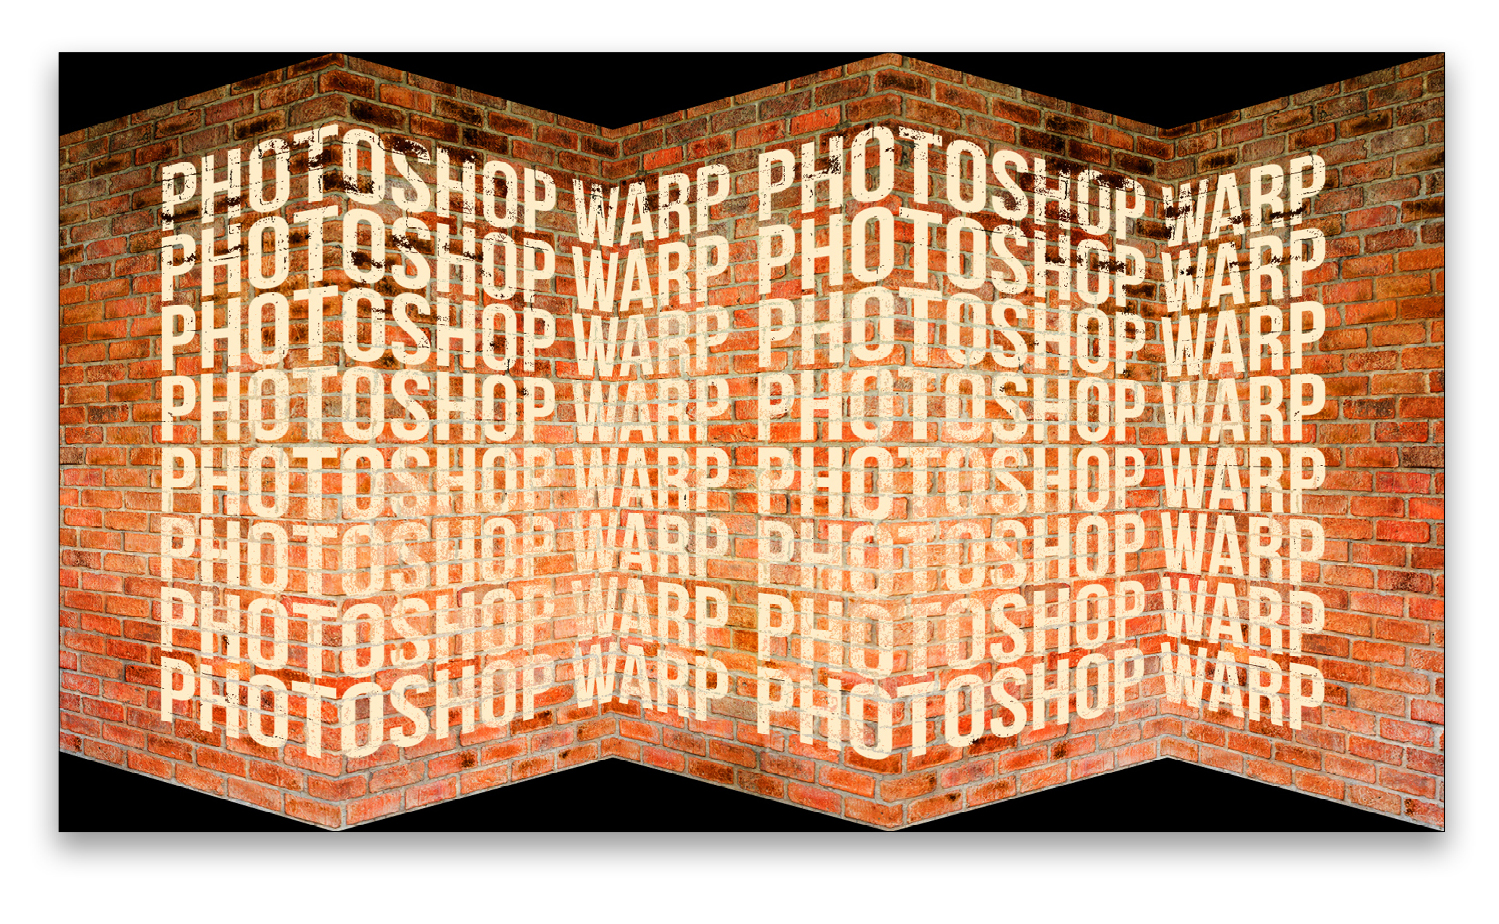
Now you have a realistic folded wall and text.

You can go back into the type layer in the smart object and add some distressed effects to the type using the Blend If sliders in the Blending Options section of the Layer Style dialog.
So that’s three cool ways to warp text and create some fun looks to accompany your images in your design projects. There’s so much more under the hood of the Type tool and type effects that I’ll be covering in future tutorials.
About Photoshop User and KelbyOne
Photoshop User magazine comes out digitally 12 times a year and is part of KelbyOne, the leading educational resource for Photoshop, Lightroom, and photography. Pro members have access to more than 900 video courses and 100 back issues of Photoshop User. To learn more about KelbyOne, click here.