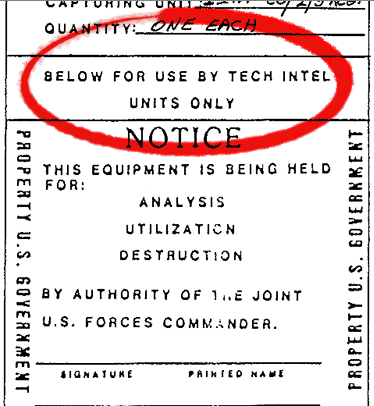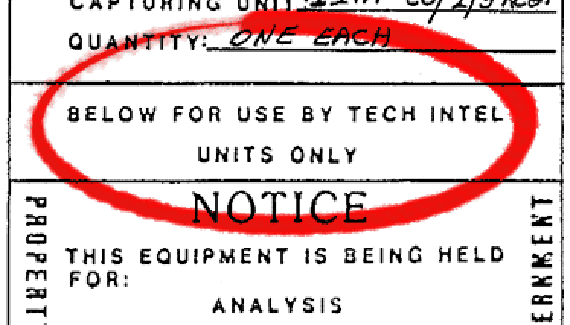
When preparing a tutorial, a screenshot for a book or magazine article, or an illustration for a technical document, it’s not uncommon to identify a critical area with a circle or a square. Here’s how to add a little flair to that emphasis. Let’s say you’re discussing a screenshot of Photoshop’s Layers palette and you want to make sure that your point is clear. Perhaps you’re explaining that a layer mask thumbnail should be selected, rather than the thumbnail for the layer itself. One way to do that is with a colored circle. Make a selection around the item, then use the Edit> Stroke command. You can even use the Line shape tool to add an arrow for greater emphasis.

NOTE: If you’re using the Stroke command with a rectangular selection and want sharp corners, use the Inside option. If you want gently rounded corners, use Outside.
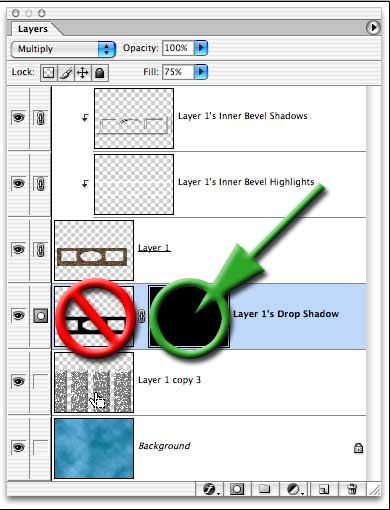
To spice up that effect a bit, work on a separate layer and add a bevel and/or drop shadow layer effect.
But here’s how to do something special, something (not yet) common: a “hand drawn” effect.
1. Add a new layer (optional, but highly recommended).
2. Make a round or elliptical selection around the element you need to highlight.
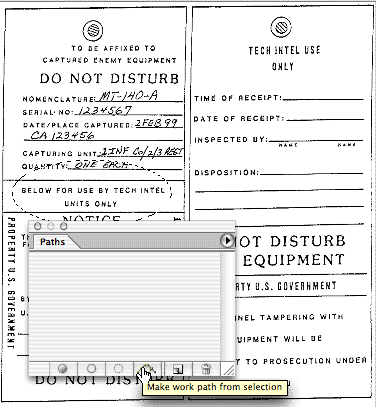
3. At the bottom of the Paths palette, click the button that converts the selection to a work path. If you think you might need to re-use this path later, double-click the name Work Path in the Paths palette and name the path to save it.
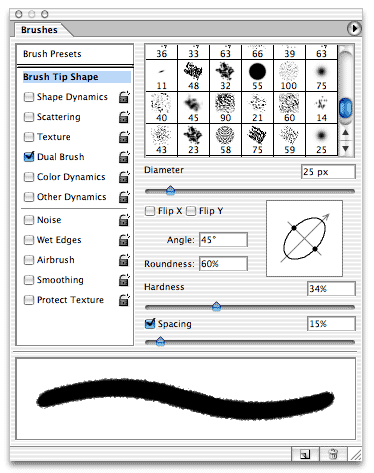
4. Select the Brush tool.
5. In the Brushes palette, select your brush tip, hardness, roundness and other such options. In this example, we’ll show an angled round brush, using the Dual Brush option and adding a “spatter” brush to make the edges a bit irregular.
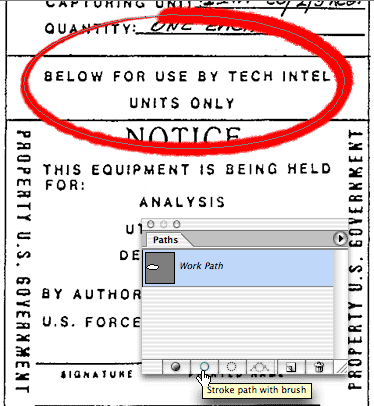
Clicking the Stroke Path button at the bottom of the Paths palette using this brush would produce a rather interesting effect, but we can do even more.
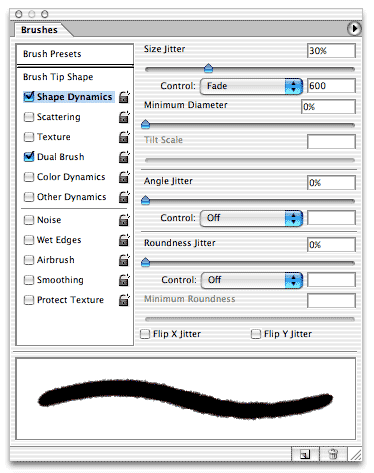
6. Still in the Brushes palette, open the Shape Dynamics pane. (Click on the name “Shape Dynamics” to open the pane, rather than clicking the checkbox to the left.)
7. In Shape Dynamics, set the Size Jitter slider to somewhere between 10 and 40%. Set the Control pop-up menu to Fade. The appropriate number to enter into the Steps field depends on the circumference of the path that you’re stroking, as well as the minimum size you’ve selected.
8. At the bottom of the Paths palette, click the Stroke Path button to apply your brush to the path. You may need to Undo and adjust the number of steps several times until you get the look you want.
9. [Optional] With the path still active, you can stroke again, using another brush, another color, even a different tool, such as the Burn or Dodge tool, to further customize your look. The Paths palette menu command Stroke Path opens a dialog box in which you can select a tool with which to stroke. Remember, too, that if you are working on a separate layer, you can change the blending mode and adjust the opacity of the layer, too.
10. Click in an empty area of the Paths palette to deselect your path.