Panoramas: When The Terrain Doesn’t Cooperate
When last we visited the exciting world of making panorama images with Photoshop, I used a relatively common subject as an example: a level drawbridge over Florida’s Intracoastal Waterway close by my home. But the best panoramic views are often from a high vantage point looking down. And these present a problem of distortion. In this column, I’ll deal with combining three views of France’s Dordogne River shot from extreme angles.

The actual view encompasses a bend in the river sweeping by the village of le Roc Gageac. Using the widest angle of my zoom lens, I shot three images with about a one-third overlap.
I followed all the steps outlined in the first pano column: resizing the photos; putting each of them on its own layer; and creating a larger canvas size to accommodate the overall panorama.
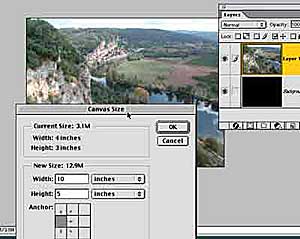
While my image was resized to 3 inches in height, I set the New Canvas Size to 5 inches high for a little wiggle room. The canvas width, set from the left center, was 10 inches. Note that I made the background layer black in order to see the rather washed out sky as I worked.
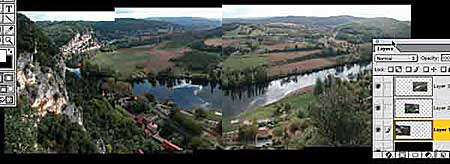
All three images are now on the background in separate layers and have been overlapped using the lower opacity layer technique previously described. Note that each layer is slightly higher than the previous one, due to the fact that I attempted to keep the center of the image constant with each shot.
Using Levels (L), I matched the colors of each layer as closely as possible, using adjacent foliage colors. In figure 2, you should be able to see the vertical lines where each image overlaps. The first step is to use the Eraser tool (E) to eliminate these contrasting vertical butt lines and blend the image as realistically as possible.
I’ll reiterate that the goal is to create a detailed image of framed peripheral vision but not to attempt to fool the viewer into believing it was made with a single exposure.
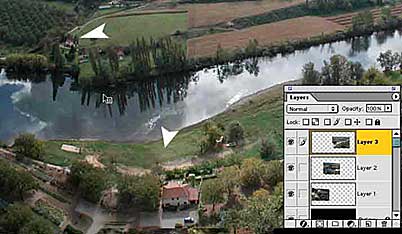
I set the Eraser tool’s options to Airbrush and selected a 100 pixel soft brush tip and 50% pressure for my Wacom tablet. Selecting the top layer (from the right), I began painting gently over the butt revealing detail from the layer beneath. In the screen shot, the upper arrowhead points to the untouched butt line. The lower arrow shows where the river has been blended in a sharp curve that isn’t really there but it’s the impression that counts.
Don’t attempt to get perfect blends by painting out with the eraser. The blends get refined even more in the next step.
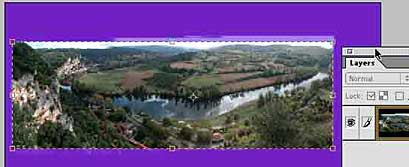
After flattening the image, I use the Crop tool (C) to create a single image. Now it’s time to fine-tune the panorama by cloning out duplicate details.
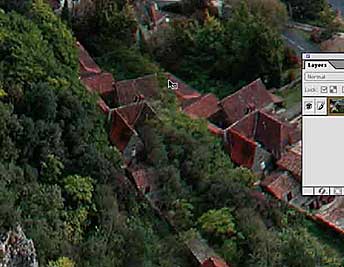
The close-up screen shot above shows that the houses of the village directly below my vantage point have been duplicated due to the extreme angle of view. Eraser painting here would have just revealed more duplicate detail. Instead, I select the Rubber Stamp tool (S) and from its options, use the same airbrush tip and pressure.
I decided to cover up the closer set of houses by cloning foliage. Using a variety of trees of the same shade from different areas as my target point, I carefully brushed in trees to eliminate the roofs. Here, you must be careful not to just sweep the clone tool down from the target, creating a repetitive pattern. Instead, select different areas as a target by Option (PC-Alt)-clicking.
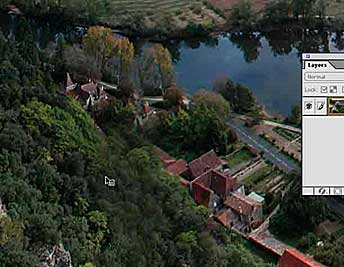
Now the village is a single set of houses. The residents might be a bit miffed that I’ve messed with their property lines but that’s life in the pano world.
The horizon and skyline present a different challenge. I used the clone tool to clone sky into the areas where the hills did not meet, then targeted the hilltops to create a new horizon. Due to the soft pressure used with my Wacom brush, the overall effect is of a cloud or fog bank coming through the gaps of the hills.

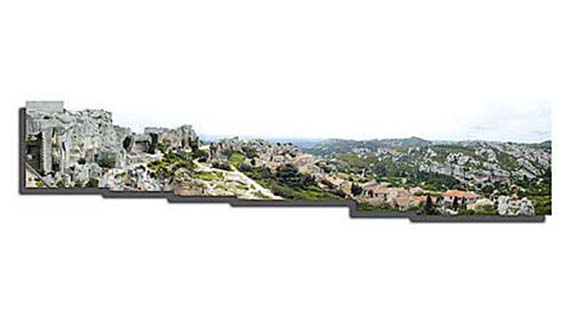
Once you get used to shooting panoramas, you’ll see scenes where the subject matter screams for pano treatment but the terrain is definitely working against you. This was the case in Le Baux, an Iron Age fortress and medieval village in Provence.
Here, I chose to make a continuous set of images matching one to the next but not trying to maintain an impossibly level horizon. If I had cropped the entire image to a rectangular frame, the effect of the steep hillside and surrounding cliffs would have been lost.
Instead, I matched the images in stair step fashion and then outlined them with the Pen tool (P) to create the irregular frame. Making my paths into a selection (Command [PC-Control]-Enter in 6.0, just Enter in 5.5 or earlier), I then sent the image to its own layer (Command/Ctrl-J) and then gave it a drop shadow.
I really like the effect and so do others. It’s sold several times.

