
Keeping Your Balance

Film photographers have always faced a balance challenge… color balance, that is. Print film technology in the past few years has improved the situation but transparency shooters are still faced with the problem.
Shoot a daylight balanced film under tungsten lights and the results will have a reddish cast. So use a tungsten balanced film… then finish up the rest of the roll outdoors and get slides with an overall blue cast. An old-time trick is to underexpose tungsten (Type B) film outdoors by about three stops to get a moonlight effect.
Daylight film and fluorescent lighting result in a sickly green cast. And so it goes: correction filters, different film types, printing correction. What a hassle!
We digital photographers are more fortunate. Setting white balance has been a routine of videographers for years and today’s digital still cameras make it even easier with automatic white balance.
Without getting too technical, light quality is measured as color temperature in Kelvin degrees (K) with clear blue sky checking in at over 10,000K, average sunlight (and electronic flash) at about 5,400K to 6,000K, and tungsten lighting at about 2,500 to 3,000K (according to the wattage).
While our brain interprets colors to our learned experience regardless of the light source (white is white, etc.), the RGB CCD’s of digital cameras are more literal.
Auto white balance works marvelously in every digital camera I have tested. But under more difficult lighting situations, white balance adjustment is a camera feature that can pose problems for the forgetful.
Out of habit from their conventional film days, many digital photographers pursue correct white balance with a vengeance. Daylight with sunshine, use the sunshine white balance. Along comes a cloud and switch to overcast.
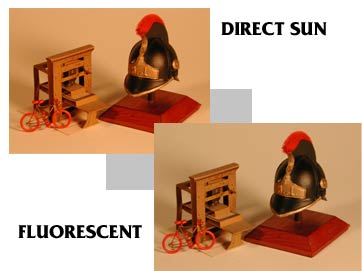
For instance, using a tungsten lighting set-up for a small product shot gives best results for my camera if the tungsten white balance is set. This adds a blue cast to what would be a reddish-yellow image with daylight white balance.
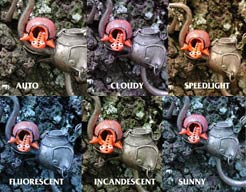
My only problem is remembering to reset the white balance before I move on to another shooting situation. This is why I rely upon Auto white balance for about 90 percent of my shooting. Below is a comparison of Auto, Incandescent, and Manual White Balance under a two-bulb, incandescent set-up.

Many digital cameras also offer a technique for setting white balance manually for unusual light situations, say for example, a mix of tungsten and fluorescent lights.
This is usually a menu-driven feature that involves aiming the lens (and meter) at a white card (or shirt or tablecloth, whatever) and then hitting the menu select button. As the screen shot above shows, this isn’t always the most precise way to determine color balance. While the one below shows some of the garish extremes that can occur with the wrong white balance. In this case, Auto would have been a vast improvement.
So, if a card full of images comes onto your desktop with strange color casts, check your white balance.
Next week, we’ll examine Photoshop’s Variations feature for correcting color casts.
