Improved Lighting Effects in CS6
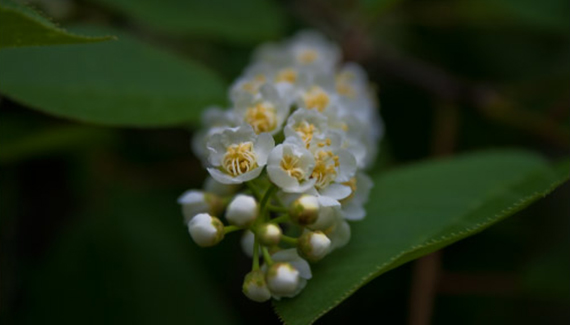
An overview of the new and improved Photoshop CS6 â˜Lighting Effects' Filter.
Step One: Open Choice Document
With Photoshop CS6 open, go to the File > Open and navigate to image of your choice. The following is an example I will work with for the beginning of this Lighting Effects introduction.
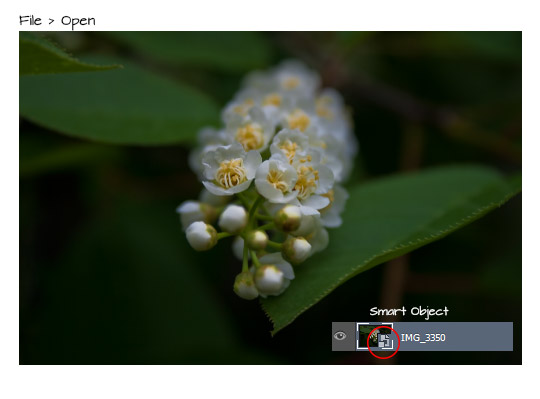
Note: In my above example, the majority of my original image files are Camera Raw (.cr2) and I often view them in Adobe Bridge then open them via the Open with > Adobe Photoshop (default) right click context menu option (per thumbnail). Then from â˜Camera Raw > Workflow Options' (the blue hyper-link at the bottom center of the Camera Raw dialog) â˜Open in Photoshop As Smart Objects' enabled I was able to open the Camera Raw file as a Smart Object in Photoshop. That's why the above image capture shows the Layer Panel as a Smart Object container.
In this manner I immediately can work with the original image Layer as a Smart Object and go straight to the Lighting Effects, as the rest of this walkthrough will demonstrate.
If you intent to work with a .jpg file format then simply go to the â˜File > Open as Smart Object' menu command, navigate to you file and double click to open. The selected file will open and automatically have the status of a Smart Object Layer, indicated with a Smart Object icon appended to its thumbnail, as captured above in red.
Step Two: Filter > Render Lighting Effects
With the Smart Object Layer active go to the Filter > Render > Lighting Effects menu command and explore its new workspace. Of the three available Light Types (Spot, Point and Infinite) when you first open the Lighting Effects the default is a single Spotlight with the below captured settings.
The Lighting Effects is divided into four areas: at the top is the Options Bar; followed by the on-screen interactive/preview area; then Properties Panel for the active light; then the individual Lights Panel.
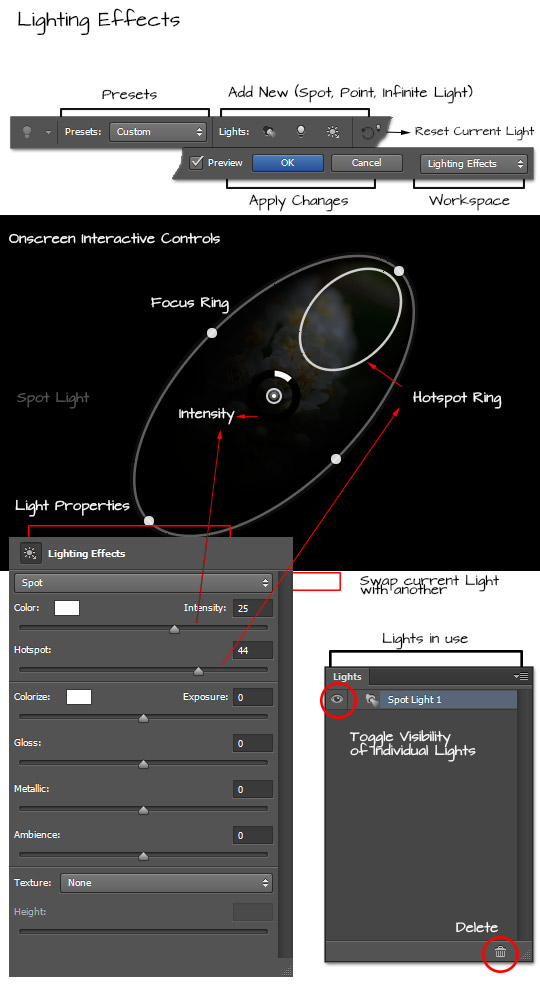
Options Bar
- Allows you to select from available prefab Lighting presets, as well as, commands to â˜Load, Save or Delete' custom Lighting effects;
- Add new Lights (Spot, Point, and Infinite) - add Lights to the scene and interact with them individually via the Lights Panel;
- Reset Current Light - this only resets the onscreen Scale Length and Scale Width to the default and not a Lights' properties.
- Apply or commit changes or cancel out of the Lighting Effects dialog altogether;
- Reset to default â˜Lighting Effects' Workspace - if you reposition the Property or Lights Panel this option will quickly get you back to the default workspace.
On Screen Controls and Property Panel
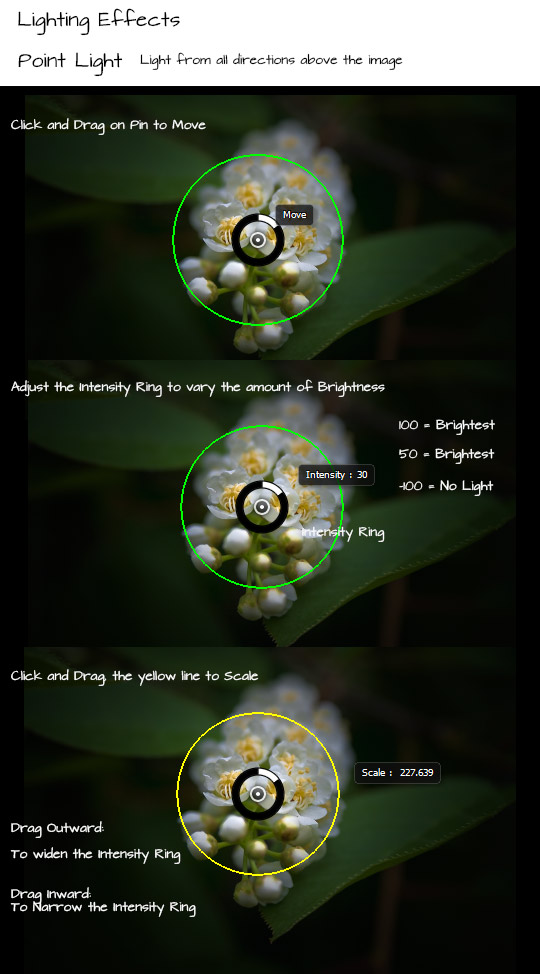
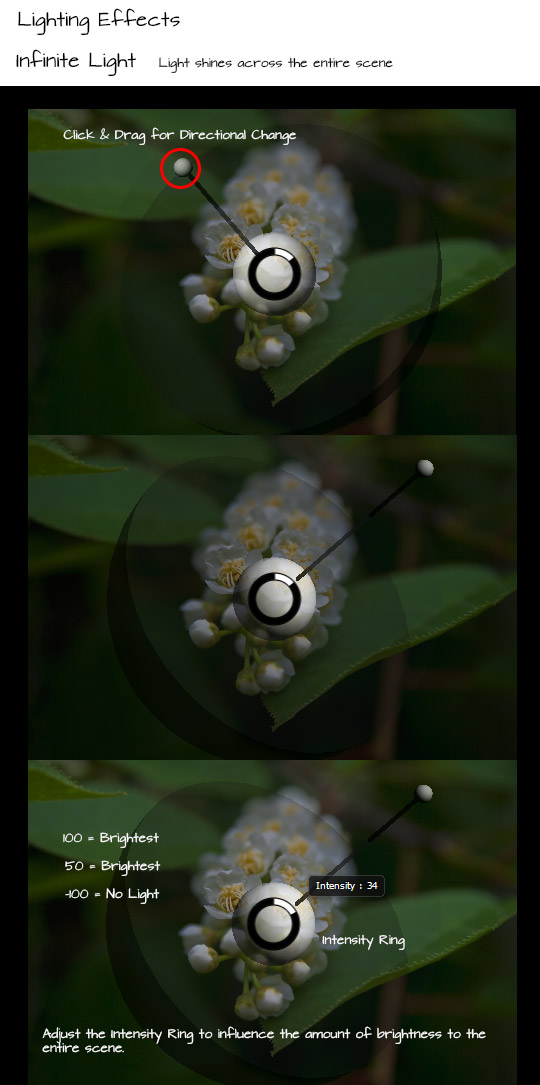
The following screen captures showcase the on-screen interactive user controls for each of the Light types - Spot, Point, and Infinite.
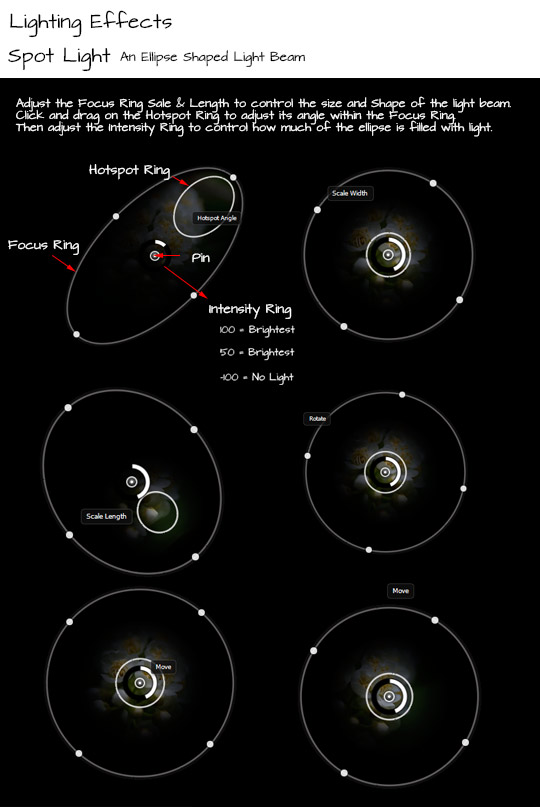
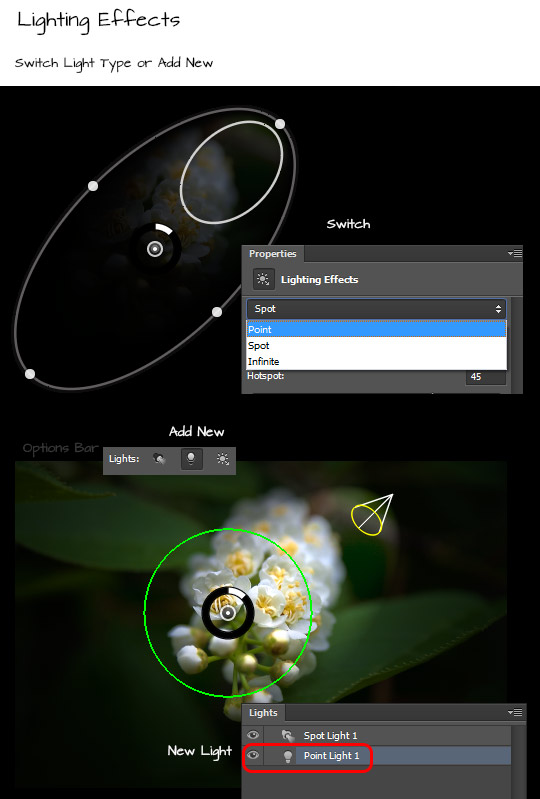
Switch Light Type or Add New
In the event you decide to switch the current light type to another, go to the Properties Panel and from the type dropdown choose an alternate type. The onscreen controls (except for Hotspot) will adjust and keep the remaining properties intact. If you revert TO a Spot type the Hotspot, Scale Width and Scale Length will default to its original setting.
For optimal control go to the Options Bar and select a Light icon to Add a New Light type. You will have full access to individual Lights from the Lights Panel.
As captured below, the Point Light Type offers on-screen, Move, Intensity and Scale options.
As captured below click and drag the directional handler (encircled in red)
When you finalize on a Light Type, go to the Properties Panel and make adjustments to the other controls not available via the onscreen interactive controls - such as Colorize, Ambience etc.
When the final property adjustments is in place click the â˜OK' command button located on the Options Bar to bring you back to the original document tab. You will see that the Lighting Effect has been appended to the Smart Object layer as a Smart Filter. Double click it to return to the last lighting effect and make further adjustments.
You can also accumulate the same Filter by going back to the Filter > Render > Lighting Effects go through the effects process and click OK. As captured below, bottom, you can stack Smart Filters and click the Blend Filter icon to alter its Blend Mode and Opacity setting for finer control.

Note: To Hide the on-screen controls but keep the interactive preview use the Ctrl/Command + H key to toggle.
Until next week
Happy trails


Video’s were so much better.
Gotta agree with RON. Bring back videos Corey!
Very detailed, clearly explained. Used screen cap of your pic to follow. Nicely done. GLR
thank you.Very clearly explained but I prefer the video
Son mucho mejor los tutoriales en video….
Que paso?
Pluto=PlanetPhotoShop-Corey Barker
Please Corey !!!
come back to show us simply good video tutorials, the lastest really really suck 😀
This is no longer Corey Barker. This is a lady named Lesa. Ya no es Corey Barker. Es una mujer llamada Lesa.
PLEASE BRING BACK THE VIDEOS PLEASE.
Come back Corey. It’s not the same without you!
100 % agree , video needed !
Corey with his video tutorials were great. really miss that
Nice tut, Lesa. Thanks for a job well done!
great tip! but could you present us with “before / after” side by side, please?
LOVE this tutorial, am happy that it has been provided- thank you do much. I also agree with the other comments, videos are just that much better for the viewer to absorb the information and to see it work live.
This would be more useful as a video.
Here’s one that I did with the lighting effects. Model was shot on white seamless, a texture layer was added, and the lighting effect used to make the texture dimensional.
http://www.pbase.com/mschiff/image/143257873
I’m sorry to say but those photos look absolutely dreadful! Far far too much black space where you have taken a natural subject (a flower) and completely alienated from its surroundings (most likely natural surroundings). Please master composition first before using such examples to demonstrate PS.
Very complex tutorial… Interesting post that you are demonstrating.. Although i must agree with Sting.. that it is quite dark.. but non the less… the technique can be applied onto other subjects.
Chris,
These effects weren’t complex enough to warrant a video. Just go in a play around with them using this tut as a guide, and you’ll pick it up faster than watching a video. And it’s WAY more fun. DL the additional effects from Adobe and you’ve got one amazing tool. If you hold down the shift key with, say, a 5 light up effect, it adjusts them all simultaneously. Just thought I’d toss that tip in there.
Hi all, the chosen images with dark surrounding were intentional to show new Blur UI controls; being that they are light grey in color, they would, otherwise be hard to ‘see’ if the surroundings were similar in color.
Nice tip Michael.
Darrell
I’m happy that I’ve found this tutorial, such a great help. Thank you.
i can’t see the lights tab in the lighting effects area. I have reset work space but it still doesn’t appear.ideas?
thanks.