

Configuring and using ALL of your crop tool’s capabilities can really speed up your work.
Basic Crops
 Most users of the crop tool simply select the crop tool, draw a crop area around the portion of the image they want and then double click on the inside of the cropped area to apply the crop. Then they go into the Image size dialog and struggle with the dimension and linear resolution of the file, sometimes having to return to fine tune the crop or even start over again. This is not only a pain in the patute, it is very time consuming and often results in lower quality final images as well, because several rounds of image size edits are applied. Here is a better way.
Crop Tool Mechanics
- Open an image
- Duplicate that image (Image>Duplicate)
Tip: make a keyboard short cut for this Duplicate function as you should do this with every image you open - Select the crop tool. The easy way to do this is to use its keyboard short cut “C”⦠easy to remember
Now before you start drawing your drop area, slow down long enough to configure your Crop tool options palette. This is the context sensitive palette that appears just below the row of Photoshop menus. By de-fault all its fields are blank (which is why I suspect many people ignore this palette)

- To enjoy the first feature of your crop tool option palette click on the Front Image button located on the right side of the palette. This will display the dimensions (6in x 8in) and the linear Resolution (200ppi) of the current active (Front) Image even before you have made a crop selection.. To clear these filed values simply click the Clear button located to the right of the Front Image button.

- Press the Enter key to select the first crop options palette field (width)
- To preset the width dimension of your cropped image type the value you want in the Width field (here 5″)
- Press the Tab key to select the second crop options palette field (Height)
- To preset the width dimension of your cropped image type the value you want in the Height field (here 4″)

- Now if you realize that you have reversed the width and Height fields ( a common occurrence for me when working with portrait images) simply click the bidirectional arrows located between the width and Height fields.

- To preset the linear resolution of your cropped image press the Tab a second time to select the Resolu-tion filed. Type in your desired resolution here (100ppi)

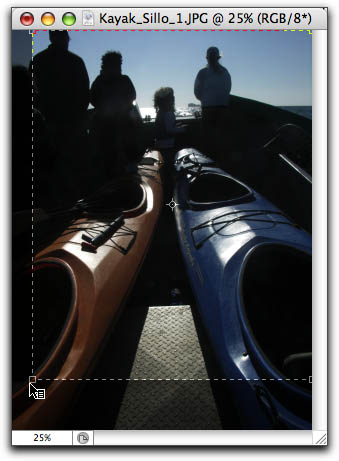
- Now you are ready to draw your crop border. Click and drag the crop tool across your image to include as much of the image as you like.. You will notice that your crop border will be constrained to a 4×5 ratio preset in the width and height field
- You can edit the size of the cropped area by clicking and dragging on any of the crop box corner control points. Note however that as you drag to resize your crop box, the ratio of the Width and Height will re-main the same (here 4×5)
- You can move the position of the crop box by clicking and dragging anywhere within the crop box
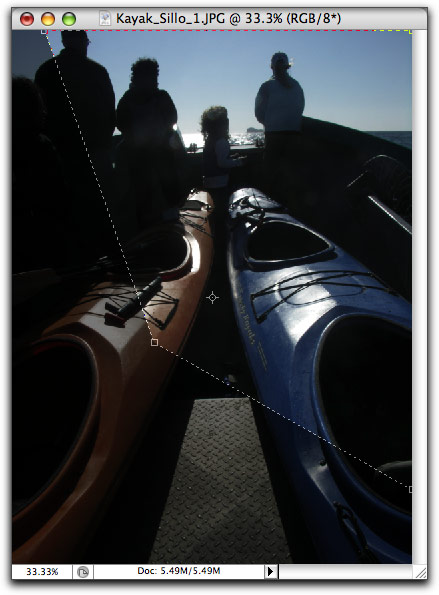
- You can also rotate your crop box by clicking anywhere outside the crop box and dragging to rotate the crop box.
- Note that by default the cropped-out area is defined by a semitransparent black screen, known as the crop Shield. Once you have made your initial crop box selection, the color and opacity of your crop shield can be edited in the crop options palette. Or if you prefer the shield can be disabled completely by unchecking the Shield checkbox.

- You can even apply a distortion effect to your cropped area by checking ON the Perspective check box. This will allow you to click and independently drag the crop box corner control points.
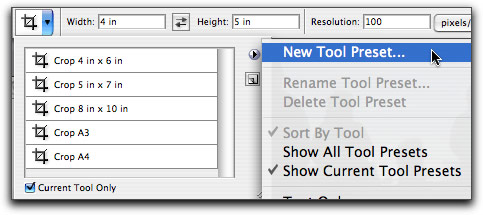
- And if you fine a set of crop setting that you would like to use repeatedly, you can save them as a Crop Preset. Just click on the Crop tool icon in the Crop option palette and select the Preset menu tick. Select New Tool Preset. Name the Preset (here 4×5 100). This new crop preset will be added to the crop preset list. This preset can then be selected to configure the crop tool option fields.
- When you are satisfied with your crop tool setting simply press the enter key to complete the crop which will adjust not only the image dimension but its resolution as well.
Tip:
You may want to consider apply some sharpening after you accomplish a crop that adjusts the linear resolution of your image to offset any interpolation based softening.So, as you can see the crop tool has a many capabilities that can help you quickly adjust your images.


Is there a way to toggle through the crop tool presets?