
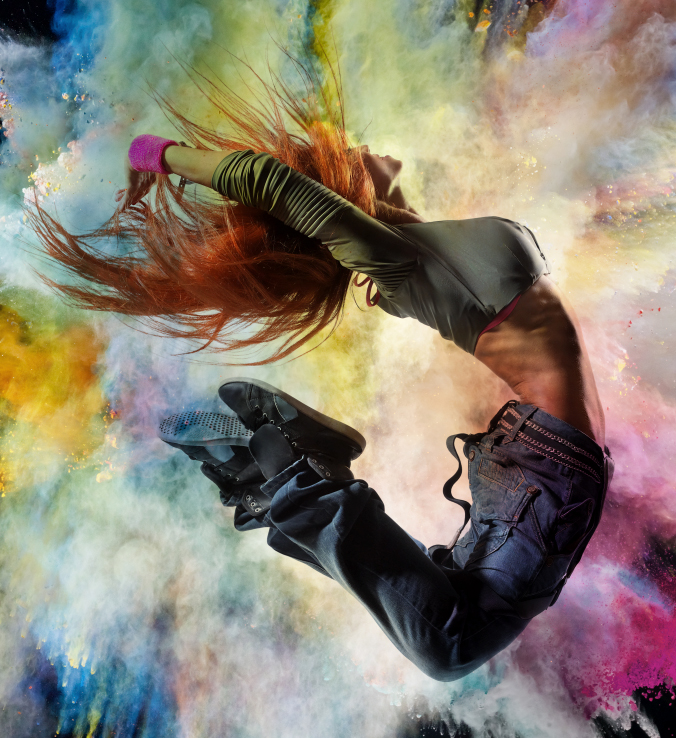
Creating a compelling photo composite is as much about finding the right assets as it is about the process of blending them together. If you're unable to capture your own assets, stock image sites are treasure chests for images, as well as inspiration. While hunting for the images used in this issue's tutorial, I encountered dozens of stock photos that sparked ideas. When I finally stumbled across the images we'll use, I was so captivated by the brilliant colors and dynamic shapes that I couldn't wait to begin exploring the possibilities. This level of enthusiasm is key to crafting a composite that stops viewers in their tracks and elicits an emotional response.
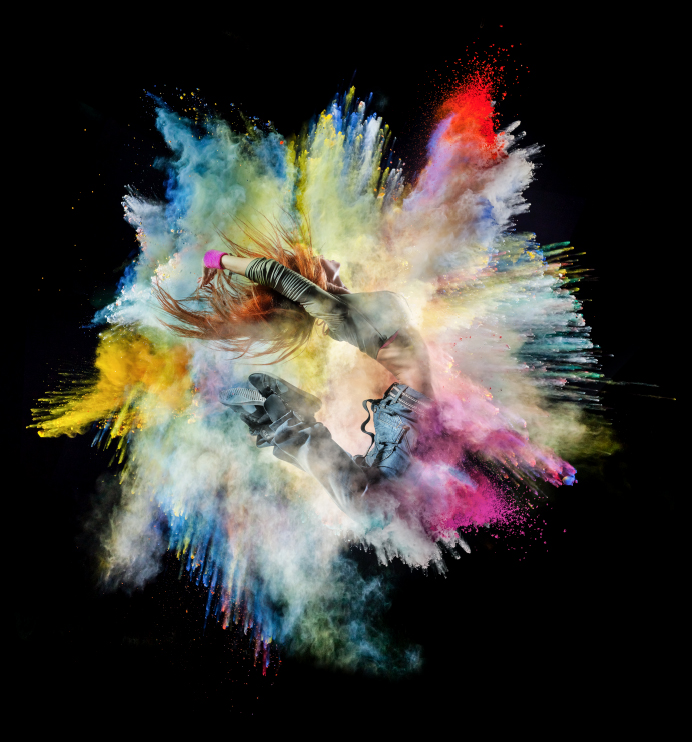
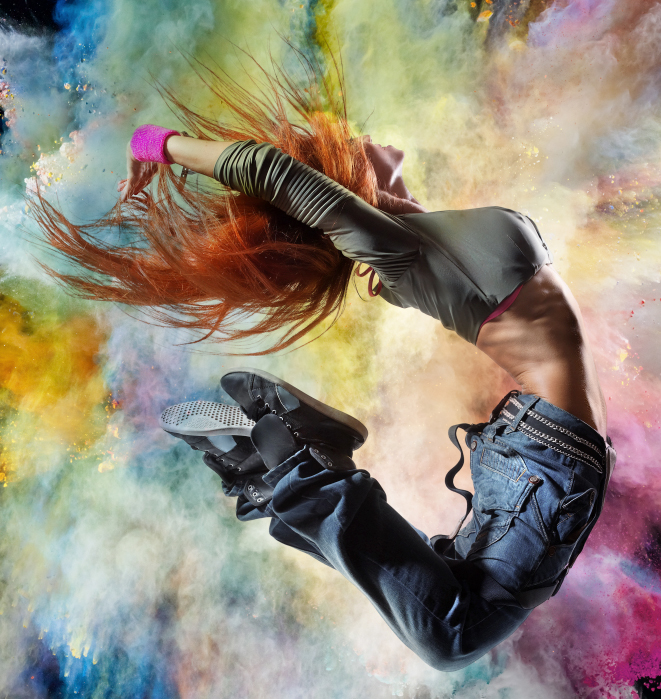
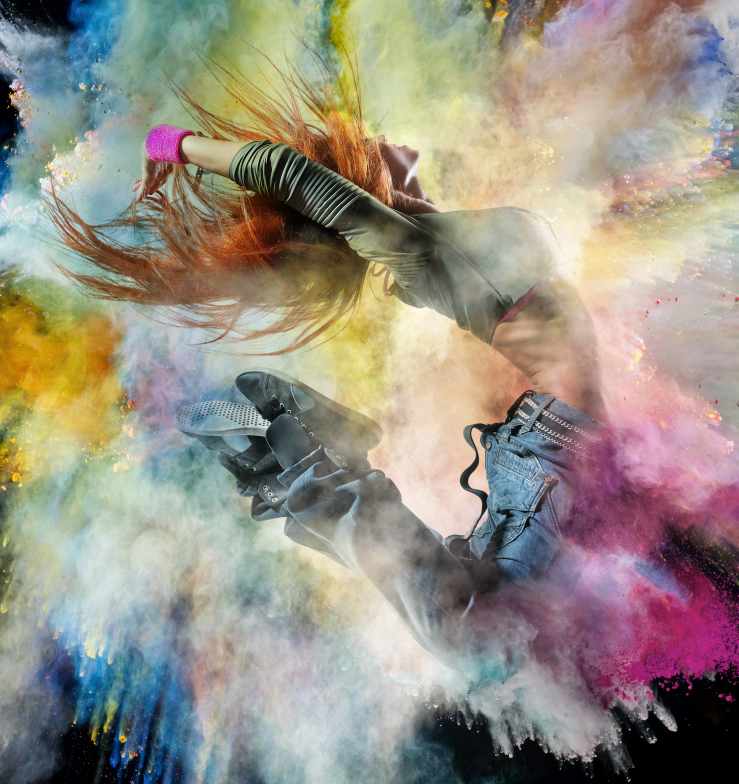
Our goal is to blend the leaping dancer with the prismatic powder so it appears as though she is actually inside the explosion. To accomplish this, we'll need to extract the dancer, balance the tones and colors, blend the powder into the edges of the dancer using a custom brush, and add punch to the overall scene. [KelbyOne members may download the files used in this tutorial at http://kelbyone.com/magazine/issue/january-2015. All files are for personal use only.]
©Alexander Yakovlev/Fotolia

©Jag_cz/Fotolia
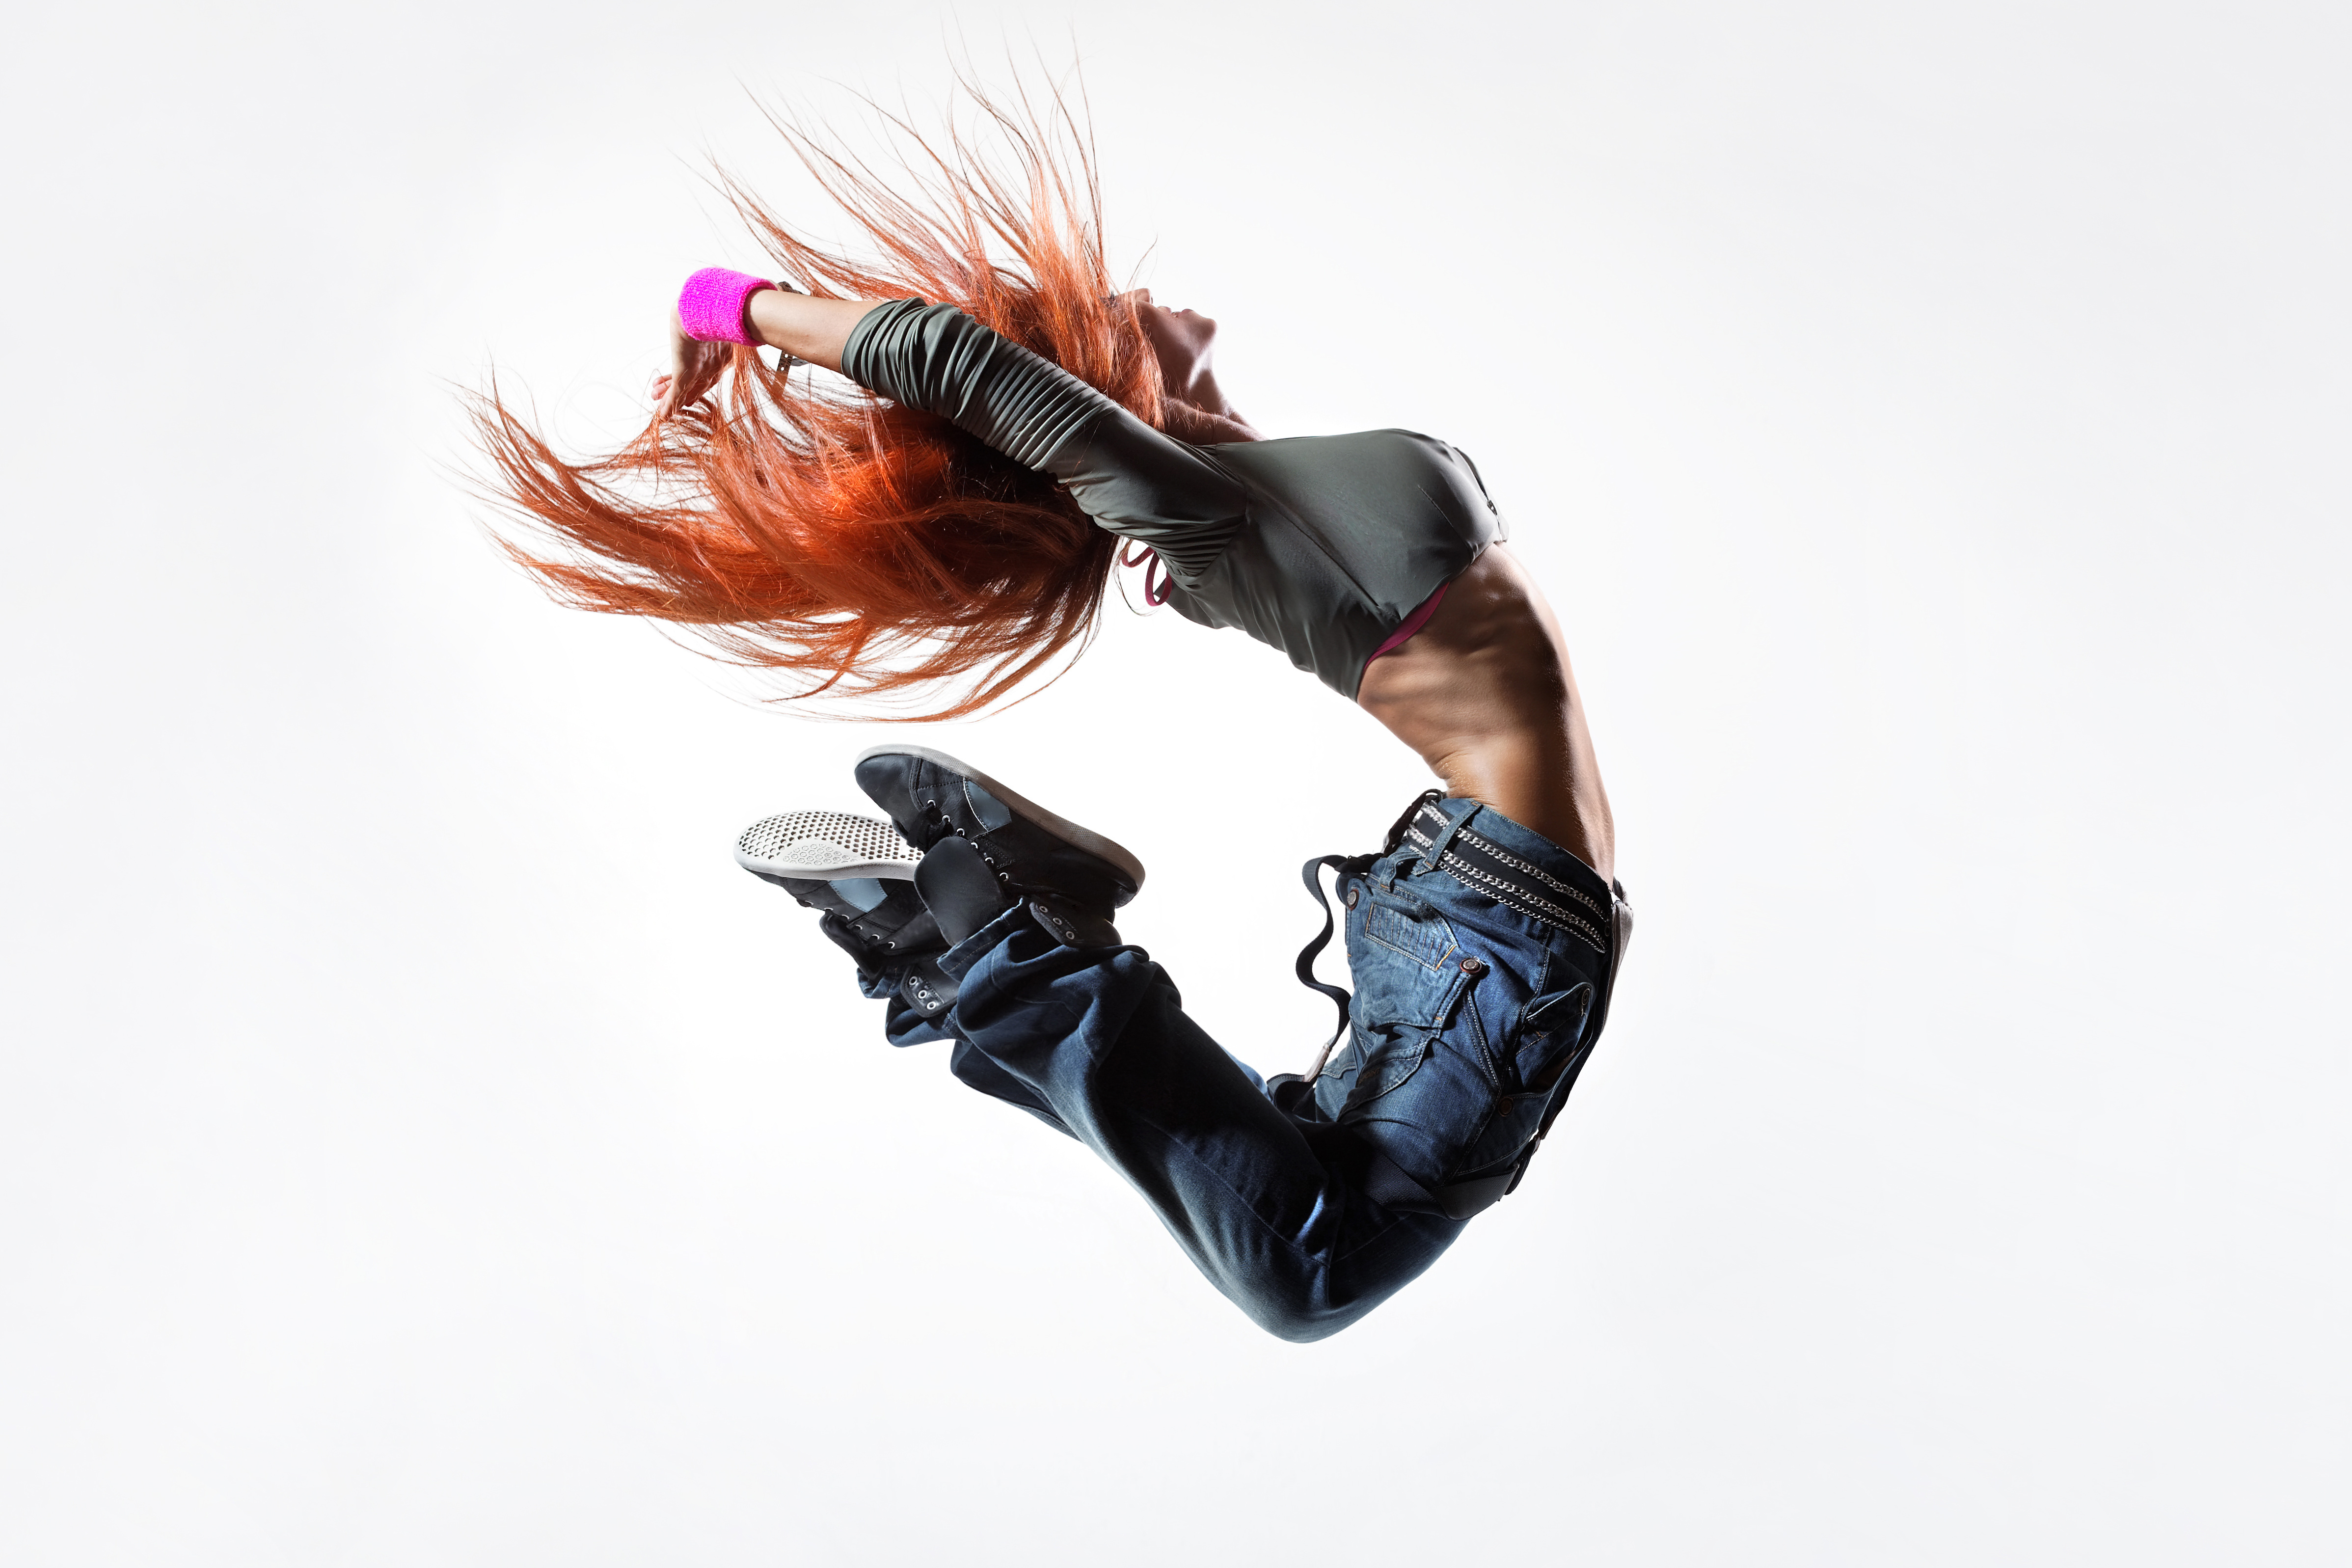
STEP ONE: Open the image of the leaping dancer. Activate the Quick Selection tool (W) and paint over the subject to produce a rough selection. Use the Left and Right Bracket keys to resize the tool as necessary to select smaller regions. To eliminate areas where the selection spills beyond the edges, hold Option (PC: Alt) and paint the selection away. Don't worry about selecting fine hair details or patches of hair where the backdrop is visible. We'll deal with the hair in a later step.
In skin and clothing regions where the Quick Selection tool creates a bumpy or errant selection, activate the Polygonal Lasso tool (nested under the Lasso tool [L] in the Toolbox), click the Add to Selection or Subtract from Selection icons in the Options Bar, and clean up the bumps. Click the Add Layer Mask icon (circle in a square) at the base of the Layers panel to turn the selection into a mask.

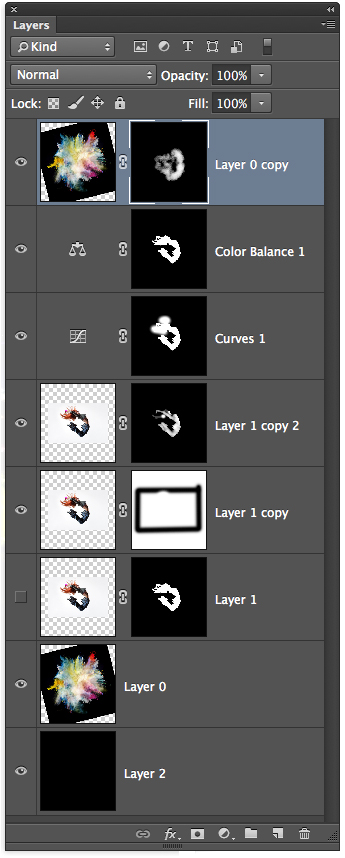
STEP TWO: Open the exploding powder image, and activate the Move tool (V). While pressing Shift, drag the dancer into the exploding powder photo. The exploding powder is a little too big and will benefit from a little rotation. In the Layers panel, click the lock icon next to the Background layer to unlock it. Press Command-T (PC: Ctrl-T) to activate Free Transform. While pressing Option-Shift (PC: Alt-Shift), grab a corner handle and scale the powder down slightly. Now hover just outside the bounding box and rotate the powder so the fragmented blast on the right side looks like it's exploding from her abdomen. Press Enter to commit the transformation.
While pressing Command (PC: Ctrl), click the Create a New Layer icon at the base of the Layers panel. This creates a new layer below the active one. Press D to set the default Foreground and Background colors. Press Option-Delete (PC: Alt-Backspace) to fill the new layer with the Foreground color (black). Use the Crop tool (C) to eliminate excess black.
STEP THREE: Let's refine the clothing and skin edges of the dancer so they exhibit believable softness and show no evidence of fringing. In the Layers panel, activate the mask for the dancer layer (Layer 1). Choose Select>Refine Mask. Set the View menu to On Layers. Drag the Feather slider to 0.8 px to add a touch of softness to the edge. Move the Shift Edge slider left until all fringing is eliminated. Try not to shift the edge any farther than necessary as this may result in loss of too much edge. Set the Output To menu to Layer Mask, and click OK.
STEP FOUR: Even though the dancer was captured on a white background, producing an accurate selection of her hair is extremely challenging. Fortunately, since she was captured on a white background, there's a marvelous trick for dealing with her hair. With the subject layer active, press Command-J (PC: Ctrl-J) to duplicate it. Turn off the visibility of the original dancer layer (Layer 1) by clicking on its Eye icon. Right-click on the duplicate layer's mask thumbnail (Layer 1 copy) and choose Delete Layer Mask. Since this is a reasonably dark-haired model in front of a white backdrop, change the blend mode from Normal to Multiply. Notice how this immediately solves the hair edge problem.
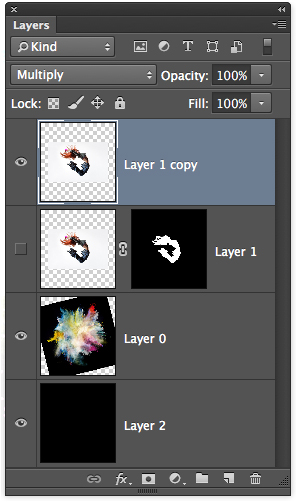
In fact, Multiply blend mode gives the dancer an overall believable appearanceâ”with two small exceptions. We need to eliminate the barely visible line at the perimeter of the dancer layer and we need to selectively restore light to critical areas of the dancer. (If you have trouble locating the perimeter line, turn the visibility of the duplicated dancer layer off and on.) To eliminate the perimeter line, click the Add Layer Mask icon at the base of the Layers panel, and switch to the Brush tool (B). Using a large, soft-edged black brush at 100% Opacity and Flow in the Options Bar, paint the line away. To accomplish this with just five clicks, hold the Shift key and click on each corner, finishing with a click on the original corner. Pressing Shift paints a straight line between each click.
To restore light to the dancer, activate the original dancer layer (Layer 1) and press Command-J (PC: Ctrl-J) to duplicate it (Layer 1 copy 2). Turn on visibility of the duplicate layer and drag it to the top of the layer stack. Activate the mask, press D, then Command-Delete (PC: Ctrl-Backspace) to fill the mask with the Background color (black). Load the original dancer's (Layer 1's) mask as a selection by Command-clicking (PC: Ctrl-clicking) it. Using a white brush set to 50% Opacity, paint over areas that benefit from additional light. Don't be afraid to paint over interesting areas more than once to add more light.

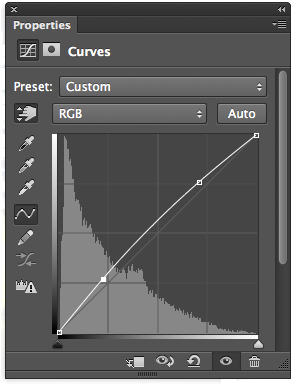
STEP FIVE: Although the tones and colors look pretty good, the dancer will benefit from some subtle shifts. With the selection still active, choose Layer>New Adjustment Layer>Curves, and click OK. From the Properties panel flyout menu, choose Auto-Select Targeted Adjustment Tool. This changes the default behavior of the On-Image Controls to on. Hover over a highlight with detail on the dancer, and click-and-drag up to add light. Be subtle. Now click on a shadow with detail and drag up to open the shadows just a little.
If there's a noticeable line in the hair caused by the original mask, fix it by painting with a large, soft-edged, white brush at 100% Opacity. Don't worry about being precise. A little extra light on the powder behind the dancer's head is acceptable.
Now let's address the color. Pull yet another selection from the original dancer's (Layer 1's) mask by Command-clicking (PC: Ctrl-clicking) it. Choose Layer>New Adjustment Layer>Color Balance, and click OK. Add a touch of Cyan and Green to the Midtones to reduce the red light on the dancer's skin and clothing.

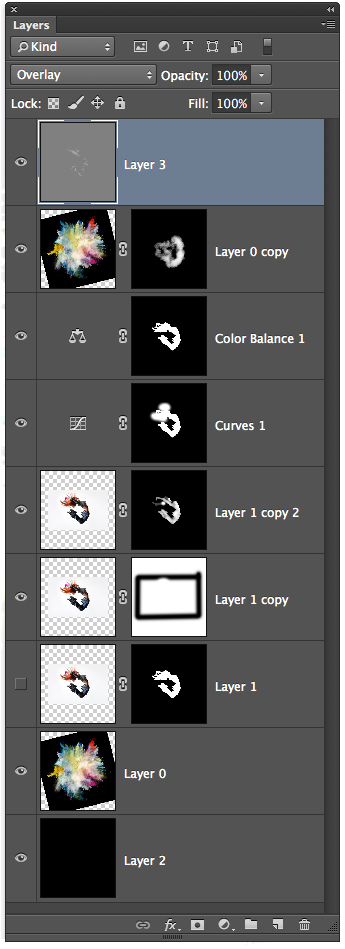
STEP SIX: Here's where the fun really begins. We'll customize a brush from QBrushes to blend the exploding powder with the edges of the dancer. Begin by Option-dragging (PC: Alt-dragging) the exploding powder layer (Layer 0) to the top of the layer stack (Option-dragging [PC: Alt-dragging] makes a copy of the original layer [Layer 0 copy]). Add a black-filled mask by Option-clicking (PC: Alt-clicking) the Add Layer Mask icon at the base of the Layers panel.
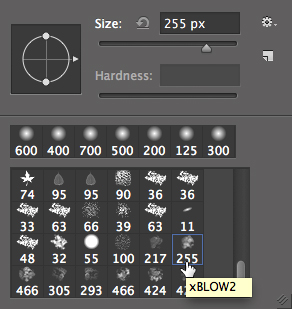
Now visit http://qbrushes.net/xplosion-brushes and download the free Xplosion Brushes. After placing the brushes in a meaningful location on your hard drive, return to Photoshop and activate the Brush tool. Open the Brush Preset Picker in the Options Bar and choose Load Brushes from the flyout menu (gear icon). Navigate to the Xplosion Brush set and click Open. In the Brush Preset Picker, choose the brush labeled xBLOW2 (255 pixels). For the practice file, you'll want to drop the size of the brush to about 50 px.
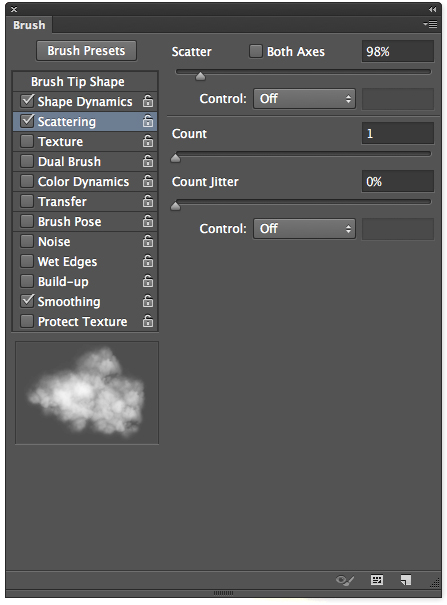
In the left side of the Brush panel (Window>Brush), click on Shape Dynamics. Slightly increase both the Size and Angle Jitter values.

Now click on Scattering. Increase the Scatter value to approximately 100%.
Set the brush to 50% Opacity in the Options Bar and paint over the dancer's edges to mingle the powder with the dancer. To build the effect in desired regions, paint more than once.
STEP SEVEN: To accentuate the most interesting features of the dancer, we'll perform a little dodging and burning. Option-click (PC: Alt-click) the Create a New Layer icon at the base of the Layers panel. In the New Layer dialog, change the Mode drop-down menu to Overlay, check the box labeled Fill with Overlay-Neutral Color (50% Gray), and click OK. Borrow the selection from the original dancer's (Layer 1's) mask by Command-clicking (PC: Ctrl-clicking) it. Using the default, soft-edged, white brush at 10% Opacity, paint over all existing highlights that benefit from more light. Build the effect where desired. Now press X to swap the Foreground color to black and paint over existing shadows to add definition to edges. Press Command-D (PC: Ctrl-D) to deselect.
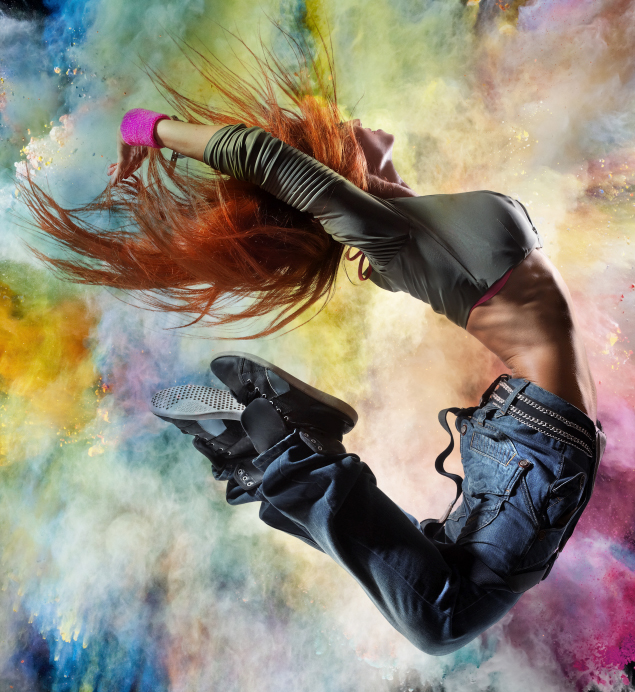
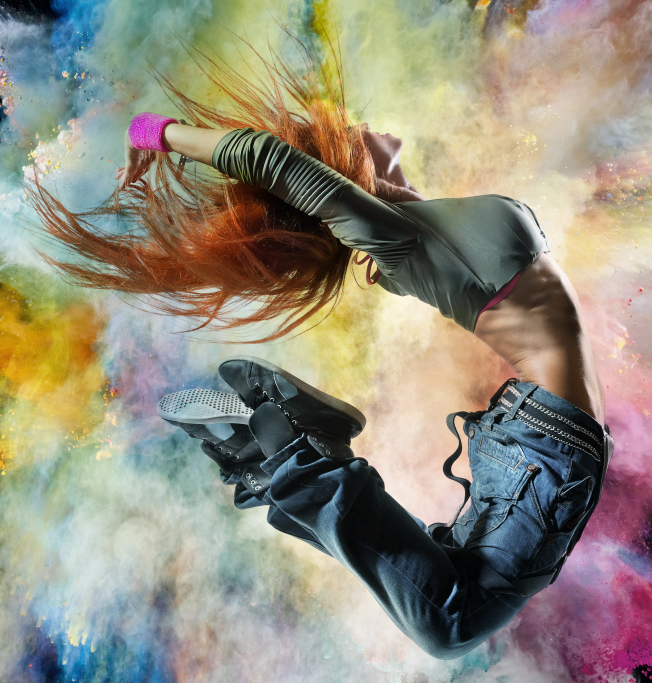
STEP EIGHT: An image with details like this really benefits from additional clarity. While holding Option (PC: Alt), choose Layer>Merge Visible. This creates a composite layer at the top of the stack. Choose Filter>Convert for Smart Filters. Now choose Filter>Camera Raw Filter. Adjust the Clarity setting until the image really pops.
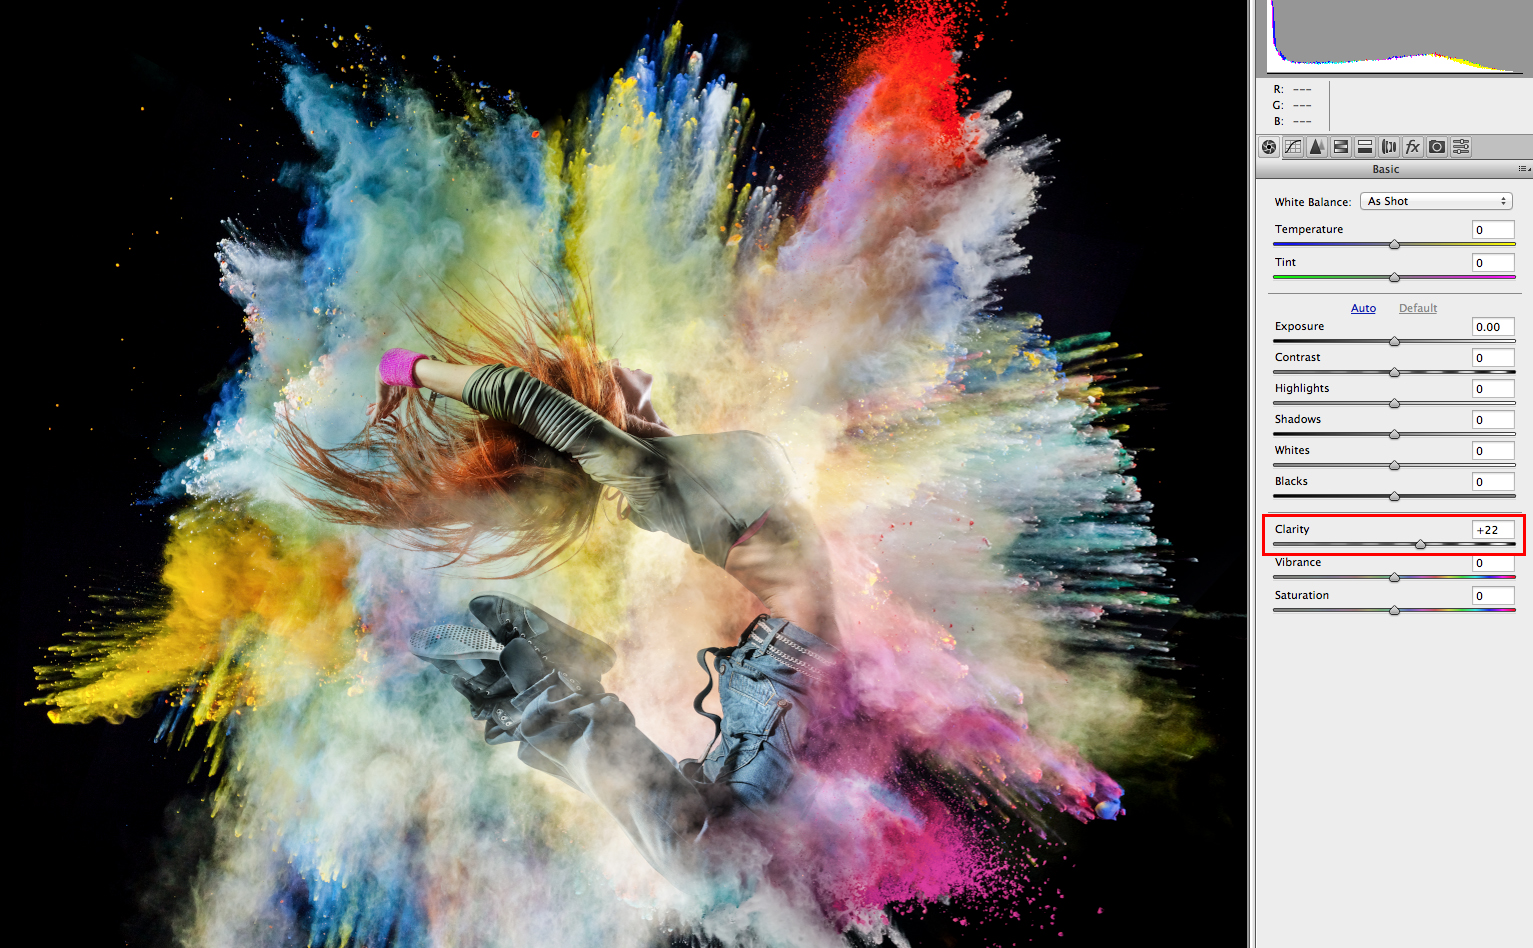
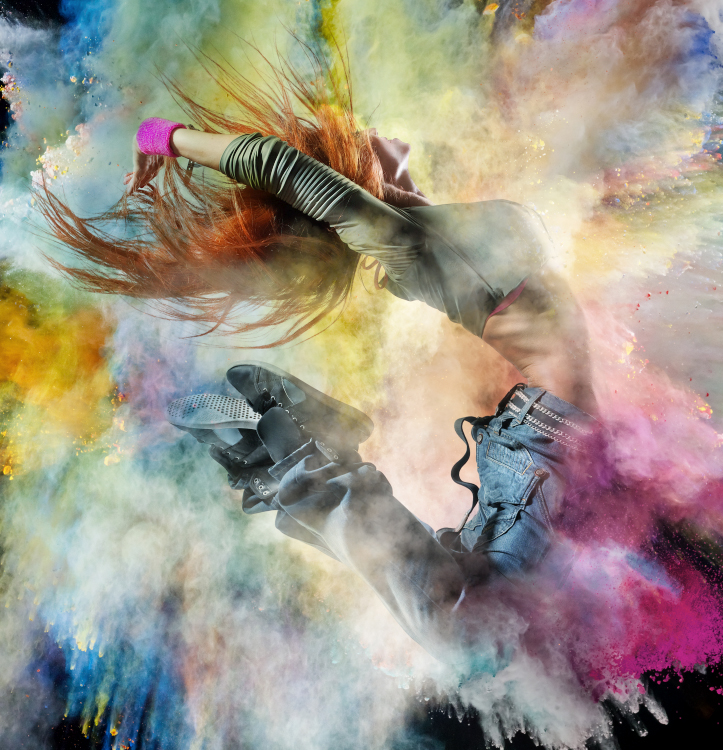
Click OK to exit the Camera Raw dialog. Here's a look at the completed colorful composite.

Compositing provides limitless fun because it challenges us to think creatively while calling into play a nearly endless variety of Photoshop techniques. Keep in mind that the original assets you choose set the tone for the entire process. Find images that get your pulse racing and you're already on your way to exhilarating possibilities.
This article is courtesy of Photoshop User magazine, the official publication of KelbyOne, which provides quality online education for creative people. For more information, visit KelbyOne.com.
