
Seven Reasons to Use the Camera Raw Filter in Adobe Photoshop CC
The Adobe Camera Raw plug-in, used to convert RAW images into pixels Photoshop can understand, is an incredibly powerful yet easy-to-use editor. However, if you don't shoot in RAW format, you might not think to use it. In this column, you'll learn seven reasons to summon the Camera Raw filter in Photoshop CC.
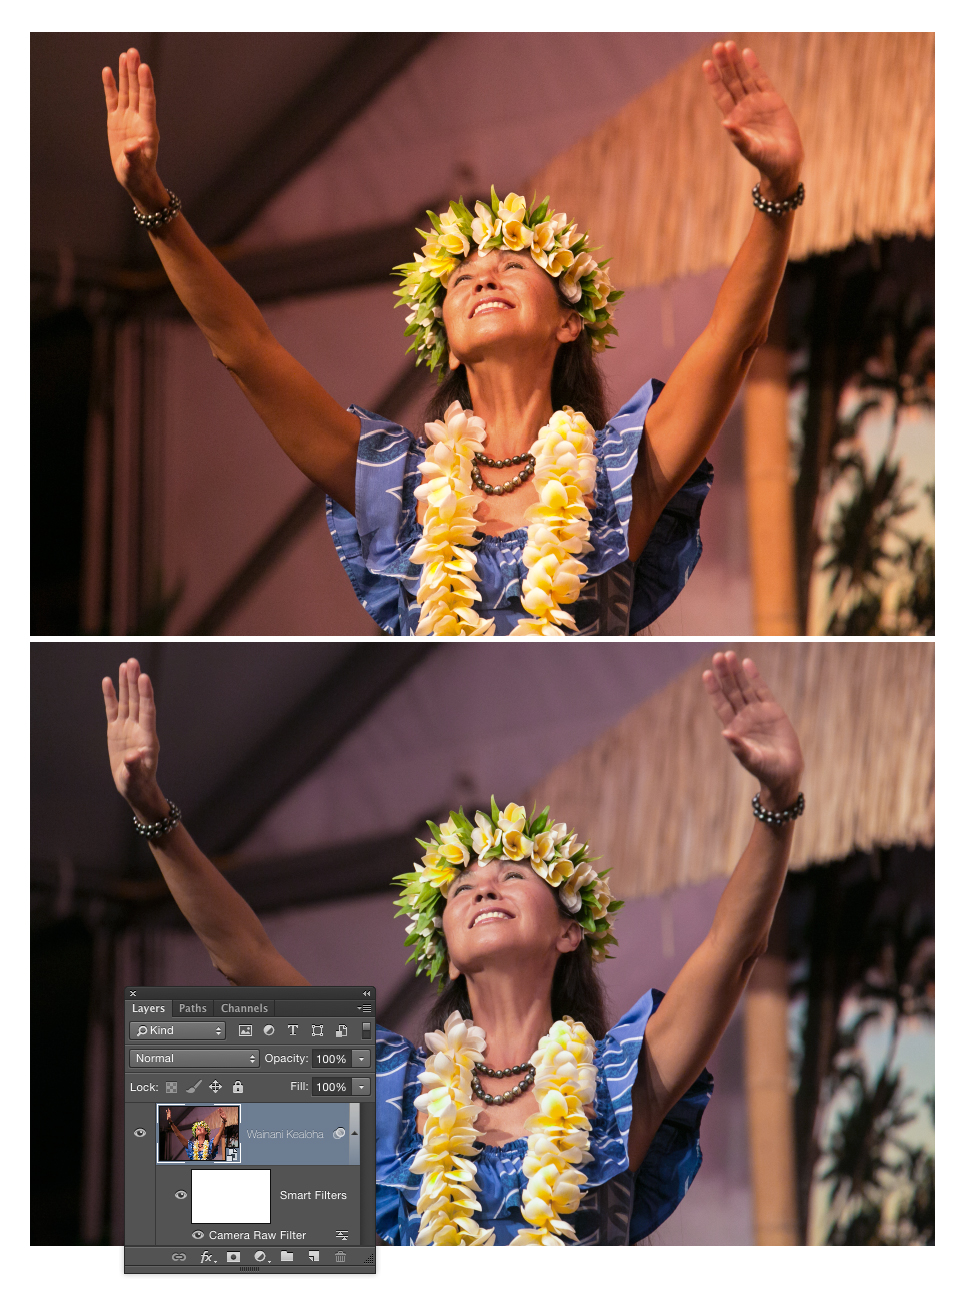
First, prepare the image to use the Camera Raw filter nondestructively. Choose File>Open as Smart Object or, if the image is open and has one layer, choose Filter>Convert for Smart Filters. For multilayer documents, click the top layer to make it active, Shift-click the bottom layer to select them all, then choose Filter>Convert for Smart Filters. Photoshop tucks them into the protective wrapping of a smart object. Next, choose Filter>Camera Raw Filter in any version of Photoshop CC. Once you close the filter, you can reopen its dialog by double-clicking its name in the Layers panel.
Tip: To access layers you've tucked into a smart object, double-click its layer thumbnail and Photoshop opens them in a temporary document. Make your changes, choose File>Save, and then close the temporary document.
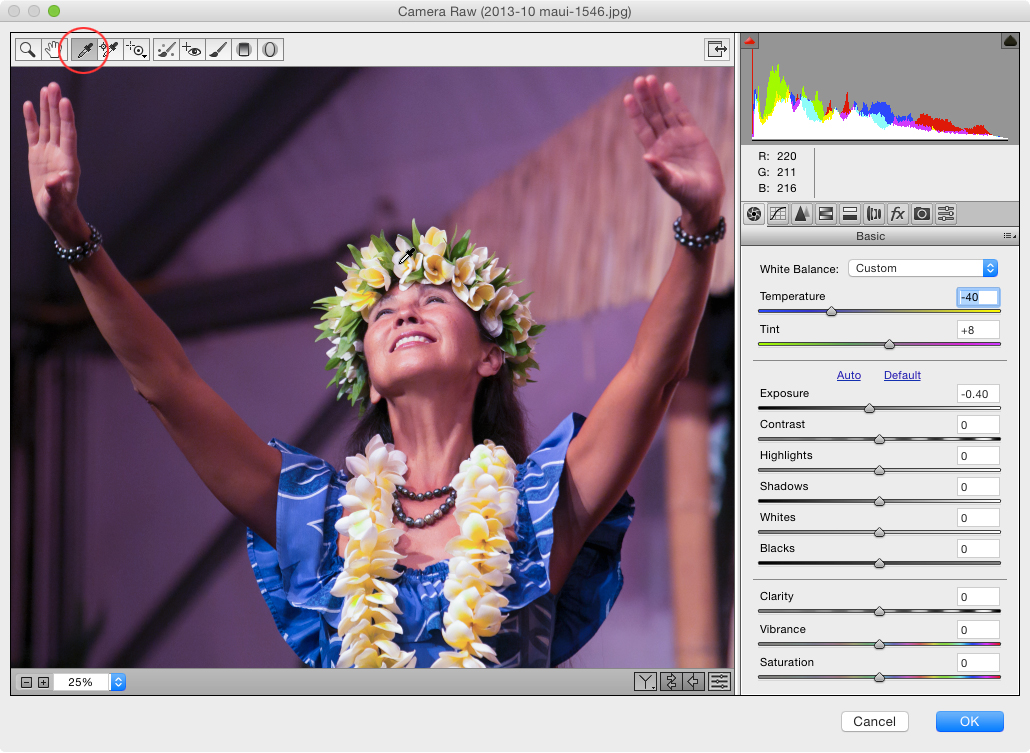
Basic Color Correction and Softening Skin
Step One: The Basic panel in Camera Raw has streamlined, slider-based controls for easy color correction and a handy tool for resetting the white balance. Press I to grab the White Balance tool and locate neutral white or gray pixels. As you move your cursor, note the RGB values below the histogram. When they're similar, click to reset the white balance. Keep clicking until the image looks good to you, and then adjust the Temperature and Tint sliders, as needed.
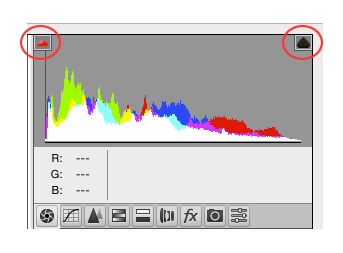
Step Two: Press U and O on your keyboard to turn on the shadow and highlight clipping warnings, respectively, which outlines their icons in gray. Adjust Exposure and Contrast to your liking, and use the next four sliders to adjust detail in highlights and shadows. If bright red warnings appear, indicating overexposed highlights, try darkening the Highlights or Whites slider (or both). If bright blue warnings appear, indicating underexposed shadows, lighten the Shadows or Blacks slider (or both). To increase contrast in the midtones, drag the Clarity slider rightward (avoid this on portraits as it emphasizes skin texture). To boost colors, use the Vibrance slider.
Step Three: To soften skin, use a negative Clarity adjustment. Press K to grab the Adjustment Brush, and click the minus icon to the left of Clarity twice to set the panel's sliders to 0 and Clarity to -50. Brush across your subject's skin. If you paint across an area that you don't want softened, Option-click-and-drag (PC: Alt-click-and-drag) to put the brush in erase mode. Tip: Turn on the Mask checkbox at lower right to view brushstrokes as a white overlay, and use the Left and Right Bracket keys on your keyboard to decrease and increase the brush size, respectively.
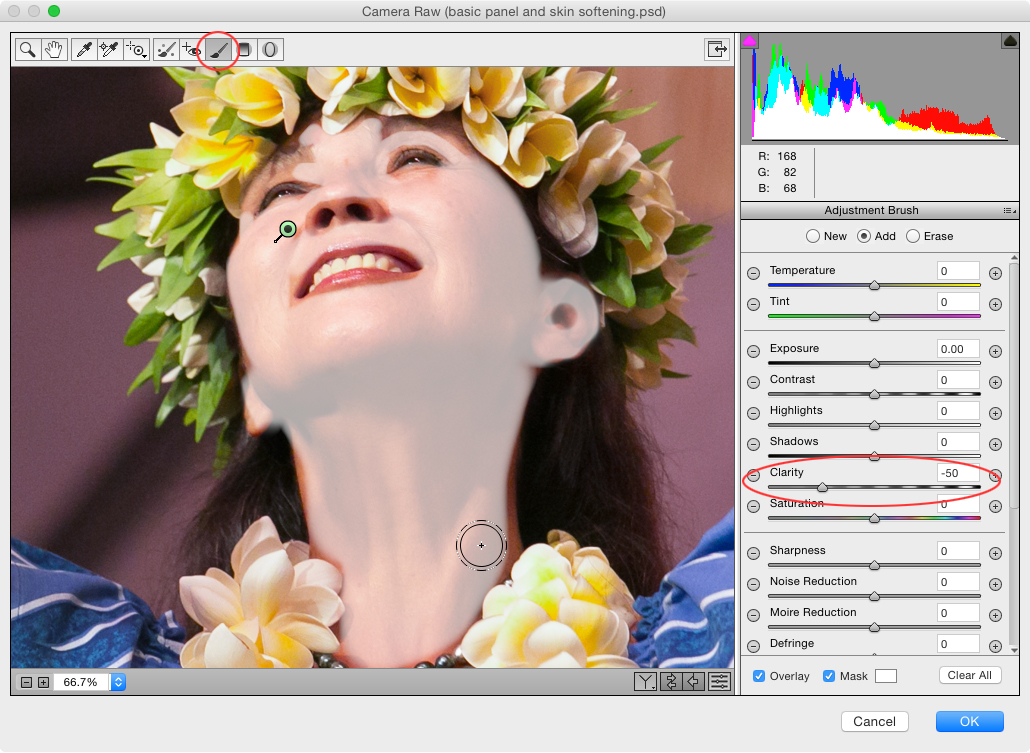
Step Four: Turn off the Mask checkbox (if it's on) and adjust the Clarity slider to your liking. Any negative setting softens pixels. Click OK.
Fixing Perspective and Darkening a Sky
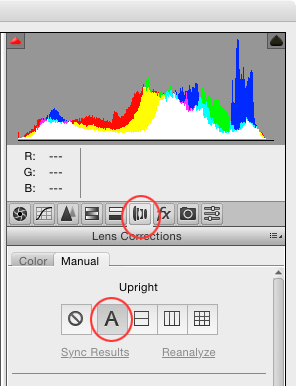
Step One: The Upright feature in Camera Raw can quickly fix the perspective in your image. Open the Lens Corrections panel. To straighten both vertical and horizontal lines in your image, click the Auto button.
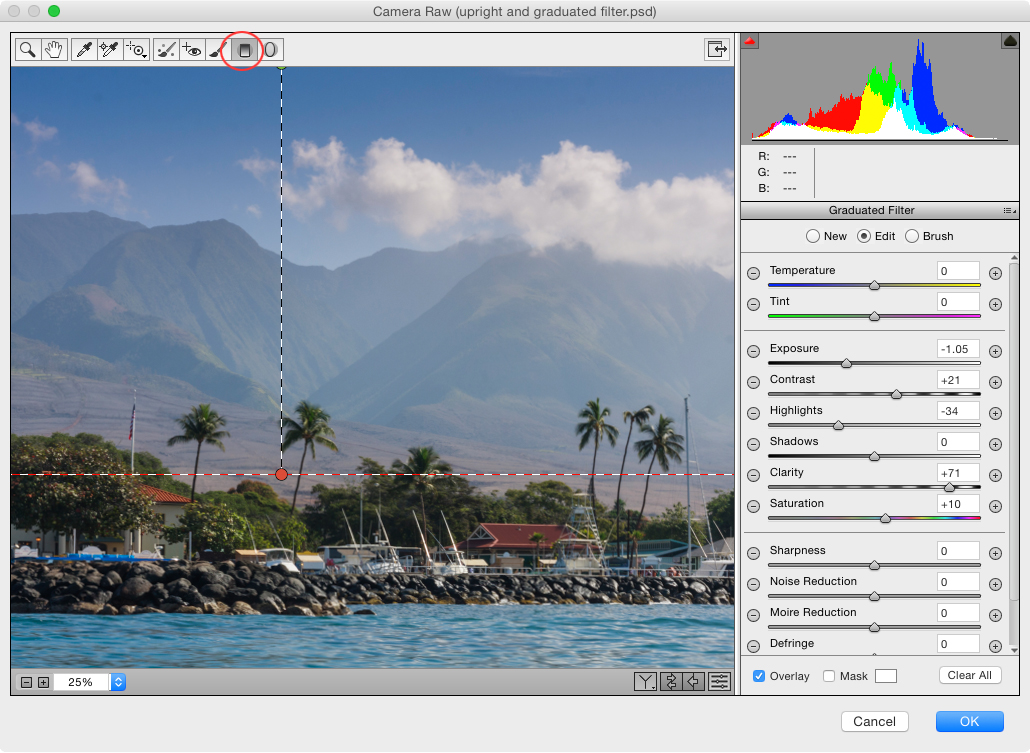
Step Two: The Graduated Filter tool (G) lets you apply adjustments like a real graduated filter that screws onto the end of a lens. It's handy for fixing overexposed skies because the change is applied gradually across the area you drag over. With the tool selected, drag across the area that needs fixing (Shift-drag to constrain the filter to be perfectly horizontal or vertical). Use the Exposure, Contrast, Highlights, Clarity, and Saturation sliders to adjust the sky to your liking. Tip: Uncheck Mask to see the effect.
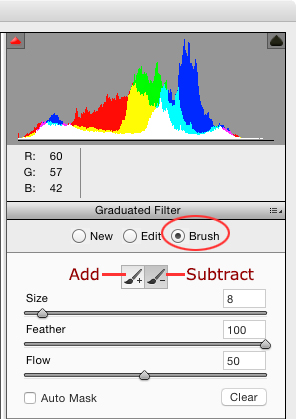
Step Three: To hide the adjustment from an area, click the Brush radio button and then click-and-drag across that area. Tip: To add the adjustment to an area outside the dotted lines, put the Brush in add mode by clicking the button labeled here and then click-and-drag across that spot.
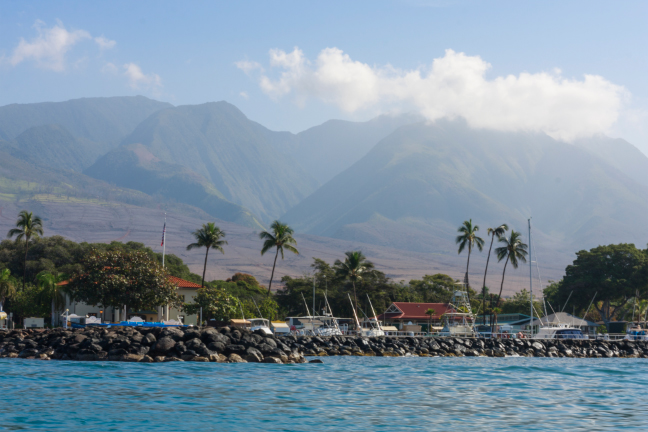
Before
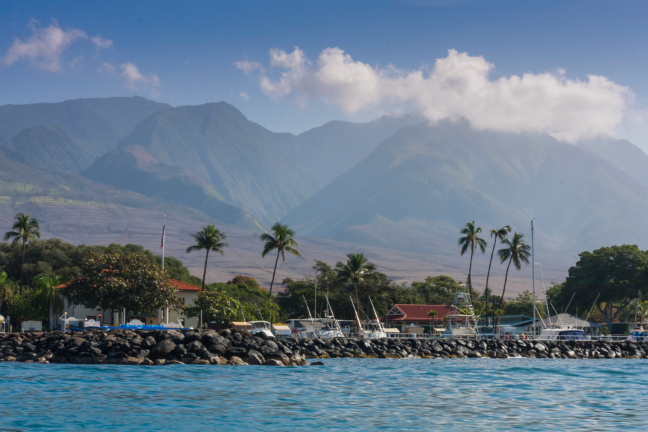
After
Split-Toning
Step One: Split-toning introduces creative color by remapping shadows to one color (usually dark) and highlights to another (usually light). There are no right or wrong color choices here, but complementary color combosâ”orange/blue, yellow/purple, green/redâ”work well. Open the HSL/Grayscale panel and turn on the Convert to Grayscale checkbox.

Step Two: Open the Split-Toning panel. It's easier to pick a highlight color after picking a shadow color, so Option-drag (PC: Alt-drag) the Hue slider in the Shadows section to see colors temporarily applied at 100% saturation. Release the Option (PC: Alt) key when you find a color you like and then drag the Saturation slider rightward to apply it. Repeat with the Highlight section's Hue slider. Use the Balance slider to set a dominant colorâ”drag leftward to favor shadow color or rightward to favor highlight color. Tip: Experiment with setting both Hue sliders to the same color, or try adjusting only the Shadows (remember, the color tint is only visible after increasing Saturation).

Sharpen High-Contrast Edges
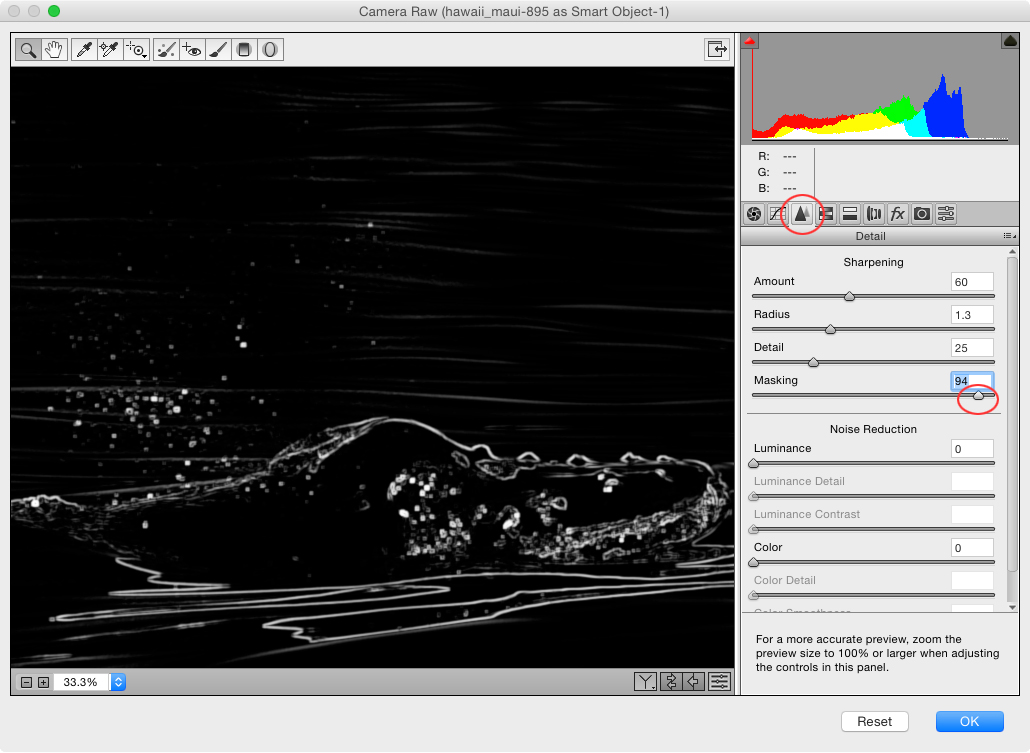
The Camera Raw Filter lets you apply localized sharpening with the Adjustments Brush, Radial Filter, and Graduated Filter, but you can also restrict global sharpening to the highest contrast edges, such as the water spray and texture of this baby whale. Open the Detail panel and adjust the sharpening Amount and Radius sliders. Next, Option-drag (PC: Alt-drag) the Masking slider rightward to restrict sharpening based on contrast; areas that will be sharpened appear white and areas that won't appear black. Tip: Use this technique on portraits to avoid accentuating skin texture.
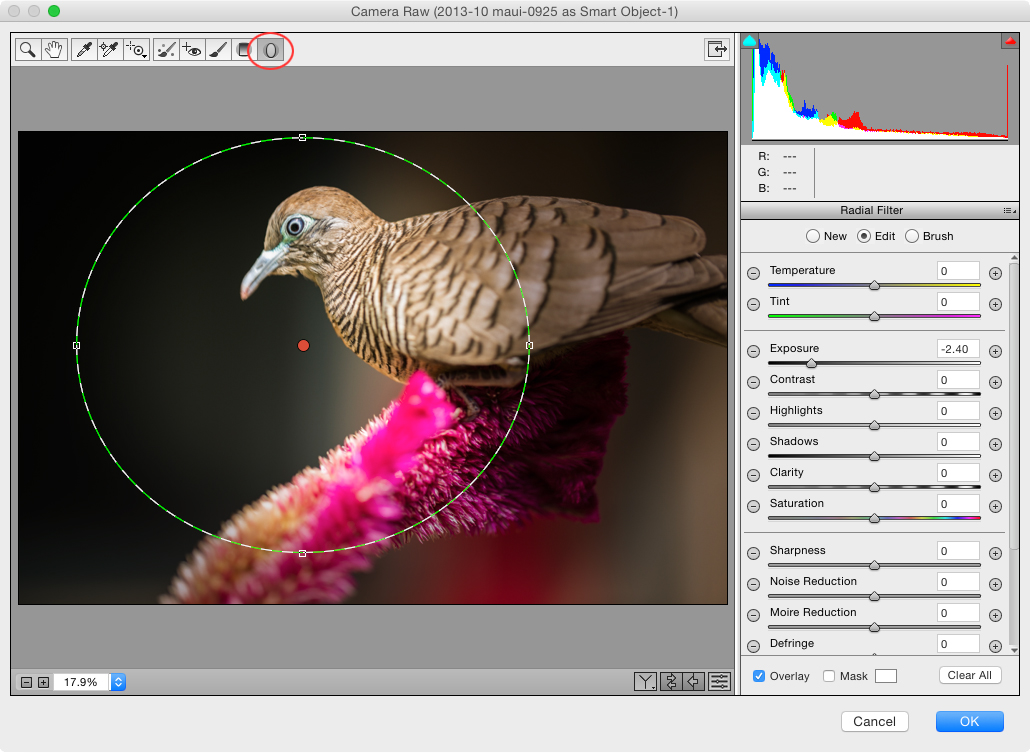
Custom Edge Vignette
If your focal point isn't centered, the Lens Vignetting sliders in the Lens Corrections panel won't do you much good. Instead, create a custom edge vignette using the Radial Filter (J). Draw an oval atop your image. Reposition it using the red pin and resize it using the square handles around the circle. Set all sliders to 0 and then drag Exposure leftward to darken the edges outside the circle. Make sure Effect at the bottom of the panel is set to Outside.
As you can see, the Camera Raw Filter is well worth using. Until next time, may the creative force be with you all.
ALL IMAGES BY LESA SNIDER
This article is courtesy of Photoshop User magazine, the official publication of KelbyOne, which provides quality online education for creative people. For more information, visit http://kel.by/k1member.
