
Vignettes are a very popular way to highlight the subject of a photograph. A vignette typically produces an image that contains the subject of the photo in sharp focus and then softens the photo as it blends into a background color so that the photo seems to fade away at the edges.
There are many different ways to create vignettes in Photoshop. The most common method is to simply draw an elliptical marquee around the subject, feather it heavily, and then inverse the selection and delete to the background color in the toolbox. This is quick and easy. The problem is that you have almost no ability to change your mind after you see what the effect looks like. You need to depend on Photoshop’s Undo or Step Backward commands.
A much better way to create a vignette is to make use of the non-destructive editing capabilities in Photoshop. “Non-destructive editing” means using layers, layer masks, styles, and other features in Photoshop as they don’t alter the original pixels in an image. By preserving the original pixels, and by taking advantage of layers that can be easily changed (such as Fill layers), you can make many different changes to your image, preview your results, and always be able to recover or back up without needing to start over.
Let’s take a look at a non-destructive way to create a vignette and see the flexibility that it offers.
1. Download and open the image shown below. To download the image, Control-Click on it on the Mac or Right-Click on it in Windows and choose Save Picture As (or whatever Save option your browser gives you). Of course, you’re welcome to also try this on your own images.

2. Choose Image>Duplicate>OK. It’s best never work on the original copy of your image!
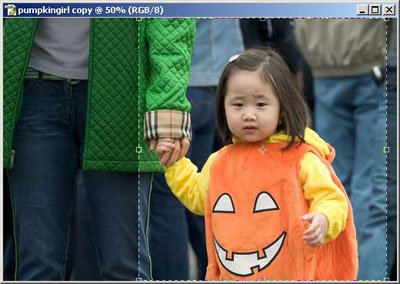
3. You need to crop this image because too much of the image shows areas of little or no interest. I cropped from the left of the green jacket to almost the right side of the image as you can see.
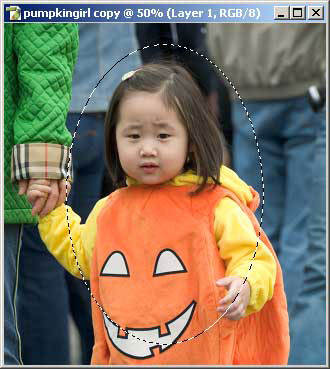
4. Choose the Elliptical Marquee tool. Reset the tool to the defaults (Control-Click on the Mac or Right-Click on Windows on the Marquee tool icon at far left of the Options Bar. Then choose Reset Tool from the drop-down menu.) This brings you back to a known state of the Elliptical Marquee tool (Feather 0; Anti-alias On; Style Normal) The Elliptical Marquee tool will create the selection that will be the sharp center of interest in the image.
5. For those of you who simply want to make an oval selection, place your cursor just a bit below the place where the young girl’s chin and hood meet the pumpkin costume. Hold the Option key on the Mac or the Alt key on Windows and drag the marquee out to the sides until the right edge of the marquee clears the hood of the costume and until the top edge of the marquee is about halfway between the girl’s head and top of the image. Release the mouse button and then release the modifier key (Option orAlt key); then place in the image, where you first click is the center of the new selection. If you need to move the marquee because it’s not where you want it, you can do so by holding the Spacebar before you release both the mouse button and the Option or Alt key.
Note: I know that many of you obsess over centering the oval marquee. Here’s a fast way to do it: Make a tiny oval selection in the white part of the child’s costume, choose Edit>Copy, deselect, and then choose Edit>Paste. The white spot in the new layer is the exact center of the image (assuming that you were looking at the image at a level of magnification that shows the entire image). You can then turn on the Rulers and drag a horizontal and vertical guide to the white dot. Place your cursor at the intersection of the guides, hold the Option or Alt key, and then drag out the marquee. Delete the extra layer and clear the guides when you have made the selection. Here’s my selection in the image.
6. Choose the Eyedropper tool and sample the dark blue in the jean’s to the left of the child’s face. That will be your first try at the color for the background.
Up until this point, the destructive instructions are the same as the instructions for the non-destructive version. In the simplest (destructive) form of creating a vignette, you would now guess at the feather amount that you wanted, inverse the selection, and fill with the foreground color. Your image would contain only one layer, and if you didn’t like either the feather or the fill color, you would need to revert back to Step 5 and 6 and try again.
To keep all of the image pixels available, you will, instead, inverse the selection and add a Solid Color Fill layer as follows:
. Choose Select>Save Selection to save this hard-edged marquee as an Alpha channel so that you can easily re-do the vignette effect at any time. (You could also click on the Save Selection as Channel icon in the Channels palette.)
. Choose Select>Inverse to select the frame area of the image.
. Choose Layer>New Fill layer>Solid Color. The layer automatically takes the same color as your Foreground color patch in the Toolbox (unless you select a different color). Click OK in each dialog box to create the layer. As you can see, you have a frame with a very hard edge.
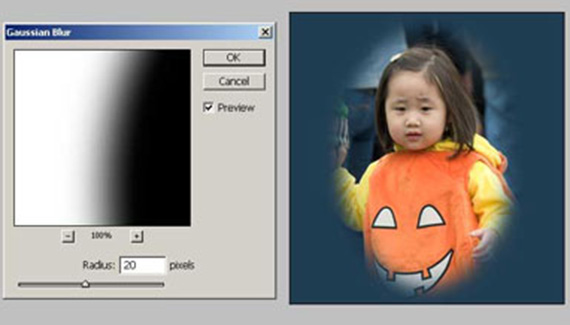
A vignette usually has a soft edge. This soft edge could have been placed on the original marquee selection using the Select>Feather command, but you can’t see the effect of the feather command until it’s applied. You can get the same effect as a feather by using the Gaussian blur command on the layer mask of the Solid Color Fill layer. The big advantage to this is that you can then preview the effect to see exactly how your image will look.
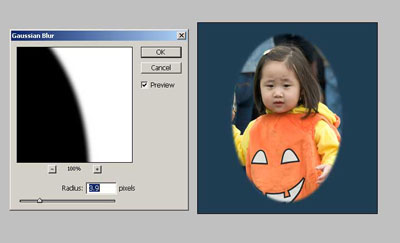
1. Choose Filter>Blur>Gaussian Blur. Slide the Radius slider until you like the degree of softness on the edge of the frame. Here’s what a Radius of 3.9 looks like.
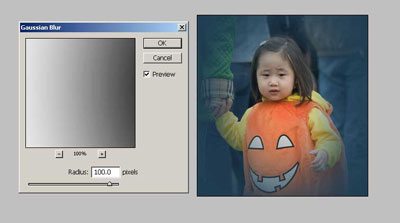
Now, here’s a Radius of 100.
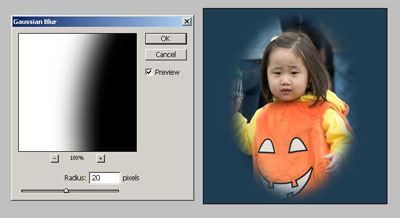
And here’s the image with a Radius of 20.
Click OK when you like the result.
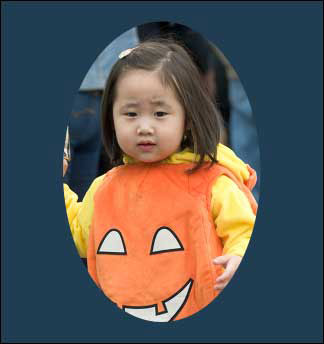
2. If you like the image, you can save it and consider the image “finished.”
This need not be the end, however. Look for Part 2 of this tutorial later this month, where we’ll use the layers that you’ve created to alter colors and add some patterns to the background of the image. You’ll be able to easily change the image in ways not possible using traditional methods.
Sherry London writes the “Photoshop Quick Tips” column for Photoshop User magazine. She’s written numerous books on Photoshop, Illustrator, Painter, and related graphics. Sherry can be reached at pracingpixel@yahoo.com and her website is http://www.sherrylondon.com.
