
Focus on Sharpening, Part 3

In the first two parts of this series, we looked at the theory of sharpening and the commands and tool available in Photoshop. In this installment, we’ll look at some typical (and unusual) sharpening techniques and how to avoid common problems.
AVOIDING HALOS
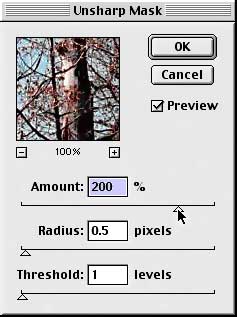
Those light and dark halos that sometimes appear when inappropriate sharpening settings are applied can be avoided. Decrease the Radius and increase the Amount setting. Think of the Radius as the width of the “halos” and the Amount as the degree of sharpening.
WORKING WITH FACES
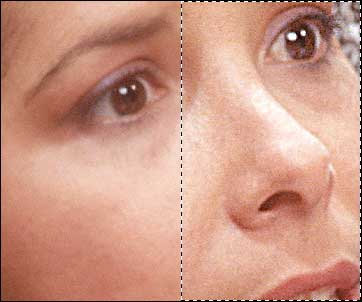
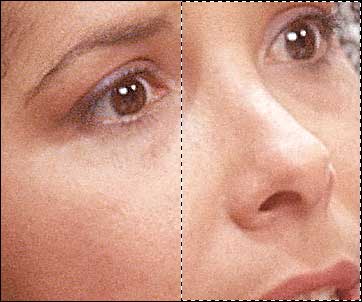
Sharpening faces can be (but doesn’t have to be) problematic. Getting the correct amount of sharpening to make eyes jump off the page can also produce skin that looks aged or diseased. In some cases you need to de-emphasize wrinkles, too. The key is to sharpen the details of the face without sharpening the broader areas of skin. The first example shows (to the right) what can happen when an entire face is sharpened.
There are a couple of ways to sharpen the details of the face without creating unseemly detail in the skin. One technique is, of course, to use the Sharpen tool rather than a sharpen command, working on areas such as the eyes, eyebrows, and mouth.
Alternatively, you may be able to sharpen the Red and/or Green channels to accomplish the same basic task. Remember that most of the color data for flesh tones in RGB is carried in the Red channel (the broad, smooth areas of color), while the Blue channel typically carries most of the detail (and noise). Here’s an example:
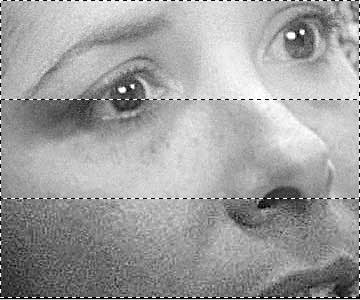
The image as a whole has an Unsharp Mask applied. In the three sections above, you can see the effect on (from the top) the Red, Green, and Blue channels. Notice how the sharpening has had a much greater effect on the Blue channel.
AVOIDING TEXTURED BACKGROUNDS
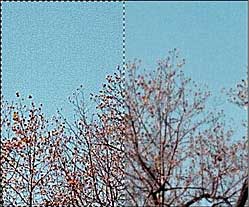
Buildings or trees against a blue sky, people in front of walls — anywhere that a detailed object appears before a plain surface, sharpening risks adding a texture to that surface. The sample image from the previous installments in this series gives a good example. Notice how the sky now has a pebbled look.
One way to avoid the problem would be, of course, too make a selection and sharpen everything except the background. That can be as simple as using the Magic Wand to select the background and using the command Select> Inverse. In other cases, sharpening one or two channels individually can be an easy solution.
SHARPENING CMYK IMAGES
Normally, sharpening should be done before conversion from RGB to CMYK color modes. However, when an image is received in CMYK mode and requires sharpening, consider sharpening only the Black channel. This, in many cases, provides the improvement necessary without introducing any unnecessary color shift.
SHARPENING IN L*a*b MODE
Converting an image to L*a*b color mode and sharpening just the Lightness channel can be a very effective technique for many images. The Lightness channel carries the can be considered the Brightness/Contrast part of the image’s pixel information. (The other two channels, a & b, carry the color information.) Keep in mind that sharpening works by increasing the contrast between pixels. By sharpening just the lightness channel, you’re working on only that information. Half of this image was sharpened in RGB mode (left). The color mode was then changed to L*a*b and the other half was sharpened, using the same settings, with only the Lightness channel active.
Notice that the general level of sharpening is comparable, but there’s a slight shift toward red in the left half (sharpened in RGB mode), and no color shift in the right half (sharpened in L*a*b mode).
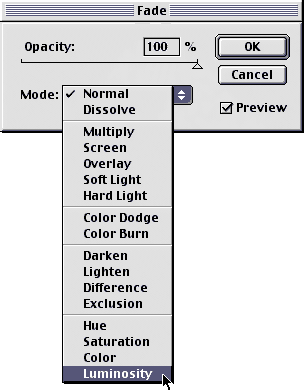
There’s another way to sharpen working with lightness, and you don’t even have to convert to L*a*b mode. (And that makes this technique better for CMYK images.)
• Apply the Unsharp Mask Filter.
• Photoshop 6: Edit> Fade Unsharp Mask.
• Photoshop 5.x: Filter> Fade Unsharp Mask.
• Change the blending mode to Luminosity.
And on the subject of the Fade command, using it can help take the edge off of a sharpening, so to speak. In the immortal words of Scott (Mr. Photoshop) Kelby, “Think of it as Filter-on-a-Slider.”
You may also find use for this little trick:
• Apply an Unsharp Mask.
• In the Fade Unsharp Mask dialog box, change the blending mode to Darken.
• Use the keyboard shortcut to apply the same Unsharp Mask settings. (Mac: Command-F; PC: Control-F)
• In the Fade Unsharp Mask dialog box, change the blending mode to Lighten.
Remember that very few images acquired from a digital camera or a flatbed scanner won’t benefit from judicious use of the Unsharp Mask filter.
