
Focus on Sharpening, Part 2
In the first installment of this series, we looked at the theory of sharpening and how it works. Now let’s take a look at the Sharpen filters and the Sharpen tool.
Photoshop offers four Sharpen filters and a single Sharpen tool. Each of the commands can be applied to an entire image or to a selection. The tool is pictured here as the active tool in the Toolbox (and is located below the cursor).
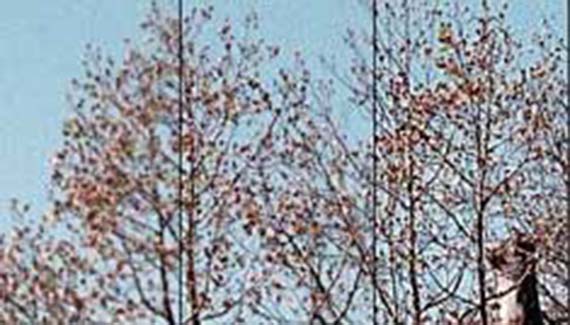
We’ll begin with a look at the Sharpen and Sharpen More commands. Neither of these commands offers you any level of control. They don’t have dialog boxes; they don’t have previews. They each apply a given set of sharpening parameters to the image, regardless of resolution or tonality. They sharpen all pixels in an image. For those reasons, they are seldom used. They can, however, do an effective (and quick) job. Below is part of a picture that is 72 pixels per inch (ppi), a low resolution image. It has been divided into three sections. On the left is the original, in the center the filter Sharpen has been applied, and on the right the filter Sharpen More has been applied. The results are viewed at 100%.
As you can see, the Sharpen command has done a fairly adequate job, while the Sharpen More command has over-emphasized the edges of the twigs and branches and has created a texture in the sky. When the same general area of the image is resampled to 250 ppi, the Sharpen command have almost no noticeable effect, and even the Sharpen More command seems to be a bit too little. (These filters can be applied multiple times.)
The Sharpen Edges command, like Sharpen and Sharpen More, has neither dialog box nor user-definable settings. Unlike the others, however, it doesn’t sharpen all pixels. Sharpen Edges looks for area where a discernable edge is present. The amount of sharpening applied, however, is miniscule and the filter is rarely useful.
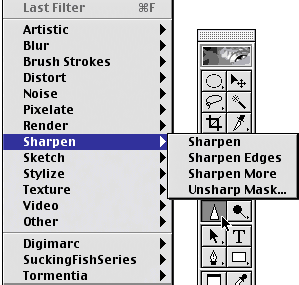
The Unsharp Mask command (sometimes referred to as USM) gives you control over the sharpening process. It is the most commonly-used sharpening tool because of its three sliders and preview window. The dialog box is shown below.
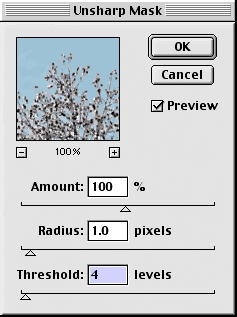
In addition to the Preview window shown, the image itself is updated as you work. The three controllable variables are:
AMOUNT: This determines the amount of contrast that will be added where ever Unsharp Mask finds an edge. The value can range from 1% to 500%. Typically, an Amount of 100% is a good starting point for a low resolution image, while 150-200% is more appropriate for high resolution images.
RADIUS: Ranging from 0.1 pixel to 250 pixels, the Radius setting determines how wide an area will be affected where Unsharp Mask finds an edge. (If you recall the ’halos“ discussed in Part 1 of this series, think of Radius as the thickness of the halos.) For most images, 1 or 2 pixels is adequate to restore detail.
THRESHOLD: Threshold can range from 0 to 255, just as any other 8-bit value. It determines how different much a pixel must vary from those neighboring to be sharpened. Threshold is used to actually find the edges. When 0 is chosen, Unsharp Mask will sharpen all pixels. Threshold also helps prevent the filter from introducing noise into areas of relatively uniform color. (Remember the texture created in the background by the Sharpen More filter in the second image?) Typically, a value between 2 and 20 is entered.
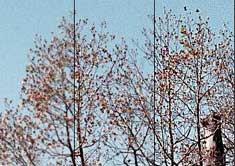
Let’s take a look at a comparison of two Threshold settings. Both halves of the image below have Amount set to 100% and Radius set to 1.5 pixels. On the left, Threshold was set to 1; on the right, Threshold was set to 6.
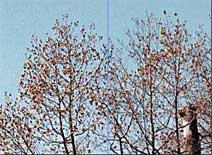
Notice the more subtle sharpening on the right, and the lack of added texture in the background. On the other hand, the smallest twigs and leaves at the ends of the branches are not sharpened at all on the right.
The other option available to you for sharpening is the Sharpen tool. The tool’s options are shown here. (The Options Bar has been shortened for convenience.)
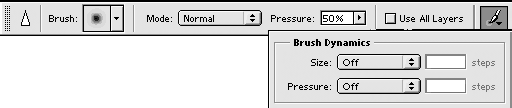
The Sharpen tool uses brushes, and the brush can be selected through the Brushes palette, just as with any painting tool. The blending modes available are Normal, Darken, Lighten, Hue, Saturation, Color, and Luminosity. Pressure, measured in percent, determines the intensity of the sharpening effect. When Use All Layers is checked, the Sharpen tool will increase contrast along all edges found below the brush. When unchecked, the tool is restricted to the active layer. Normally found to the right of the Options Bar, Brush Dynamics allows the Sharpen tool to fade either the brush size or the pressure as you drag. It also offers a Stylus option for use with drawing tablets.
In the next installment of this series, we’ll look at some specific sharpening techniques and ways to avoid certain sharpening problems.
