Three Tips for Image Noise Reduction
Digital grain, or noise, can’t always be avoided in photography. Despite massive advances in camera sensor technology over the years, noise is still a major issue for all different types of photographers. There are a few things you can do to help reduce the noise in your photos, one of the more useful ways is to use an AI image denoiser and we will get to that in a second. Ultimately, noise reduction starts when you’re shooting your photos, but powerful software can help you to correct noisy images. In this post, we’ll look at a few of the best tips to reduce noise in your photography.
Do it in Your Camera Settings
Increasing ISO of your photo will add more noise. If you can, keep your ISO as low as possible for the least amount of noise. If you need to gather more light for your image, consider increasing the shutter speed or opening up the aperture. Using a tripod can help you have the ability to open up your shutter speed, rather than the ISO, so the use of a tripod is generally recommended in low light situations. Sometimes, you have no choice but to increase the ISO, due to shutter speed or aperture constraints. In this case, you’ll have to use one of the other tips provided in this post. Also keep in mind that new software tools, such as an AI image denoiser, allow you to shoot at a much higher ISO to get the shot. These new technologies are incredible at removing noise and adding sharpness no matter the ISO.
Shoot in Raw
Raw files take up much more space on your memory card, but will result in photos that are much easier to adjust after you’ve taken them. Jpeg photos are compressed, so it is much more difficult to remove noise after the fact on jpeg photos, compared to raw. Raw files also work better when using software to reduce noise, there’s more data in these files for the software to interpret. Another benefit of using image noise reduction software on either file type is that programs like ON1 NoNoise AI give you amazing results regardless of raw or jpeg.
Use a Noise Reduction Plugin
Undoubtedly, most photographers will still run into noise problems in their photos, even when taking all precautions to reduce noise in their photos. For those times, using a noise reduction plugin, such as ON1 NoNoise AI can save your photos from being burdened by noise. ON1 NoNoise AI uses AI models to remove noise from your photos. This works much better than using the noise reduction slider in Lightroom or Photoshop. The results are incredible! Keep in mind that sometimes when reducing noise your image may start to lose details. Well, not any more. The newest version of ON1 NoNoise AI also includes the new Tack Sharp AI for saving out of focus shots, deblurring, or maintain your image details. You will get cleaner and crisper images using this AI noise reduction plugin.
Let’s look at how to use ON1 NoNoise AI. ON1 also offers a free Getting Started Course for ON1 NoNoise AI you can either stream online or download.
First, open your file into ON1 NoNoise AI. This can be used as a plugin, or as a stand-alone app.

Once open, zoom in to your image by using the options on the top of the screen. Start off between 100 and 200 zoom, and adjust as you see fit. Next, find the Noise and Sharpening Dialog box on the right side of the screen.
This is where you can adjust the settings to dial in the noise reduction. Start off by making sure that the “Auto On” box is present. If the box says “Auto Off”, click the box once to turn automatic settings on. This is a good place to start. Review the adjustment made by looking at your image, and sliding the bar in the center to the left and right. On the left side of the frame, you’ll see the image before any edits, and on the right side, you’ll see the image after. You can click and drag on the image itself to move around the frame.
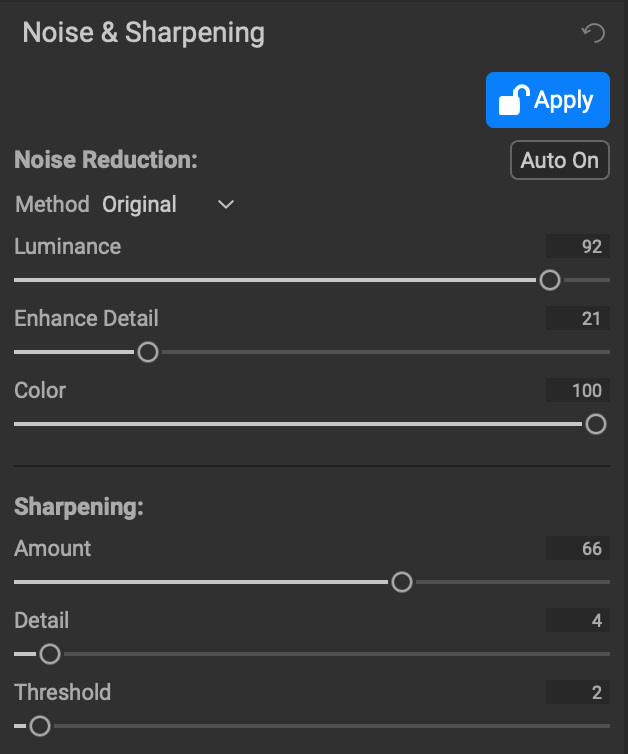
After you’ve reviewed your image, you can make changes to the automatic settings. If necessary, start by adjusting the Luminance slider, and then work your way down the sliders from there. Here’s a brief explanation of what each slider does:
Noise Reduction
Luminance: Effects how much or how little noise is removed from the image
Enhance Detail: Helps to bring more detail back into the photo, very similar to sharpening
Color: Targets color specific noise
Sharpening
Amount: Increases the amount of sharpening being added after noise reduction
Detail: Effects how detailed you want the sharpening to work
Threshold: Changes how much or how little is sharpening in the image
Once you’ve nailed in the perfect settings, click Done in the bottom right corner. Then, you’ll have the option of how and where you want to save your image. Save the image as you see fit and continue editing your photo in your normal workflow.
Noisy photos aren’t quite the detriment they were many years ago. With AI technology and a few in the field tips, you can basically eliminate noise from your photography.