
Here’s a quick technique to create a colorful confetti background and colorful text.
Start a new Photoshop file.
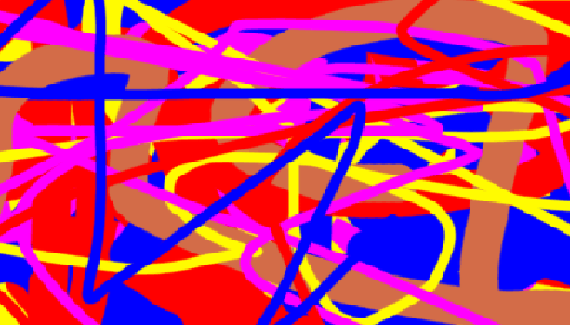
First thing to do is create a layer with bright colors in a random pattern.
Create a new layer and name it “Color.”
Click on the foreground color and select a bright, rainbow color and click OK. For this example I chose red.
Type Alt-Backspace (Windows) or Option-Delete (Mac) to fill the layer with the foreground color.
Type “B” to select the Brush Tool and select a 40 pixel brush, larger for a high resolution image.
Click on the foreground color and select another bright color and click OK. Paint random squiggly lines on the color layer. Then choose another bright color and paint more squiggly lines. Repeat this with 3 or 4 colors.
If one color gets covered too much, click the foreground color and move the cursor over the color on the layer and click to choose it. Then paint some more lines. There’s not much to this part, just paint several colors randomly on the layer. It’s supposed to look like a mess.
For the final touch you can choose a smaller brush and paint some small lines with different colors.
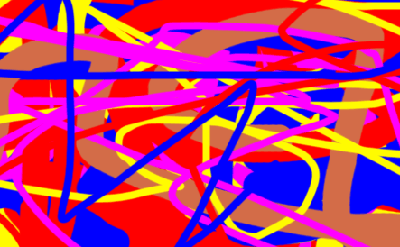
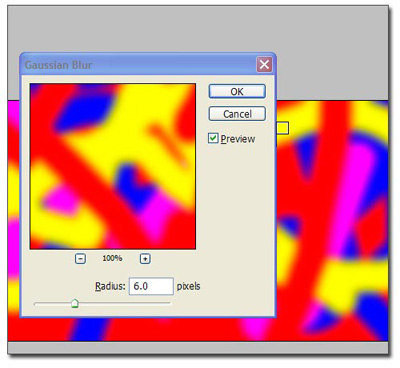
Blur the layer by selecting Filter, Blur, Gaussian Blur. Choose around 5 pixels or higher for higher resolution images.
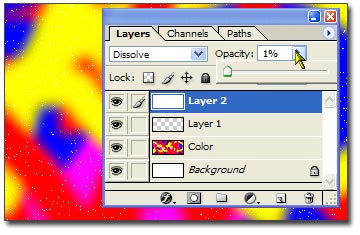
Next create two new layers above the Color layer.
Click the top layer to select it, and type Control-Backspace (Windows) or Command-Backspace (Mac) to fill the layer with the background color. The exact color doesn’t matter. Then set the Blend Mode to dissolve and the opacity to 1 percent. You’ll see a bunch of dots on top of your random colors.
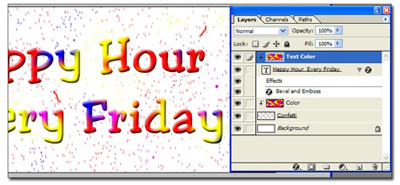
Currently the layer is a solid color with a dissolve blend mode, which looks like dots. Convert the solid color to actual dots by merging the layer with the empty layer below it. Type Control-E (Windows) or Command-E (Mac) to merge it down. Notice the new layer is at 100 percent opacity and consists of lots of small dots. Name this layer Confetti and move it below the Color layer.
Then select the Color layer and type Control-G (Windows) or Command-G (Mac). (Or select Layer and then Create Clipping Mask.) This joins the Color layer with the Confetti layer as a clipping mask. The top layer shows up only where the bottom layer has pixels. The result is a screen of random confetti.
Next, duplicate the Color layer and Alt-Click (Windows) or Option-Click (Mac) between the two color layers to remove the Color copy layer from the clipping mask. Name this copy “Text Color.”
Click on the Color layer and type T to select the Type tool. Then click on the screen and type some text. You won’t see the text yet, so on the Layers pallet, click the Text Color layer
Alt-Click (Windows) or Option-Click (Mac) between the text layer and the Text Color layer to create another clipping mask. Then position and edit the text to your liking.
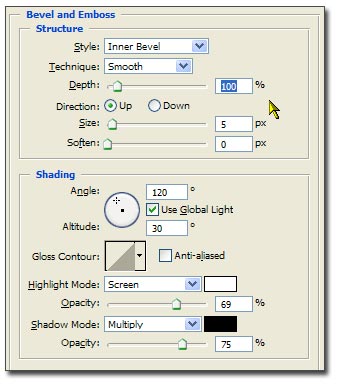
A good final touch is a Bevel on the text. On the Layers pallet, double click the right side of the text layer, and click the Bevel and Emboss effect. You can copy these settings or adjust the effect to your liking.
A Few Final Touches
You can paint a few larger dots or streaks on the Confetti layer, and then apply a slight motion blur to the confetti layer.
Another option is to resize the confetti by selecting the layer, typing Control-T (Windows) or Command-T (Mac) and dragging the corner handles and pressing Enter.
An option for the Text Color layer (for the text) is to spin it 180 degrees so the text coloring doesn’t match the confetti coloring.
By the way, this method of making dots can be used to create a star field on a black background.
Experiment with the confetti layer to see what you can come up with and have fun.
Dave Loebig is a graphic designer, writer and instructor in the Tampa area. You can contact him at BrandonBusiness.com.
