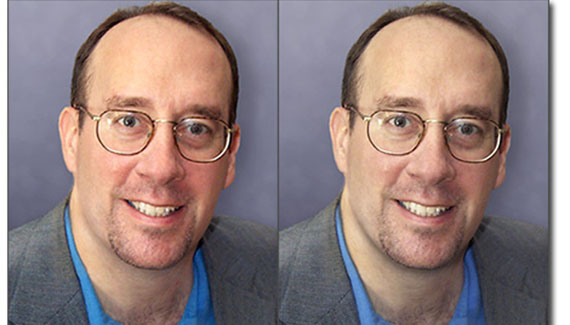
What one thing do most clients want done to their headshots? That’s right, they want the extra weight removed. Here’s one quick way that takes advantage of how the brain uses shadow to perceive depth.
Take a look at a thin person’s headshot and notice that there’s often a shadow right under the jaw line. Depending on the lighting, sometimes it’s a very thin line, but sometimes it’s wide and fairly dark. The brain naturally uses it to give the perception of an edge at the jaw, so you never notice it until you look for it.
Then look at a headshot of somebody with a little extra weight. The skin under the jaw line hangs down some and catches light, thus there is less shadow.
So, what can we do about it? We simply add a little shadow under the jaw, and while we’re at it, along the collar. Here’s how I do it.
Note: I use paths (vector shapes) throughout this tutorials, and you should be familiar with creating paths as well as modifying them before continuing. If you haven’t worked with vector drawings or paths before, you take a look at an excellent series of tutorials on paths by Peter Bauer.
Working with Vectors, Part 1
Working with Vectors, Part 2
Working with Vectors, Part 3
First, open the picture and create a new layer set above the picture. I always name this layer set “Defatten,” though I never tell my client. Type D to set the default foreground and background colors.
Next, create a crescent shape that opens toward the top of the picture.
Select the pen tool and select the “Shape layers” option.

Click at the back corner of the jaw line. Click and drag again closer to the front of the jaw line. Click and drag again near the bottom of the chin. Click and drag along the jaw line on the other side of the face, and again near the back of the jaw line.
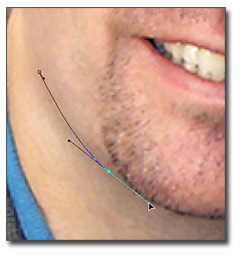
Click and drag below the jaw somewhere on the neck. Finally, click on the first point you created to close the shape.
You should have a shape similar to this example.
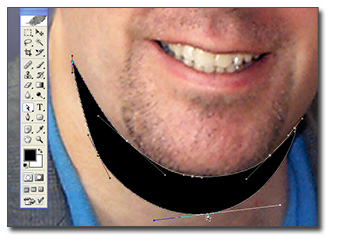
Next, with the Direct Selection Tool touch up the shape so it lines up with the jaw line. Type Shift-A to toggle between the Path Select Tool (the black arrow) and the Direct Selection Tool (the white arrow–that’s the one we want).
Click and drag the anchor points to put them directly on the jaw line.
You may also have to change the curve of the shape to line it up with the jaw line. With the Direct Selection Tool, click a point on the shape. Then click and drag a direction point to change the curve of the path.
Next, we’re only going to use this shape layer to create a selection, so turn the layer off by clicking it’s eye icon on the layer palette.
Type Control-Shift-N (Windows) or Command-Shit-N (Mac) to create a new layer. Type “Jaw Shadow” to name the layer and click OK. Hold the Control key (Windows) or the Command key (Mac) and click the shape later to create a selection.
You should be on the Jaw Shadow layer. Type Alt-Backspace (Windows) or Option-Delete (Mac) to fill the selection with the foreground color, black.
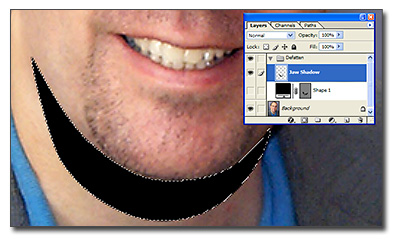
Type Control-D (Windows) or Command-D (Mac) to deselect. Type 5 to change the opacity of the layer to 50 percent.
On this shadow, the edge near the jaw should have a slight blur. Select Filter, Blur, Gaussian Blur. Choose around 1 or 2 pixels (higher for higher resolution images) and click OK.
The bottom part of the shadow should be very light and blurred. Create a layer mask by selecting Layer, Add Layer Mask, Reveal All. Click B to select the Brush Tool, and select a soft edge brush of around 20-50 pixels. (The size depends on the size of the picture.) Type 4 to set the brush opacity to 40 percent, and begin painting on the mask near the bottom of the shadow. You’ll end up masking most of the bottom part of the shadow, but don’t cover too much just yet.
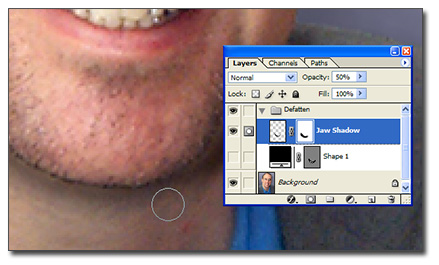
Change the opacity of the layer to around 20 percent and see how the shadow appears. Make it very subtle by adjusting the opacity of the layer and masking and unmasking more or less of the layer until you have something that looks real.
Finally, if the subject’s shirt or jacket collar is touching the skin, put a slight shadow in the space between the collar and the person’s neck.
Type Control-Shift-N (Windows) or Command-Shit-N (Mac) to create a new layer. Type “Collar Shadow” to name the layer and click OK. Type P to select the Pen Tool, and select the Paths option.

Type B to select the Brush Tool and choose a 3 to 5 pixel soft edge brush. Type 0 (zero) to set the brush opacity to 100 percent, and click the Paths pallete. Then click the Stroke path with brush icon.
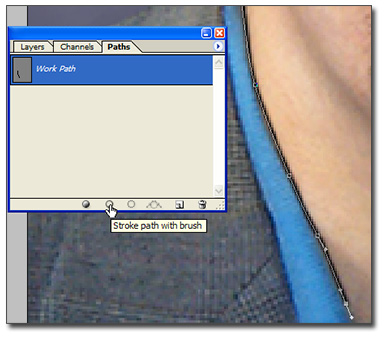
Click on the Paths palette in the blank space below the path to deselect it, and click the Layers palette.
Change this layer’s opacity to around 30 percent. If the shadow is still too sharp, blur the layer a few pixels or adjust the layer opacity to create another subtle shadow.
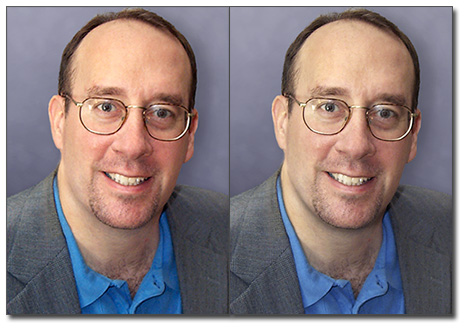
That’s a quick fix for a moderately overweight headshot. It doesn’t solve every weight related issue, but it quickly takes care of the basics. The key is subtlety. Don’t overdo it and don’t make the shadows too dark.
Dave Loebig is a graphic designer, writer and instructor in the Tampa area. You can contact him at BrandonBusiness.com.


Haha thanks for this tutorial, my mom will finally agree to take a family picture this time because of this!