
HDR Toning Workflow Tip

In Photoshop CS5 or CS6 step into the world of HDR Toning with this workflow tip. HDR Toning simply gives you an opportunity to apply HDR (High Dynamic Range) â˜like' effects without the need for multiple exposure images, however, it's current operation is that it flattens all layers within your document.
Step One: Open Choice Document
With Photoshop CS5 or CS6 open, go to the â˜File > Open' menu command and navigate to an image of your choice (.jpg or Camera Raw file format). I opted for a .jpg version of the following wooden statue I have in my home.
Tip: HDR Toning in Photoshop is classified as an â˜Image Adjustment' as opposed to a â˜Layer Adjustment'. The former will flatten all available Layers in the document into a single Layer image; the latter is a non-destructive adjustment and appears as a separate Layer that can be applied to all Layers (if it appears as the top-most Layer in the stacking order) or it can be clipped or isolated to a single Layer or a group of Layers below it.

Step Two: Smart Object â˜Chaining'
Once the image file is open the first workflow tip is to convert the image Layer (in my case it's called â˜Background') into a Smart Object Layer. The reason for this is because we will target the â˜contents' of the Smart Object Layer with the HDR Toning as this will offer the flexibility to work with the original document.
A. As captured below, with the original image Layer active (in my case' Background') go to the â˜Layer > Smart Objects > Convert to Smart Object' menu command to finalize the conversion. There will be no direct change to the document but the Layers Panel will update the Layer caption to â˜Layer 0' and append a Smart Object icon (encircled in red, below) to its Layer thumbnail. Next, double click directly onto â˜Layer 0' thumbnail to access its container contents.
B. A new document container/tab will open called â˜Layer0.psb'. Within this document container drag and drop the original â˜Background' image Layer onto the â˜New Layer' icon to create a copy called â˜Background copy'.
C. With â˜Background copy' layer active go to the â˜Layer > Smart Objects > Convert to Smart Object' menu command. At this point we now have a â˜protected' version of the original image file (Background) and the HDR Toning will be applied to the contents of the Smart Object â˜Background copy'. Double click directly onto â˜Background copy' Smart Object thumbnail to access its contents.
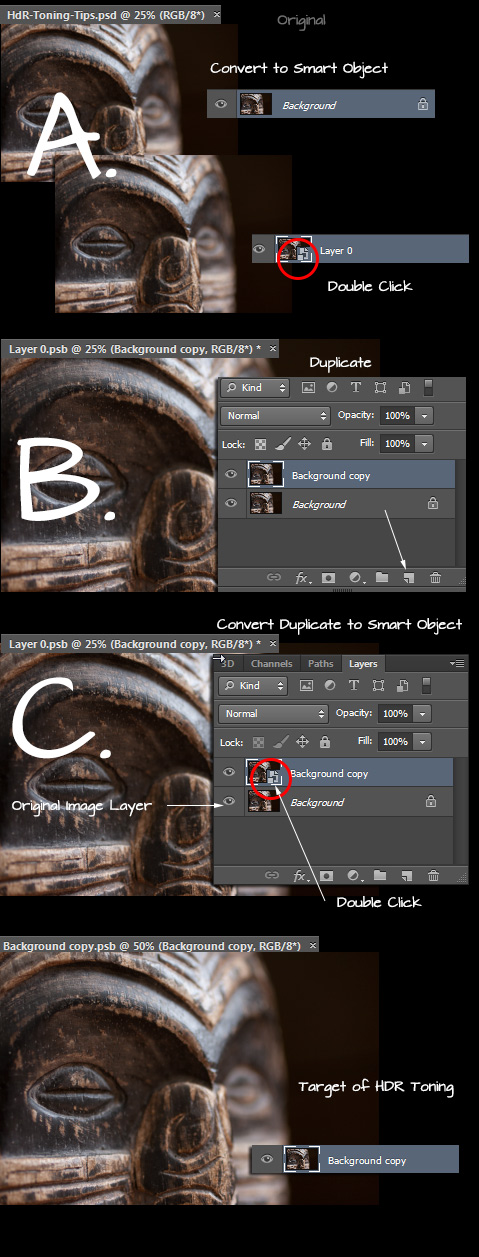
Ultimately, the above process â˜protects' the original image layer AND the current document workflow. The actual HDR Toning will be applied to the â˜'Background copy' nestled deep into a Smart Object. The changes will travel up the chain of Smart Objects, and as captured above (C) because the original image Layer is NOT part of this Smart Object â˜chain' it remains unscathed.
Step Three: HDR Toning
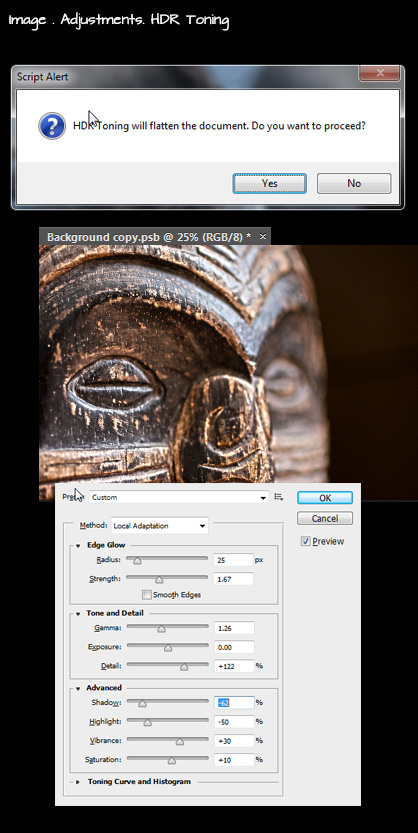
Now that we have access to the Smart Object container contents, go to the Image > Adjustments > HDR Toning menu command click â˜Yes' at the prompt to flatten the document, and then make the necessary adjustments as you see fit, then OK to commit.
Note: This walk-through is not necessarily geared toward a specific â˜look' but to show that you can preserve your original image contents and apply additional adjustments to the document.
Step Four: Step Save and Close Smart Objects
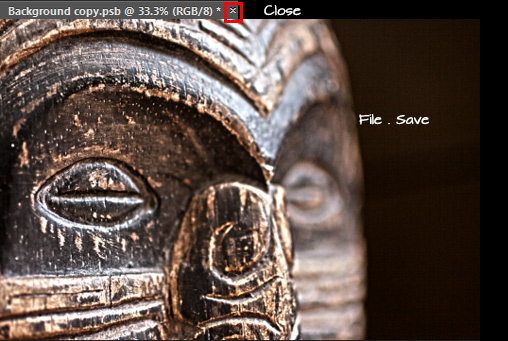
Now that the HDR Toning is in place, go to the File > Save menu command to commit changes to the Smart Object container. Then click the X to the right of the document tab title as I have captured below.
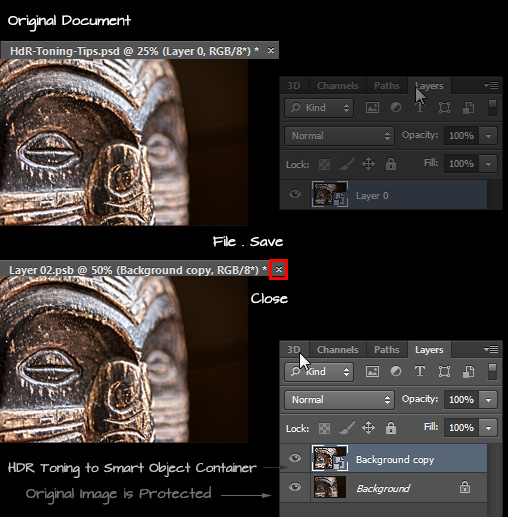
Repeat the File > Save and Close at the second Smart Object instance until you are brought back to the original document view.
Workflow Tips:
– Is you are unhappy or need to reapply HDR Toning to the original image layer, navigate back inside â˜Layer 0' Smart Object container delete the â˜Background copy' and repeat Step 2, B and C, followed by Step 3.
– You can add additional Layers or Adjustments to the document and not have to worry about them being flattened during the above process.
Until next week
Happy trails

I’m a big fan of Smart Objects (and of Planet Photoshop). I’m always being asked how to get the most out of Smart Objects. Nice to have a place I can send people for a simple (great) explanation. Thanks
I am HUGH Smart Object fan as well, Tom. Glad it helped.
Darrell