
Double Processing to Create the Uncapturable
Excerpt from The Adobe Photoshop Book for Digital Photographers (for Versions CS6 and CC)
NOTE: YES there is a newer version of this book, but this one has a landscape. ☺
As good as digital cameras have become these days, when it comes to exposure, the human eye totally kicks their butt. That's why we shoot so many photos where our subject is backlit, because with our naked eye we can see the subject just fine (our eye adjusts). But when we open the photo, the subject is basically in silhouette. Or how about sunsets, where we have to choose which part of the scene to expose forâ”the ground or the skyâ”because our camera can't expose for both? Well, here's how to use Camera Raw to overcome this exposure limitation:
Step One:
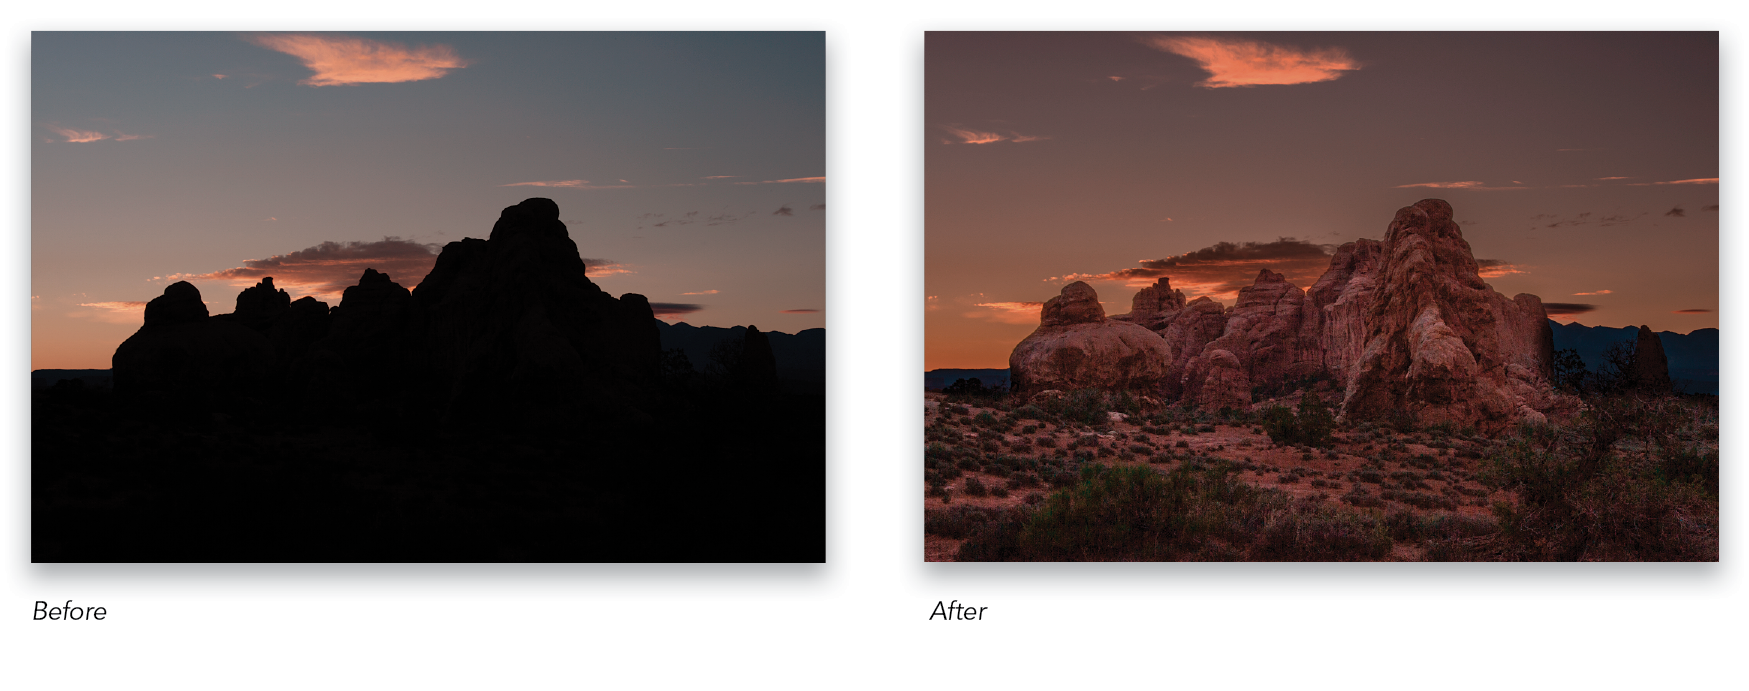
Open the photo you want to double-process. In this example, the camera properly exposed for the sky in the background, so the rock formation in the foreground is a silhouette. Of course, our goal is to create something more like what our eye sees, but our camera can'tâ”a photo where both the foreground rocks and the sky are each exposed properly. Plus, by double-processing (editing the same RAW photo twice), we can choose one set of edits for the sky and another for the rocks, to create just what we want.

Step Two:
Let's start by making the rocks visible. Drag the Shadows slider all the way to the right, and now at least you can see them, but it's still not enough, so you'll have to bump up the Exposure slider, as well (here, I've dragged it over to +1.00). The rocks look kind of "flat" contrast-wise, so bump up the Contrast a bit, too (let's go to +28). Lastly, since these are rocks, and we want to accentuate their texture, let's crank the Clarity up to around +40, and then make the little bit of color that's there more vibrant by increasing the Vibrance to around +37. Now, press-and-hold the Shift key, and the Open button changes to Open Object (as seen here). Click it.

Step Three:
Clicking Open Object makes your image open in Photoshop as a smart object (you'll see the layer thumbnail has a little page icon in the bottom-right corner). Now we need a second version of this image, because the sky looks way too light in this version. In our second version of this RAW file, we'll focus on just the sky. If you were to duplicate the layer by dragging it onto the Create a New Layer icon, the double-processing wouldn't work. That's because the duplicate layer would be tied to the original layer, so any changes you made to the duplicate would also automatically be applied to the original layer. We need to be able to edit these two layers separately from each other. Basically, we need to break the link between the two layers. To do that, go to the Layers panel, Right-click on the layer, and from the pop-up menu that appears, choose New Smart Object via Copy. This gives you a duplicate layer, but breaks the link to the original layer.

Step Four:
Now, double-click directly on this duplicate layer's thumbnail and it opens this duplicate in Camera Raw. Here, you're going to expose for the sky, without any regard for how the foreground looks (it will turn really dark, but who caresâ”you've already got a version with it properly exposed on its own separate layer, right?). So, drag the Exposure slider way over to the left (I went to -0.85), and drag the Highlights slider to -23 to help darken the sky. I also dragged the Temperature and Tint sliders a little to the right to warm the color of the sky, and lastly, I increased the Clarity to +35 (it made the clouds look a little more interesting). Once the sky looks good, click OK.

Step Five:
You now have two versions of your photo, each on a different layerâ”the brighter one exposed for the rocks in the foreground on the bottom layer, and the darker sky version on the layer directly on top of itâ”and they are perfectly aligned, one on top of the other. This is why we call it "double-processing," because you have two versions of the same image, each processed differently. Now what we need to do is combine these two different layers (with different exposures) into one single image that combines the best of both. It'll be easier if we have the image with the properly exposed rocks as our top layer, so click on that layer and drag it above the darker sky layer (as seen here). We'll combine the images with a layer mask, but rather than painstakingly painting it, we can cheat and use the Quick Selection tool (W). So, get it from the Toolbox and paint over the rocks and foreground, and it selects them for you in just a few seconds (as shown here).

Step Six:
Go to the Layers panel and click on the Add Layer Mask icon at the bottom of the panel (shown circled here in red). This converts your selection into a layer mask, which hides the light sky and reveals the new darker sky layer in its place (as seen here). It still needs some tweaking (for sure), but at least now you can see what we're aiming forâ”the brighter foreground rocks from one layer blended with the darker sky from the other layer.

Step Seven:
Now, you're going to lower the Opacity of this top layer (the brighter rocks layer), so it blends in a little better with the darker sky layer. Here, I've lowered it to 77%, and the colors match much better. Well, except for those blue mountain areas on either side of the base of the rocks, which look kind of funky. They're too bright, and a bit "glowy." We're going to have to fix that. Uggh!
TIP: Always Opening Your Images as Smart Objects
If you always want your RAW-processed images to open as smart objects, click on the workflow options link at the bottom of the Camera Raw dialog (the blue text below the Preview area), and when the dialog appears, turn on the Open in Photoshop as Smart Objects checkbox.

Step Eight:
Press the letter B to get the Brush tool, then click on the Brush icon in the Options Bar and choose a medium-sized, soft-edged brush from the Brush Picker. Also, to help blend this a little better, lower the Opacity of the brush (up in the Options Bar) to just 50%. Now, press D, then X to set your Foreground color to black, start painting over those blue mountain areas on the sides of the photo, and it paints back in 50% of the darker image, so it helps to hide those areas without making them solid black. If you make a mistake, switch your Foreground color to white and paint over your mistake to erase the spillover.

Step Nine:
Now, we have a pretty common problem to deal with here: along the edge, where the brighter rocks meet the darker sky, there's a little bit of a white fringe happening (I zoomed in here to 100%, so you can see it better). Luckily, that's fairly easy to fix, without having to take a tiny brush and paint all along that edge (which is how we used to do it, and we still sometimes do that for a little touch-up, but this isn't a little touch-up).

Step 10:
We're going to shift the edge of our mask a few pixels, so you don't see that white edge fringe any longer, and we'll let Photoshop do all the heavy lifting. Go under the Select menu and choose Refine Mask. This brings up the Refine Mask dialog you see here. First, to make seeing this white edge easier, from the View pop-up menu up top, choose On Black and now it really stands out, so you can see it clearly for what you're going to do next. In the Edge Detection section, turn on the Smart Radius checkbox and drag the Radius slider to the right until the white edge is almost gone (I dragged to 8.2). Then, under Adjust Edge, drag the Shift Edge slider to the left (as shown here) until the white edge disappears (as you see here, where I dragged to -25), then click OK. See, that was fairly easy. Again, if after doing this, you still notice a white pixel or two here or there, just take a very small brush (you're still at 50% Opacity with this brush) and simply paint over it to hide it.

Step 11:
Now, let's finish this baby off. Go to the Layers panel and, from the flyout menu at the top right, choose Flatten Image to flatten the image down to one layer. The image looks a little dark overall, so press Command-L (PC: Ctrl-L) to bring up the Levels dialog, and bring back some of the overall highlights by dragging the white Input Levels highlights slider (right below the far-right side of the histogram) to the left to brighten things up.

Step 12:
Lastly, I would do something to make the image a little more vibrant (and applying an effect to the combined image helps unify the look). You could reopen the image in Camera Raw (it's not a smart object any longer, so you'd have to do it the old-fashioned wayâ”see page 18). Instead, let's do a quick Lab Color move. Go under the Image menu, under Mode, and choose Lab Color. Now, go under the Image menu again and choose Apply Image. When the dialog appears, in the Source section, choose the "a" channel, then change your Blending mode to Soft Light. This adds color and contrast. Click OK, and then go back under the Image menu, under Mode, and switch back to RGB Color.


Learn how to do more from The Adobe Photoshop Book for Digital Photographers (for Versions CS6 and CC) here: http://kel.by/psccbook

