
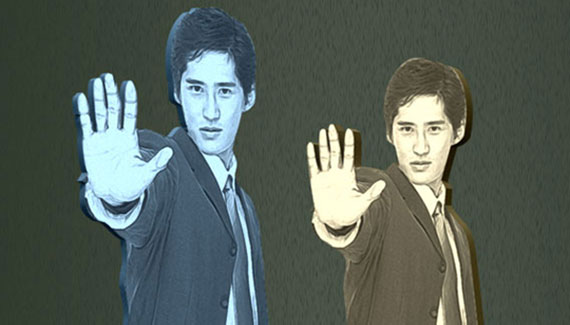
Using Photoshop CS6 create pop-up characters with ease by first isolating the subject from its surroundings then mixed with some filter effects including the new Oil Paint then a few conversions to 3D.
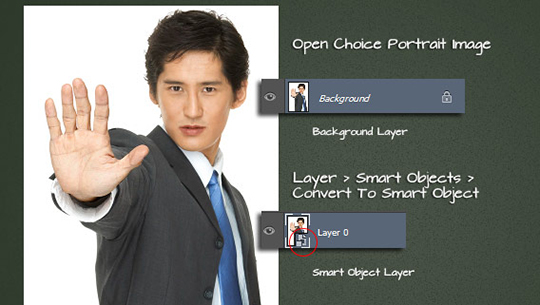
Open Choice Image
With Photoshop open go to the File > Open menu command and navigate to a portrait image file of your choice (preferably one with a solid background color - example mine has all white) to open it.
The image file will open as a â˜Background' Layer so before moving on to the portrait effects lets convert this layer into a Smart Object Layer. With the â˜background' layer active in the Layers panel go to the Layer > Smart Objects > Convert to Smart Object menu command. Once applied the â˜background' Layer will revert to â˜Layer 0' and a new Smart Object icon will be appended to the Layer thumbnail, as captured below (encircled in red).
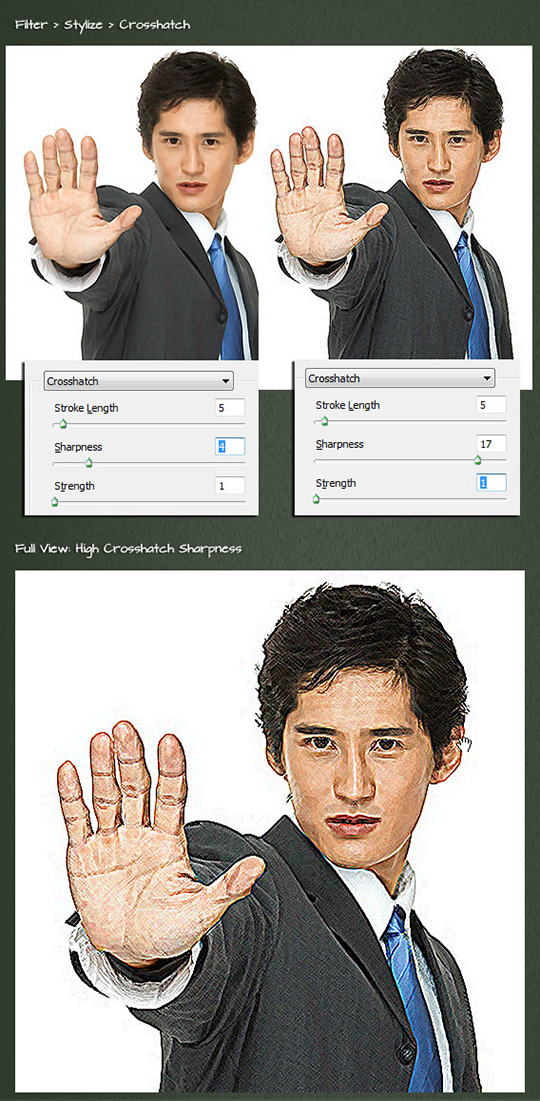
Step One: Filter > Stylize > Crosshatch
With the Smart image layer active (in my case Layer 0) go to the Filter > Stylize > Crosshatch menu command and explore the Stroke Length and Sharpness properties; Strength set to the default of 1. As captured below I toyed with Sharpness property for a soft (on the left) and harsh outlines (on the right).
Note: Photoshop CS6 has the Filter Gallery groups turned off by default. To enable them go to the Edit > Preferences menu command and choose the â˜Plug-Ins' option: then in the Filters section tick â˜Show all Filter Gallery groups and Names' then OK to commit and exit the preferences dialog.
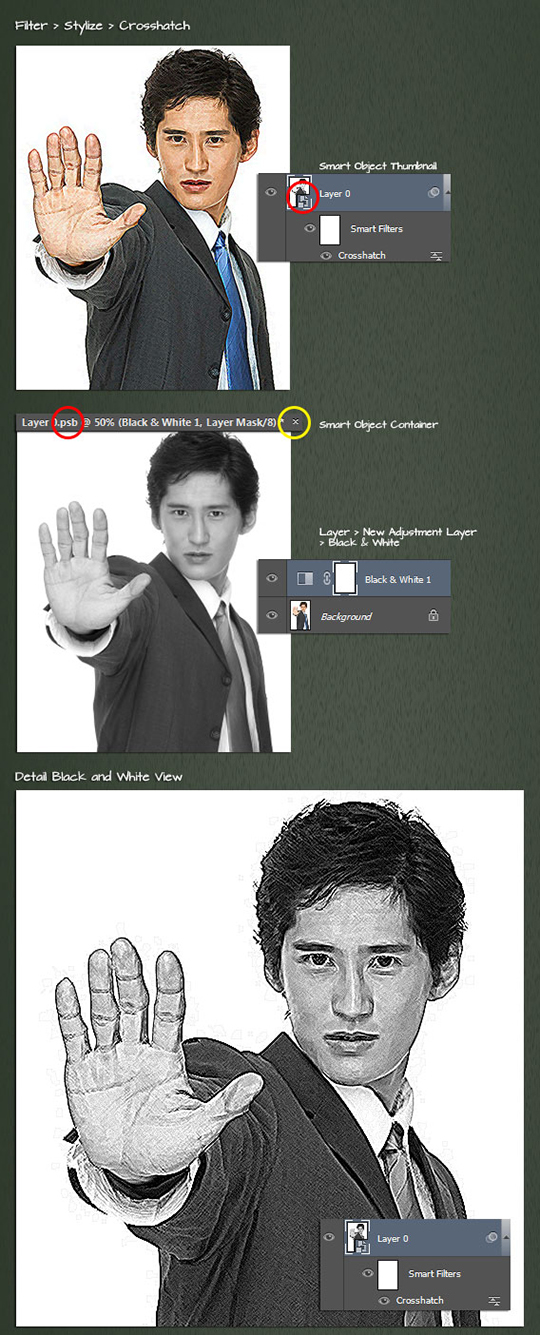
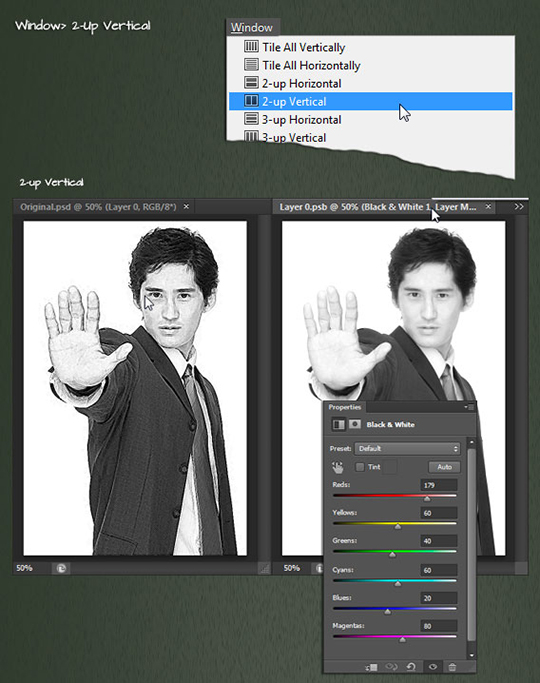
Step Two: Create Black and White Version
For an alternate black and white version let's add a simple Black and White Adjustment Fill layer inside of the current (in my case Layer 0) Smart Object Layer.
Double click directly onto the Smart Object Layer thumbnail (encircled in red, below). This will open the Smart Object Layer (.psb) document container. Then go to the Layer > New Adjustment > Black & White menu command and ensure it is placed as the top-most Layer in the stacking order. Then close (click the X, as captured below, encircled in yellow) to close and at the prompt choose Save to commit changes to the Smart Object container.
Smart Object Tip
Accessing and experimenting within Smart Object containers is a repetitive task. In the above use case when I added the Black and White Adjustment Layer I found myself experimenting with the its properties, particularly the â˜Reds'. Of course it's never a direct â˜hit' and I always resort to altering values, but process of opening, altering, and saving the Smart Object changes is incredibly repetitive.
One way to ease up on that process is to 2-up Vertical Tile the original and the Smart Object container. So in the case of experimentation all that is needed in the process is a Ctrl/Command + S (from the .psb document tab) to see the real-time preview to the original. Then close the Smart Object container document when you are content with the changes.
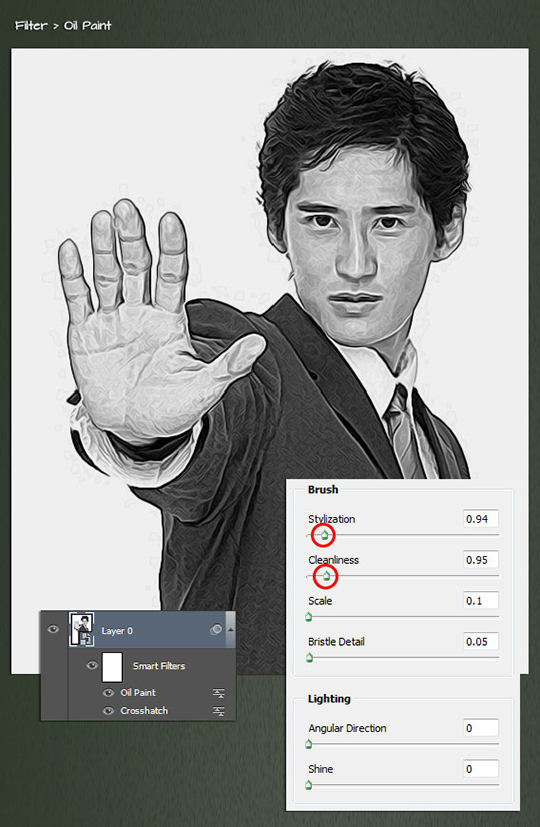
Step Three: Filter Oil Paint
Still with the Smart image layer active (in my case Layer 0) go to the Filter > Oil Paint menu command. At the Oil Paint dialog adjust the Brush: Stylization and Cleanliness properties to simulate a subtle â˜paint' effect. I opted for 0.94/0.95 values, respectively s captured below.
Leave the Lighting properties at 0 and the Scale and Bristle Detail will be ignored. Click OK to commit changes and the new Smart Filter will be applied and appended to the Smart Object layer in the Layers panel.
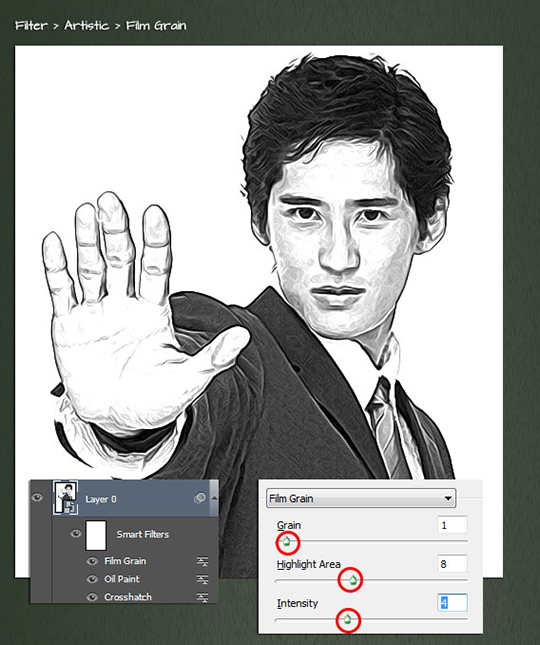
Step Four: Apply Filter > Artistic >Film Grain
Still with the Smart image layer active (in my case Layer 0) go to the Filter > Artistic > Film Grain menu command and adjust the three property sliders to introduce a little more highlights mixed with a touch of â˜grain', then click OK to commit and apply changes.
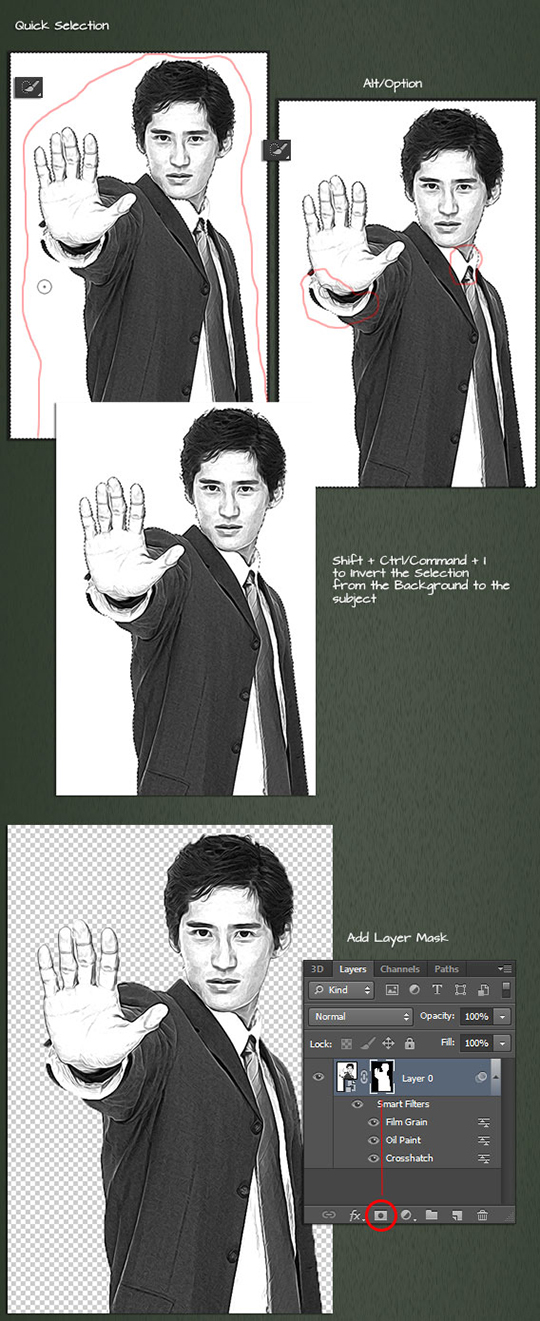
Step Five: Quick Select Background
Now that the portrait effects are in place lets isolate the subject from the white background.
Using the Quick Selection Tool- select the background areas outside the subject (as marked by the red line); then Alt/Option click to subtract areas that seeped into the original selection; then Shift + Ctrl/Command + I to Invert the selection from the background to the foreground subject.
Then click the Add Layer Mask icon at the bottom of the Layers Panel to apply it to the active Layer. As captured, below, bottom, we now have an isolated subject with transparency.
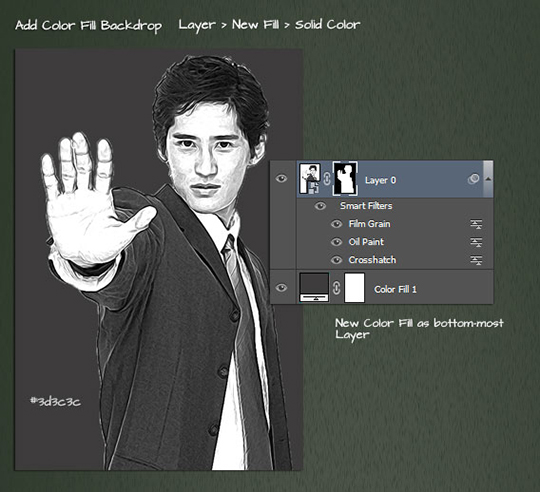
Step Six: Add Base Backdrop
Now that we have transparency, the image still needs a backdrop and a Solid Color Fill shall suffice. Go to the Layer > New Fill > Solid Color menu command and at the Solid Fill dialog select a color. I opted for a dark grey then click OK to add it to the document. Ensure that the new Color Fill layer is the bottom-most Layer in the Layer stacking order as captured below.
As you can see the â˜cut-out' suffers from some fringe edges.
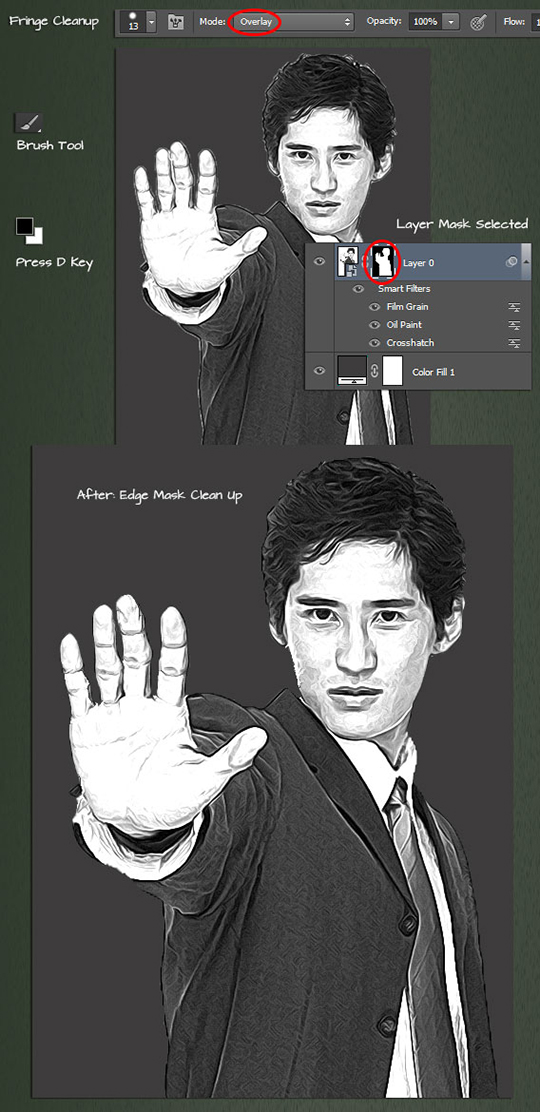
Step Seven: Fringe Clean-Up
This step is optional if your image does not exhibit such fringe edges. A quick remedy is to simply â˜brush' away the edges using an Overlay Blend Mode with Foreground color set to Black.
As captured below: Ensure the Layer Mask thumbnail is active; Press the D key to reset the default swatches to Black/White; Activate the Brush Tool and on the Options Bar set the Brush Tip to a Hard edge and change the Blend Mode to Overlay.
With these options in place selectively brush along the edges of the subject and watch the fringes disappear. In some cases a single brush stroke will work but for most, successive brush strokes (click, stroke and release) over the same area will do the trick.
As captured, below, bottom a full detail view of the cleaned up image layer.
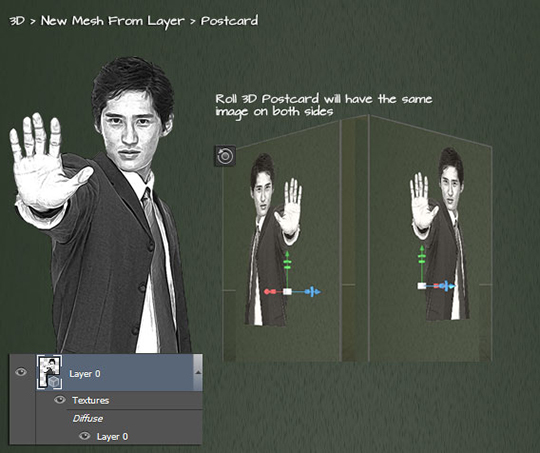
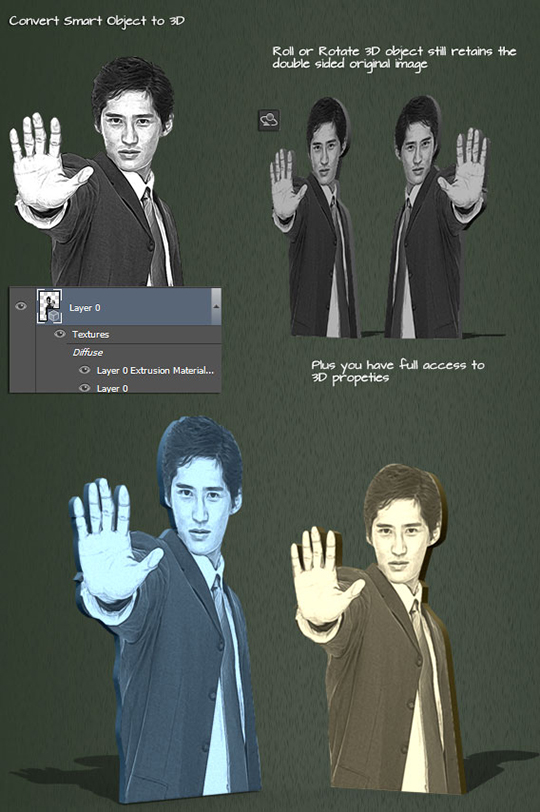
Step Eight: Convert Smart Object to 3D Layer: Postcard
Now on to some 3d fun: with the Smart Object image Layer active go to the 3D > New Mesh from Layer > Postcard menu command.
The Smart Object is now a 3D postcard Layer and if you select the Move Tool, and from the Options Bar activate the 3D Roll Tool dragging the 3D object from left or right you will see that the original image is now on the front and back of the 3D object.
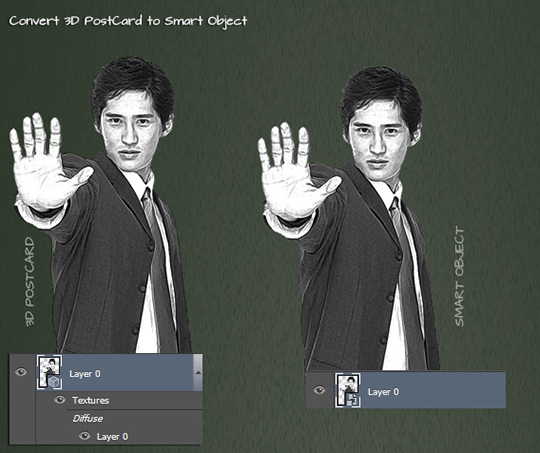
Step Nine: Convert 3D Postcard to Smart Object
Now that we have the â˜two-sided' 3D postcard we need to convert the 3D Layer to Smart Object again. With the 3D Postcard layer active in the Layers Panel (in my case Layer 0) go to the Layer > Smart Objects > Convert to Smart Object menu command.
Step Ten: New 3D Extrusion from Selected Layer
Now let's convert the Smart Object layer into a 3D Layer again- with the Smart Object layer active go to the 3D > New 3D Extrusion from Selected Layer menu command.
Until next week
Happy trails
http://www.heathrowe.com

Thks for tut, awesome, good luck to u