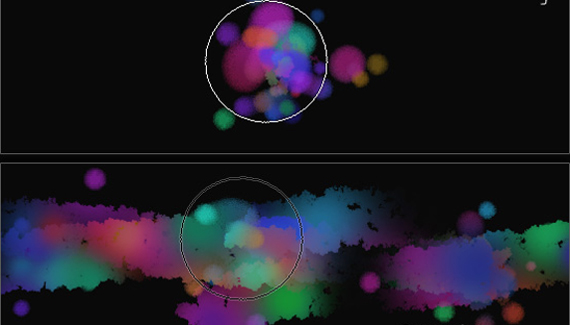
Using Photoshop 7 or above craft your own water color Brush Presets and along the way I’ll show you how to preserve the color scheme used during its creation.
Step One: Create New Document Preset
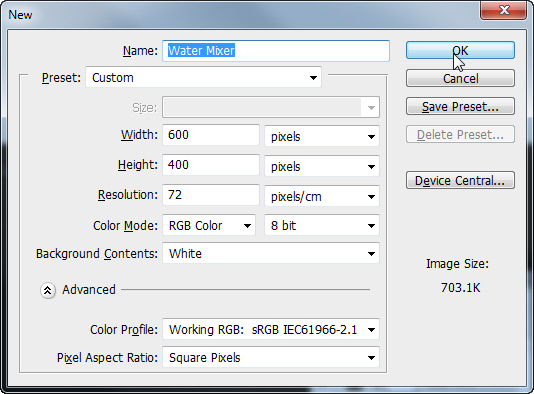
Open Photoshop and choose File > New and create a document preset of your choice. I opted for 600×400 with White Background Content.
Step Two: Document Preparation
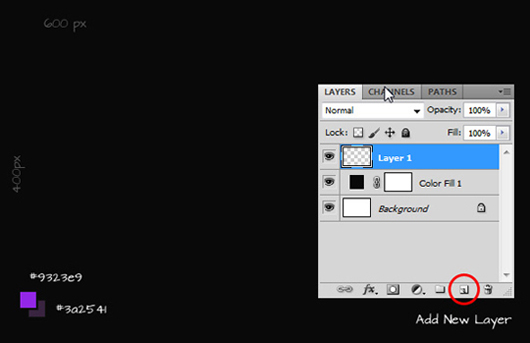
Before setting up the Brush Preset dynamics add a Solid Color Fill Layer (Layer > New Fill Layer > Solid Color) using Black(#000000) to create a Color Fill 1 Layer as captured below in the Layers Panel. Then click the Add New Layer icon command located at the bottom of the Layers Panel to create an empty Layer (called Layer 1) positioned at the top of the Layer stacking order.
Set Foreground/Background Color swatches to a complimentary color scheme of your choice. I opted for a light purple foreground/ dark purple background.
Step Three: Brush Dynamics: Select Tip Shape
Now let’s configure the Brush Tip for the water color preset we are about to create.
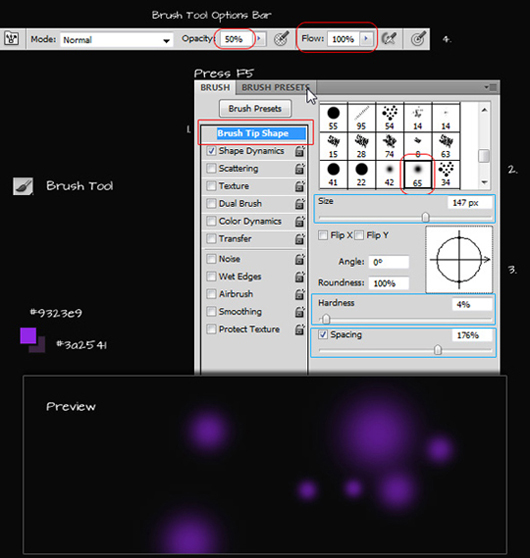
Select the Brush Tool (B) from the toolbar. Then press the F5 Key (or go to the Window > Brush menu command) to bring up the Brush Dynamics Panel.
Select the very first tab option in the left window pane, called Brush Tip Shape (1); when selected it should highlight in blue as I have captured below. Then in the right window pane, select the a default preset from the thumbnail list called ‘Soft Round 65’, as I have encircled in red (2). Then below this thumbnail list alter the default properties of this preset tip: (3) increase the Size – I used 147px; lower the Hardness – I opted for 4%; increase the Spacing – I opted for 176%. Once these preset tip options are in place, go to the Options Bar (4) for the active Brush Tool and adjust the Opacity to 50% and the Flow to 100%.
My preview capture shows what it would look like at this stage when tested on Layer 1.
Step Four: Adjust Scattering Brush Preset Property
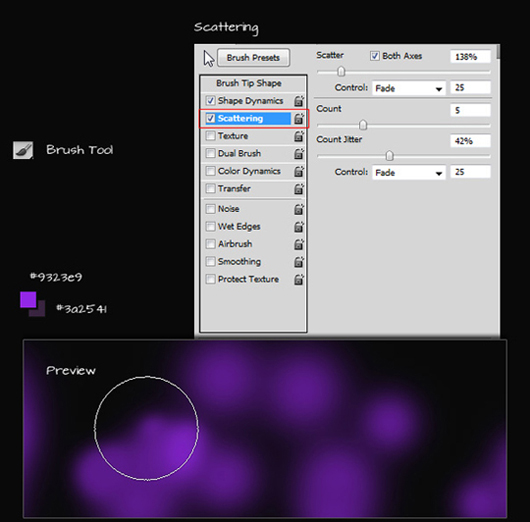
Still in the Brush Dynamics Panel, tick & select the Scattering option from the left pane, then adjust the Scatter, Count, and Count Jitter as I have in the right pane, as I have captured below.
My preview capture shows what it would look like at this stage when tested on Layer 1.
Step Five: Adjust Dual Brush Preset Property
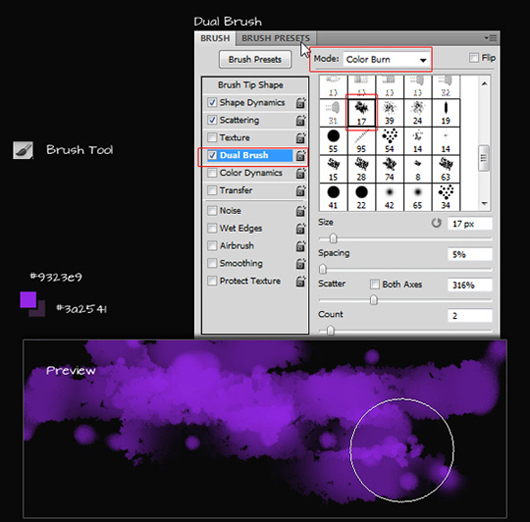
Next, tick & select the Dual Brush option from the left pane; then in the right thumbnail pane area choose another brush preset – I opted for Chalk 17px; set its Color Mode to Color Burn; then adjust its Size, Spacing, Scatter and Count properties as I have captured below.
My preview capture shows what it would look like at this stage when tested on Layer 1.
Step Six: Initiate Type Mask
Now let’s initiate the Type Mask directly onto the ‘copy’ Layer Mask.
1. Select the ‘copy’ Layer Mask thumbnail;
2. Select the Horizontal Type Mask Tool from the toolbar;
3. Configure your choice of Type Tool Options: Font Face, Size and Anti-Alias;
4. Then click once, anywhere directly onto the document to initiate the Type Mask Tool;
When you initiate Type Masking, quick mask mode kicks in showing a red overlay as I have captured below.
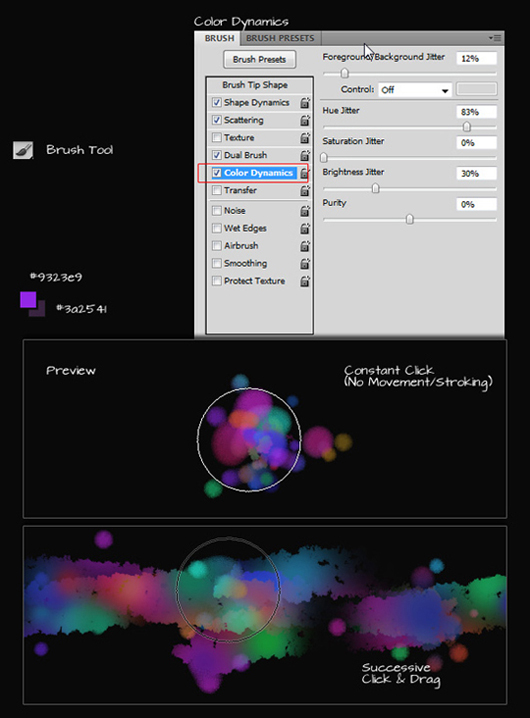
Step Seven: Save As New Preset
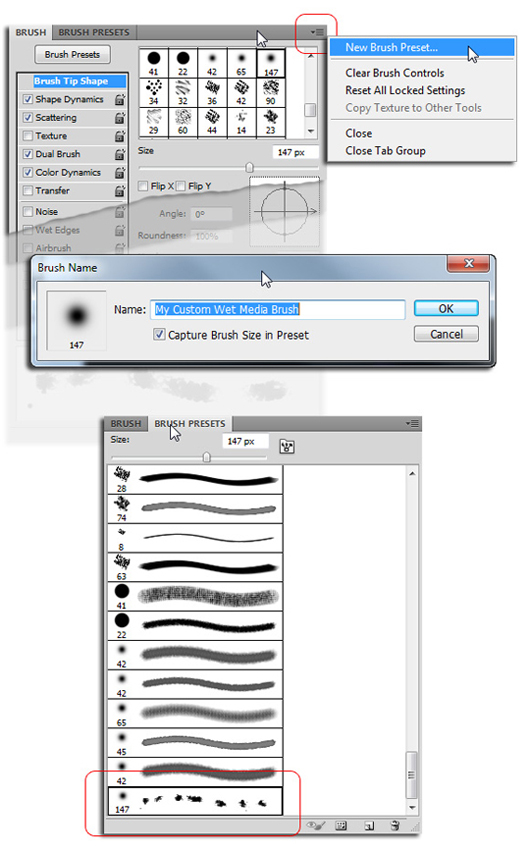
Once the new dual brush media preset is complete, click the Brush Dynamics property icon and from the contextual list choose New Brush Preset. At the prompt give the Brush a user friendly name and click OK. You now have a saved version of the preset in the preset collection list, as captured below.
So anytime, you access the Brush Dynamics or the Brush Preset Picker from the Options Bar you can choose from the new Brush Preset.
Note: Saving the new Brush Tip does not ‘capture’ the foreground/background colors. So be aware that though this tutorial starts with a non-default swatch color scheme and employs Dual Brush options, you have to set up/or alter the swatch color scheme when in use. The Options Bar Opacity and Flow controls are also not captured during the saving of new Brush Preset. See the following tip to preserve the color scheme as well as the Options Bar properties.
Tip: Create Brush Tool Preset – Include Color
To preserve the color scheme, as well as, the full Options Bar property, for a specific Brush Preset (such as the one created above) we will rely on a separate Brush Tool Preset.
With all the above Brush Dynamics in place (or reselect the previously saved preset to bring back all the options if you toggled to a different preset), the Brush Tool active, and the Fore/Background Color swatches set; select the Tool Preset Picker down arrow icon command; then in the Picker panel, click the Create New Tool Preset icon command located to the right; at the New Tool Preset prompt, give it a user-friendly name and ensure to enable Include Color, then OK.
As captured below, bottom, the new Brush Tool Preset is at your fingertips from the Tool Preset picker, with the color scheme that was active when created.
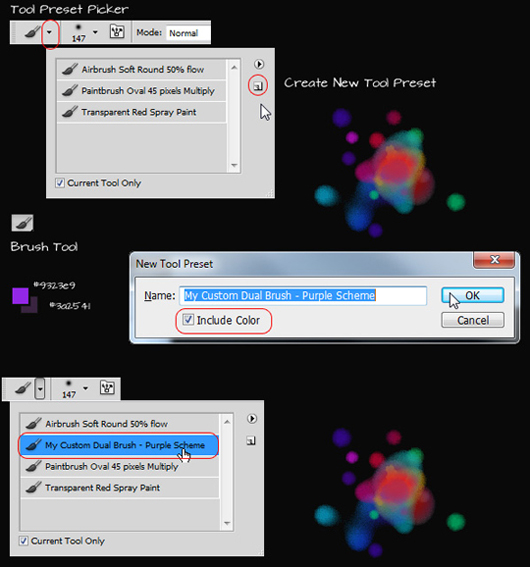
From there you can alter the Foreground/Background color swatches to a new color scheme; and/or adjust the Options Bar properties (Mode, Opacity, and Flow); then create additional Brush Tool Presets.
The above routine was just a single ‘dual brush’ example; you can go back into the original Brush Preset dynamics, apply tweaks and save as variations; then re-apply the Brush Tool – Include Color onn the variations using different color schemes.
Until next week
Happy trails
http://www.heathrowe.com

