
One of our senior graphic designers, Margie Rosenstein, asked me to watch the new season intro for So You Think You Can Dance so I could see the geometric, vector-looking video graphics that were used in it. They combined a da Vinci-style mechanical rendering with a Minority Report-like computerized vector effect that was freakin' cool. She thought it would make a good "Down & Dirty Tricks" column, and she was absolutely right. So right, in fact, that we used it for the September 2014 issue cover design. Here's how we created it.
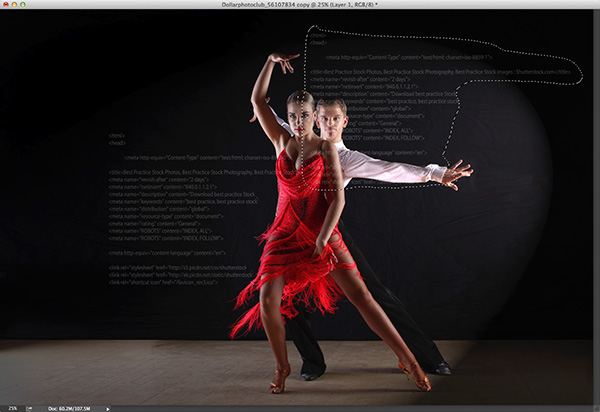
Step One: Open an image where the subject could convey geometric movements or shapes (we used dancers in our example, but you could use BMX riders, basketball players, figure skaters, etc.). Now, open an image of some computer code. Using the selection tool of your choice (we used the Lasso tool [L]), make a selection of a portion of the code, then switch to the Move tool (V) and click-and-drag it onto the first image you opened. This will add a new layer (Layer 1) to the Layers panel. If necessary, press Command-T (PC: Ctrl-T) to enter Free Transform and resize and reposition Layer 1. (Note: Based on the resolution of the image that you use for this tutorial, you may need to experiment with the various settings used in each of the steps.)
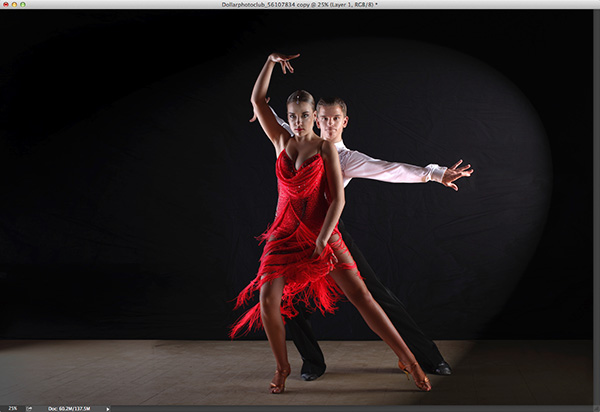
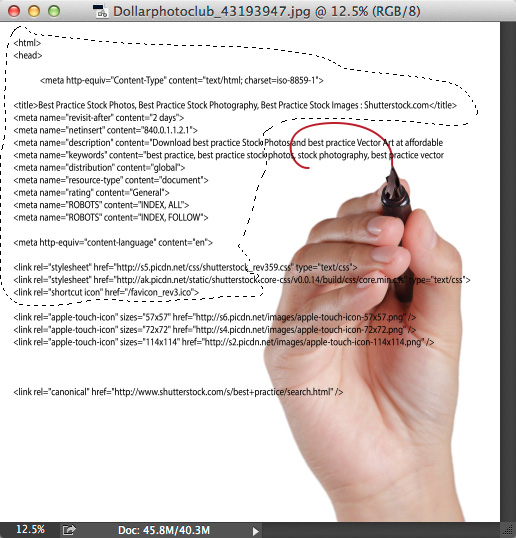
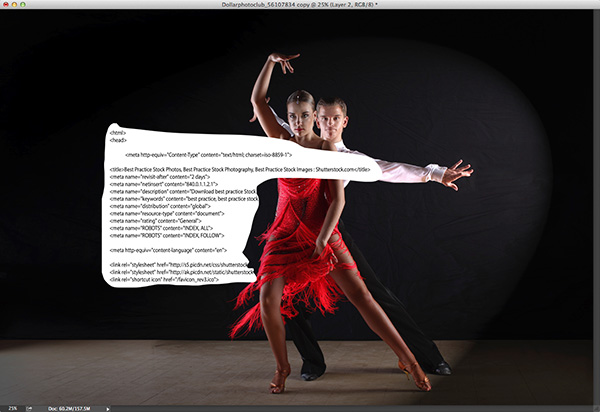
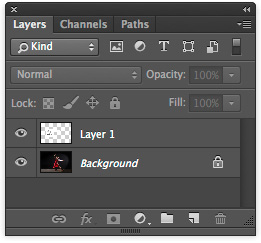
â”CREDIT: ©air/Dollar Photo Club; ©buchachon/Dollar Photo Club
Step Two: With Layer 1 as the active layer, press Command-I (PC: Ctrl-I) to invert the selection. Change the layer blend mode to Screen to knock out the black around the text, and lower the Opacity to 25%. Command-click (PC: Ctrl-click) directly on the Layer 1 thumbnail to load it as a selection. Press-and-hold the Option (PC: Alt) key, and click-and-drag the selection up and toward the right to duplicate it on the same layer (Layer 1). Do this one more time and drag the selection just below the copy you just created so you have three sets of code. Press Command-D (PC: Ctrl-D) to deselect.

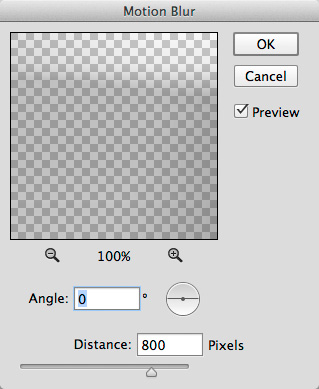
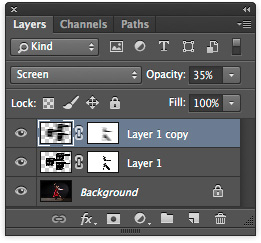
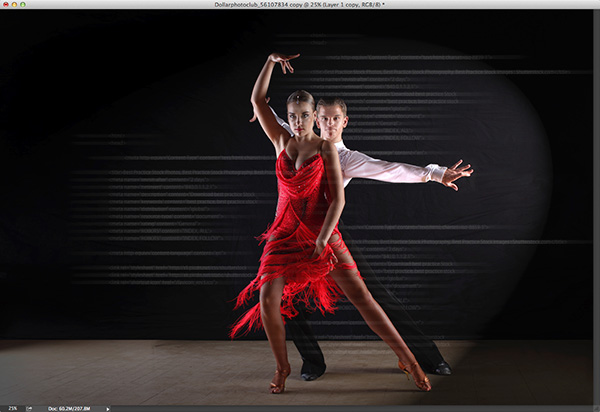
Step Three: Click the Add Layer mask icon (circle in a square) at the bottom of the Layers panel. Choose the Brush tool (B) from the Toolbox. Press D then X to set the Foreground color to black, then using a soft-edged brush, paint away the code areas over the faces, arms, and legs. Lower the layer Opacity to 10%. Now, duplicate Layer 1 (Layer 1 copy) by dragging it onto the Create a New Layer icon at the bottom of the Layers panel. Raise the Opacity of Layer 1 copy to 35%. Go to Filter>Blur>Motion Blur. Enter 0° for Angle and 800 pixels for Distance, and click OK.
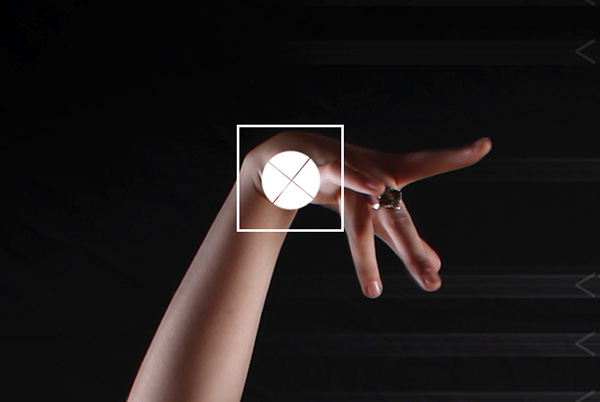
Step Four: Press D then X to set the Foreground color to white. Click the Create a New Layer icon to add a new layer (Layer 2). Using a hard-edged brush, paint a circle over the topmost portion of your subject (the hand in our example) to create a target or connection point. Choose the Single Column Marquee tool (nested under the Rectangular Marquee tool [M]) and click in the center of the circle you just created. Press Delete (PC: Backspace), then deselect. Choose the Single Row Marquee tool and click in the center of the circle again. Press Delete (PC: Backspace), then deselect. Press Command-T (PC: Ctrl-T) to bring up the Free Transform bounding box. Rotate -45º and press Enter to apply the transformation.


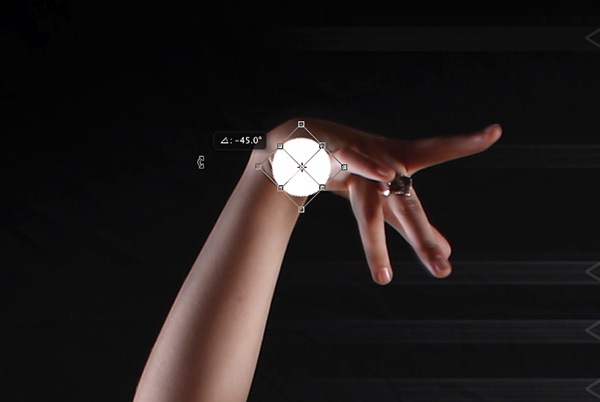
Step Five: Choose the Rectangular Marquee tool. While holding down the Shift key (to constrain the selection), make a rectangular selection around the circular target we just created. Go to Edit>Stroke, enter 3 pixels for Width, and click OK. Command-click (PC: Ctrl-click) the Layer 2 thumbnail to load it as a selection. Press-and-hold the Command-Option (PC: Ctrl-Alt) keys, and click-and-drag the selection (to duplicate it) over three other connection points (the male's hand, her right knee, and left toe in our example). Deselect. Set the Fill for Layer 2 to 75%. Click the Add a Layer Style icon (Æ’x) at the bottom of the Layers panel and choose Outer Glow. Choose Overlay for Blend Mode, 25% for Spread, 100 px for Size, and click OK.

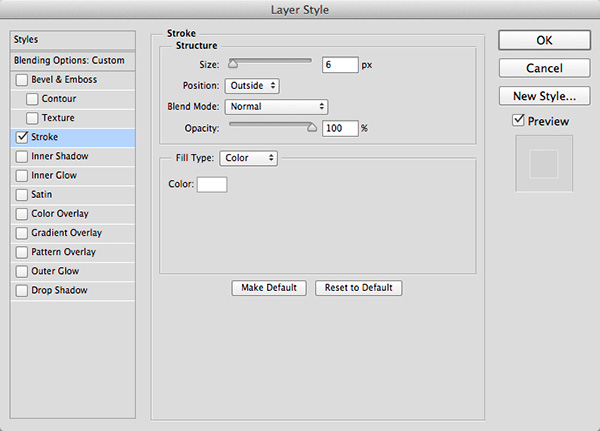
Step Six: Create a new layer (Layer 3) and change the blend mode to Overlay. Choose the Polygonal Lasso tool (nested under the Lasso tool) from the Toolbox. Click on each of the targets you just created to make a selection (see example). Click on the Foreground color swatch, choose a blue color (R:12, G:66, B:224), and click OK. Press Option-Delete (PC: Alt-Backspace) to fill the selection. Click the Add a Layer Style icon at the bottom of the Layers panel and choose Stroke. Enter 6 px for Size, click on the Color swatch, choose white, and click OK. Click OK again to apply the layer style. Lower the Opacity to taste, and deselect.
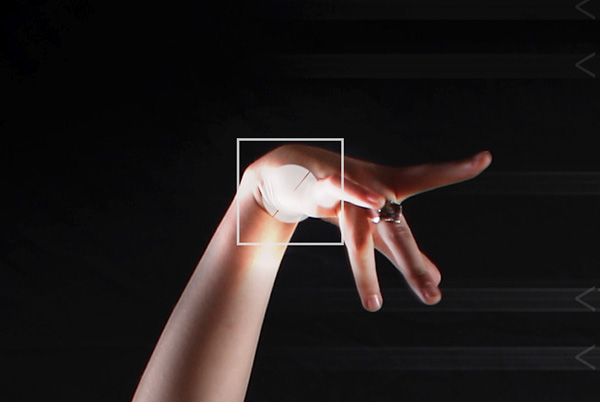

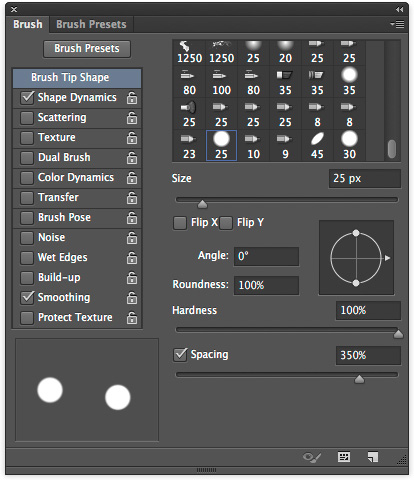
Step Seven: Create a new layer (Layer 4) and change the blend mode to Soft Light. Choose the Ellipse tool (nested under the Rectangle tool [U]) from the Toolbox. Go to the Options Bar and choose Path from the drop-down menu on the left. While holding down the Shift key (to constrain the path), make a circular path from one wrist toward the other (see example). (Tip: To reposition the circle as you're drawing it, press the Spacebar.) This will create a Work Path in the Paths panel (Window>Paths). Press D then X to set the Foreground color to white, and choose the Brush tool. Go to Window>Brush. In the Brush panel, Enter 25 px for Size, 100% for Hardness, and 350% for Spacing. Go to the Paths panel. With the Work Path selected, click the down-facing arrow at the top right of the Paths panel and choose Stroke Path. When the Stroke Path dialog appears, choose Brush from the Tool menu, and click OK. Press Delete (PC: Backspace) to remove the work path in the Paths panel.
Note: You can create different-sized work paths and stroke them individually as many times as you wish on the same layer (we added one larger circle around the dancers).


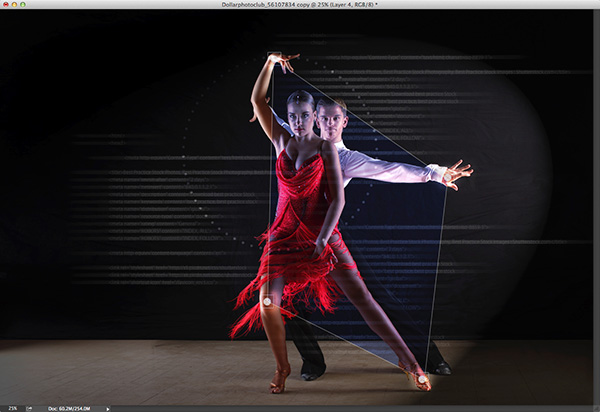

Step Eight: You can also use the Brush tool without paths to create diagonal lines. Simply click on a starting point (the right hand of the male dancer in our example). Now, hold down the Shift key and click on an ending point (just beyond and below the left hand of the male dancer in our example). The brush will follow where you click as long as you hold down the Shift key.
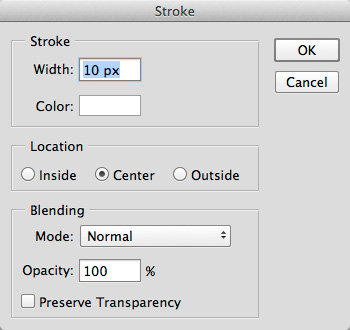
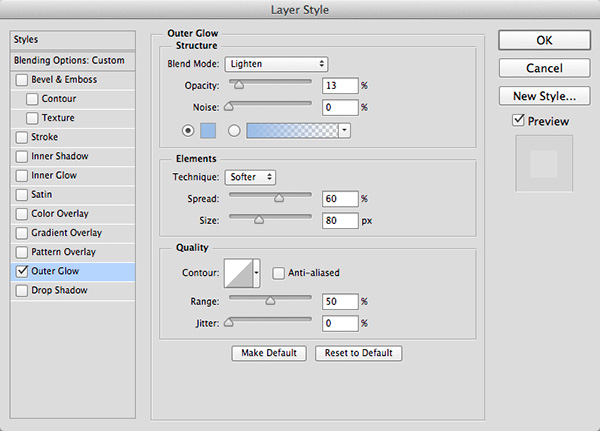
Step Nine: Create a new layer (Layer 5), change the blend mode to Screen, and lower the Fill to 50%. Choose the Elliptical Marquee tool (nested under the Rectangular Marquee tool). Make a circular selection over the smaller dotted circle we created in Step Seven. Go to Edit>Stroke, enter 10 px for Width, and click OK. Click the Add a Layer Style icon and choose Outer Glow. Choose Lighten as the Blend Mode, enter 13% for Opacity, click on the color swatch, choose a light-blue color (R:155, G:189, B:231), and click OK. Enter 60% for Spread, 80 px for Size, and click OK to apply the layer style.
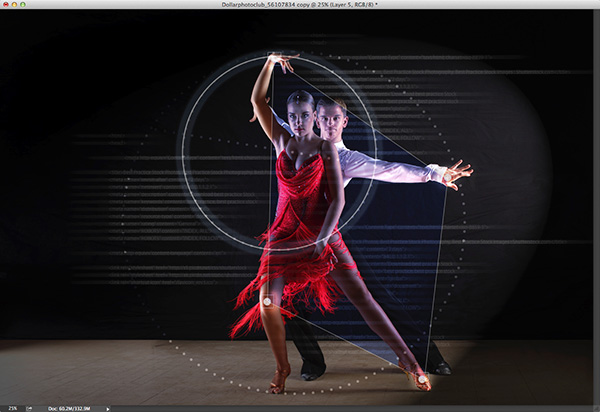
Step Ten: Click the Add Layer Mask icon. Choose the Gradient tool (G) from the Toolbox. Click the gradient thumbnail in the Options Bar. In the Gradient Editor dialog that appears, choose Foreground to Transparent, and click OK. Click the Linear Gradient icon in the Options Bar, then click-and-drag a gradient from the center toward the left of the circle you just created (you may have to press X to set the Foreground color to black).
Note: You can add as many circles as you want, but you may have to adjust your layer mask depending on where you want the circles to appear.
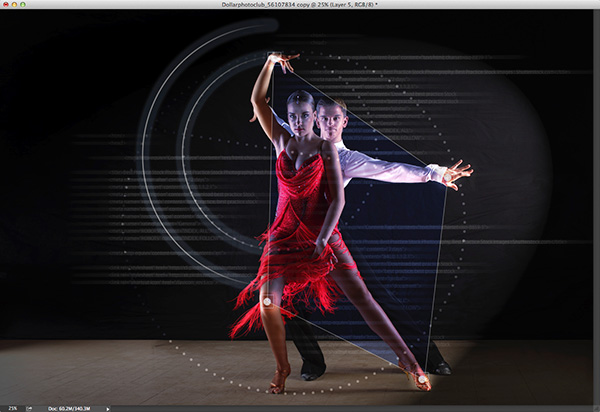
Step Eleven: Create another new layer (Layer 6), change the blend mode to Soft Light, and lower the Opacity to 50%. With the Elliptical Marquee tool, create a circular selection over the center of the image and press Option-Delete (PC: Alt-Backspace) to fill the selection with white. Go to Select>Transform Selection. In the Options Bar, enter 87% for both Width and Height. Press Enter to apply the transformation. Press Delete (PC: Backspace) to knock out a hole in the circle. Deselect.
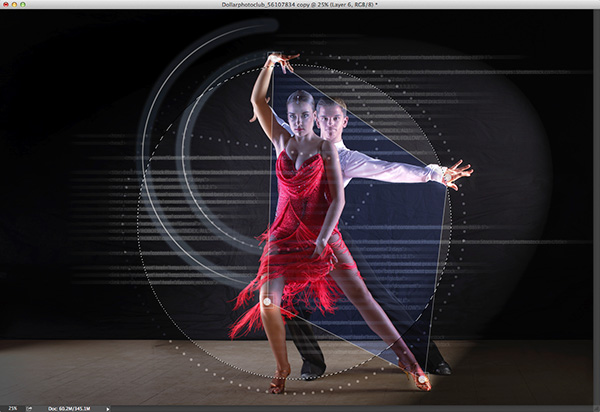
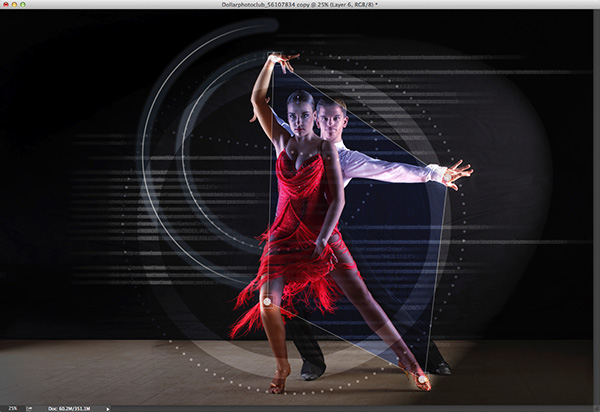
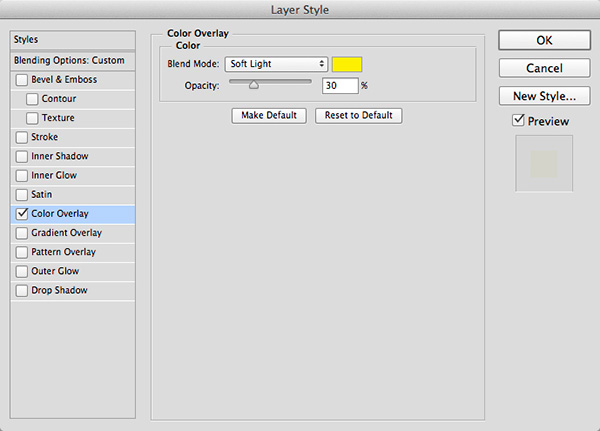
Step Twelve: Click the Add a Layer Style icon and choose Color Overlay. Choose Soft Light as the Blend Mode, click on the color swatch, choose a yellow color (R:255, G:240, B:0), and click OK. Enter 30% for Opacity and click OK. Click the Add Layer Mask icon. Using the Gradient tool, mask away the left side of the circle. Now, using the selection tool of your choose (or the Brush tool with a hard-edged brush), mask away sections of the circle so it appears segmented.


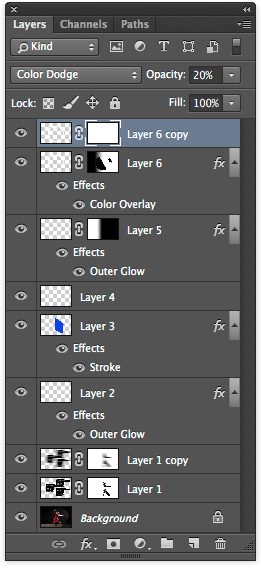
Step Thirteen: Duplicate the segmented circle layer you just created (Layer 6 copy) by dragging it onto the Add a New Layer icon. Click on the Layer 6 copy layer mask thumbnail to make it active, and press Command-Delete (PC: Ctrl-Backspace). You basically removed the mask by filling it with white, but we'll use it later. Now, click on the word Effects, below Layer 6 copy, and drag it to the Trash icon at the bottom of the Layers panel to remove it. Change the blend mode to Color Dodge, and lower the Opacity to 20%.
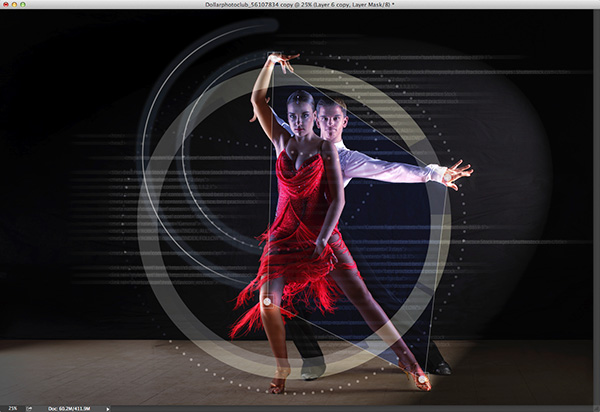
Step Fourteen: Press Command-T (PC: Ctrl-T) to bring up the Free Transform bounding box. You can move any of the adjustment points horizontally or vertically to change the shape (see example), and you can also move each point independently by holding down the Command (PC: Ctrl) key when you click-and-drag any adjustment point. This allows you to skew the original circle shape and give it any specific shape or perspective you want. Press Enter to apply the transformation.
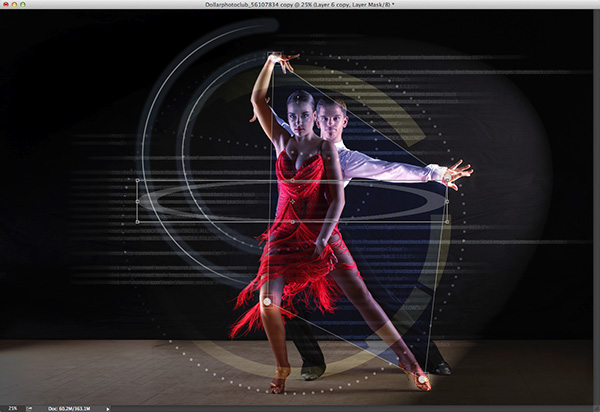

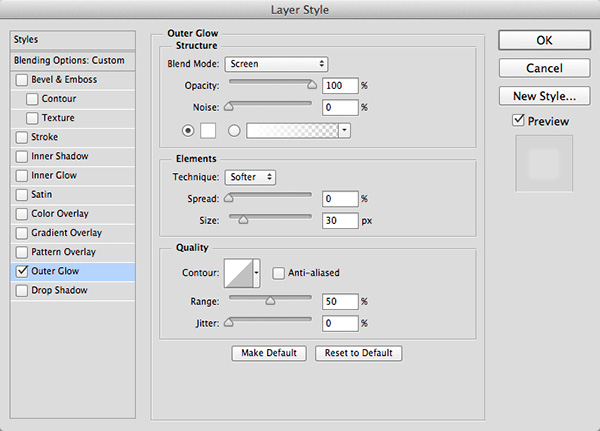
Step Fifteen: Choose the Brush tool. With the layer mask thumbnail of Layer 6 copy still highlighted, paint with black to mask away the upper portion of the arc you just created where it intersects with the dancers. This will make the arc appear as if it's going behind them. Click the Add a Layer Style icon and choose Outer Glow. Choose Screen as the Blend Mode and change the color to white. Enter 100% for Opacity, 30 px for Size, and click OK to apply the layer style and complete the effect.
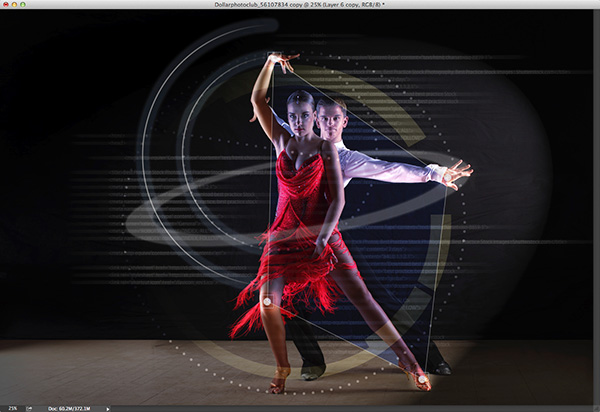
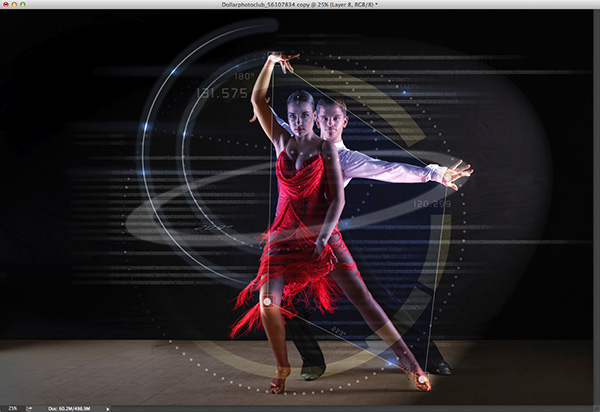
â”CAPTION: We added some random numbers and additional highlights to the final image.
This article is courtesy of Photoshop User magazine, the official publication of KelbyOne, which provides quality online education for creative people. For more information, visit www.KelbyOne.com.

