
Using the Dodge and Burn Tools
Excerpt from The Adobe Photoshop CC Book for Digital Photographers (2014 Release)
In older versions of Photoshop, when we wanted to dodge and burn, we had to jump through a bunch of hoops (creating special layers, and using blend modes and such), because the Dodge and Burn tools wereâ¦wellâ¦let's just say they weren't the best (and that's being kind). Luckily, back in Photoshop CS5, Adobe updated these tools, which totally fixed the problem, and now it's safe to use the Dodge and Burn tools for lightening and darkening different parts of your image.
Step One:
Before we dig into this, I just want to you let you know up front that I would normally do my dodging and burning inside Camera Raw using the Adjustment Brush (and do the lightening and darkening using only the Exposure slider). However, if you're already in Photoshop and don't want to go back to Camera Raw, then here's how you'd do it: In the photo shown here, our light is kind of out of balance. The thing I want people drawn to is the mossy rock in the foreground, but the brightest thing in the photo (the thing that draws your eye) is the sky and sunlit trees, which is where I don't want the viewer looking. In fact, almost the entire foreground is in shadow, so first, we're going to dodge (lighten) the rock and a little of the hillside. Then, we're going to burn (darken) the sunlit trees further up the hill and the sky. Basically, we're just going to rearrange how the light is falling on our photo. Now, I don't use the Dodge and Burn tools directly on the original photo. Instead, press Command-J (PC: Ctrl-J) to duplicate the Background layer. That way, if we don't like what we've done, we can lessen the effect (by lowering the layer's opacity) or undo it altogether by throwing the layer away.


Step Two:
Get the Dodge tool (O) from the Toolbox (as shown here), and begin painting over the area you want to lighten (in our case, we'll start by painting over the mossy rock in frontâ”you can see the brush cursor near the front of it here). Keep holding the mouse button down as you paint because the Dodge and Burn tools have a build-up effectâ”each time you release the mouse button and start painting again, the amount of Dodge (or Burn) builds up.


Step Three:
Release the mouse button, and paint over that same mossy rock area again, and you'll see how it gets another level brighter. Remember: While the mouse button is held down, you're painting one level of brightness. Release the mouse button, then click-and-paint over that area again, and you're painting over the original brightness with more brightness, and so on (it's kind of like polishing a silver platterâ”the more times you polish it, the brighter it gets). Now look at how much brighter the rock is here, compared with the original image in Step One. Next, let's work on the hill just above the rock.

Step Four:
Start painting over the hillside to dodge (brighten) it, but keep the mouse button held down the whole time to paint just one level of brightness over it. Now, before we switch to burning on the sunlit trees and sky, take a look up in the Options Bar for this tool, and you can see that we've been dodging just the Midtones (and that's generally where I do my dodging and burning), but if you wanted the tool to just affect the highlight or shadow areas, you can choose that from that Range pop-up menu. Also, the 50% Exposure amount is fine for something like this, but if I were doing this on a portrait, I'd usually want something much more subtle, and I'd lower the amount to around 10%-15%.

![]()
Step Five:
Now, let's switch to burning. First, start by pressing Command-J (PC: Ctrl-J) to duplicate your top layer. So, at this point, you've got the original untouched image as your Background layer, the brightened Dodge Layer in the middle (I renamed it "Dodge Layer" just to make it easier to see), and a copy of the brightened layer on top, which is the one we're going to burn on (I named it "Burn Layer"). By keeping everything on separate layers, if you don't like the burning effect, you can reduce it by lowering the opacity, or delete it altogether and you won't lose the dodging you did on the layer below it. Now get the Burn tool (as shown here), and paint over the sky and bright trees. By darkening those areas, it takes the focus off of them, which helps lead the eye to the rock. (Whether you realize it or not, you're painting with light. Cool!)


Step Six:
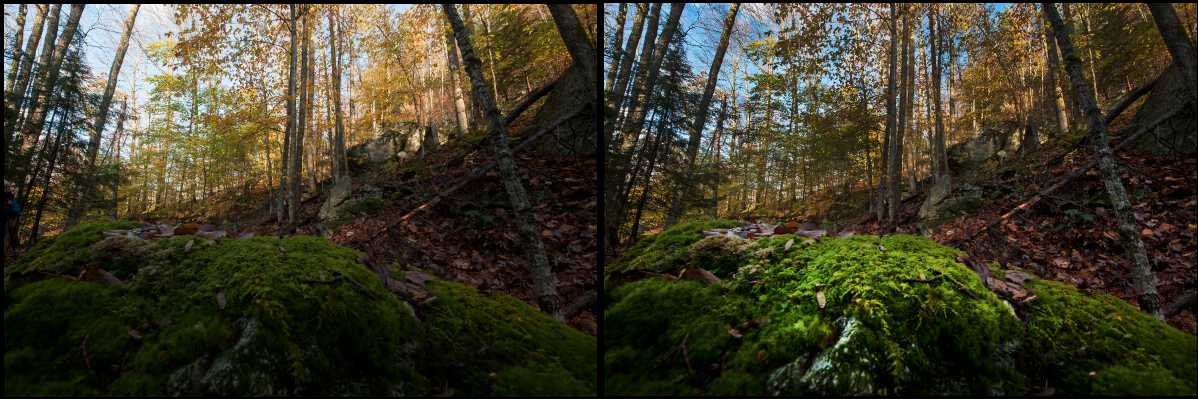
Let's darken the sky a bit more by burning over it, again. Just rememberâ”while you're painting, keep your mouse button held down the whole time, or part of your sky will be one shade darker, and then another part might be two shades darker (where the two areas overlap). One more thing: up in the Options Bar you'll see a checkbox for Protect Tones. That's the checkbox that helps to keep the color of what you're dodging and burning intact, so things just get brighter or darker, and not sunburned and color saturated. I leave this on all the time, even when I'm not dodging and burning portraits (which is when it's most useful). Below is a before/after, and while I'm usually fairly subtle with my dodging and burning, here I took things a little farther than I normally would, just to show a clear example of the power of dodging and burning.

![]()

Learn how to do more in Photoshop CC (2014 Release) here: http://kel.by/skccbook
