

In order to make this action works in any language, we need to make some steps using the menus (instead shortcuts) so we can fully control the names of every single layer we make.
Before starting the tutorial, please download these assets:
- Font: http://www.impallari.com/lobster/
- Patterns: http://www.aurove.com/downloads/seamless-denim-textures/
1) Prior to record the action, we will need to install the font, load the patterns and create 2 brushes into Photoshop. Please refer to your system process to install the font.
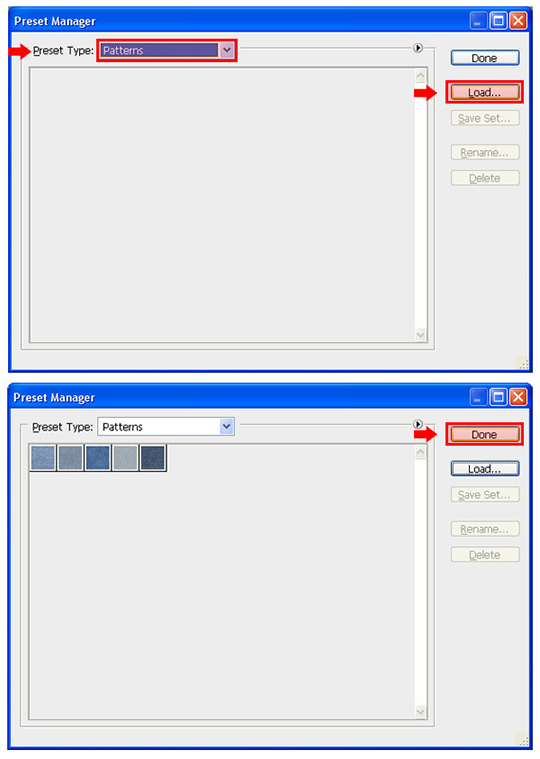
2) Loading the Patterns: to load the .PAT file into Photoshop, proceed as follows: Open Photoshop and go to Edit > Preset Manager. In the Preset Manager window, select Patterns from the Preset Type dropdown menu. Click on Load, find on your computer the recently downloaded Denim.pat file and click on Load. Click Done.
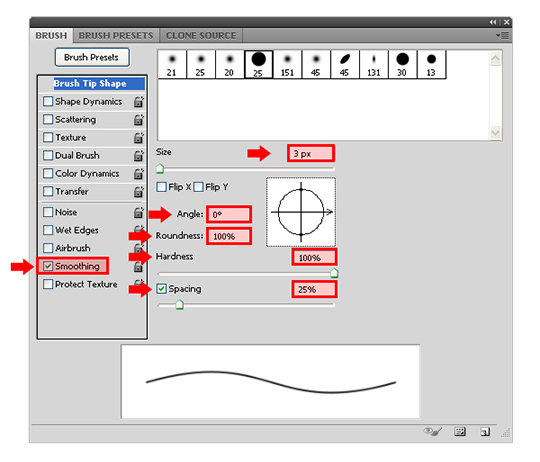
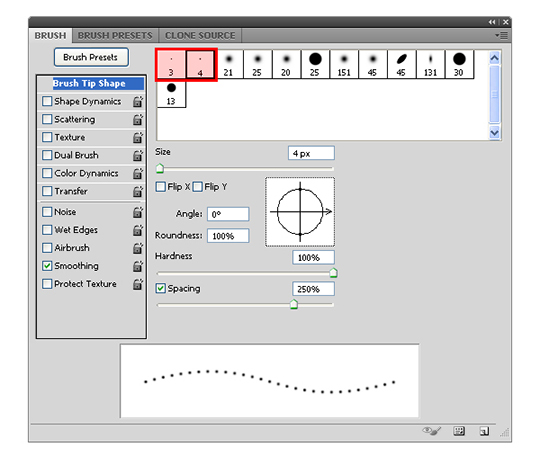
3) Creating the brushes: first, select the brush tool (B). If you do not have the Brush panel visible, go to Window > Brush. In the brush tab, select any available brush and set the Size to 3px, the Angle to 0º, the Roundness to 100%, the Hardness to 100% and the Spacing to 25%. Finally, check the "Smoothing" option in the left panel of the brush window.
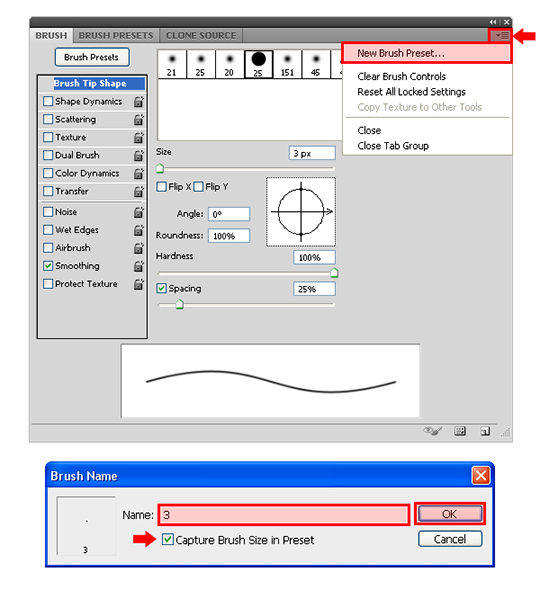
Now click over the small dropdown icon at the top right corner of the brush window and select New Brush Preset. In the new dialog, be sure to have the Capture Brush Size in Preset selected, (this will help you find the brush easily) set the name to "3" and click OK.
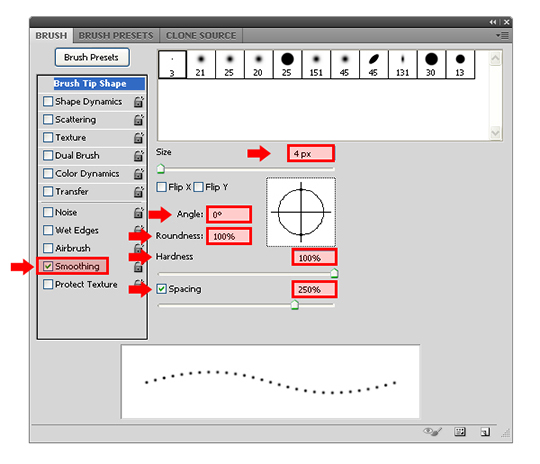
4) With the Brush window still active, and the brush tool (B) selected we will create another brush. Set the Size to 4px, the Angle to 0º, the Roundness to 100%, the Hardness to 100% and the Spacing to 250%. Finally, be sure to have the "Smoothing" option in the left panel of the brush window checked.
As we did in the previous brush, click over the small dropdown icon at the top right corner of the brush window and select New Brush Preset. In the new dialog, be sure to have the Capture Brush Size in Preset selected, set the name to "4" and click OK.

Now, you should have these 2 new brushes displayed in your Brush window.
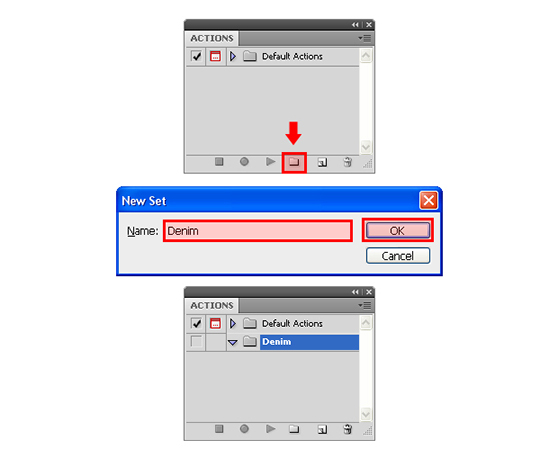
5) As we will let the user decide the canvas size from start; we do not need to open any document,so we will start recording the action right now. If you do not have the Actions Panel visible, go to Window > Actions. Click on the Create New Set icon and set the name to Denim. Click OK.
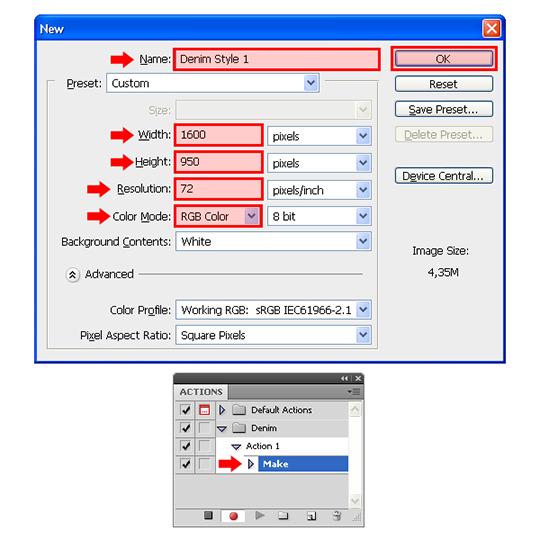
6) Still in the Actions panel, click over the Create New Action icon, set the name to Action 1 and click Record. From now on, every step we make will be recorded, so please follow the instructions exactly in order to make the action works in any language.

7) Go to File > New. In the dialog box, set any canvas size you wish (the final user can still modify these values if he wish). I will be working in a 1600px x 950px canvas so you can have a better view of the details later on the tutorial. Set the name of the new document to Denim Style 1, the Width to 1600, the Height to 950 and be sure to have a 72dpi resolution and the color mode set to RGB. Click OK. You will notice that the action is already recording this in the Actions Panel.
8) Go to Edit > Fill. In the dialog window be sure to have the Mode set to Normal and the Opacity set to 100%. From the "Use" dropdown menu select Pattern. Click over the small pattern thumbnail and in the Patterns window select the "Denim 2" pattern. Click OK.

9) Press "D" on your keyboard to reset the swatches.
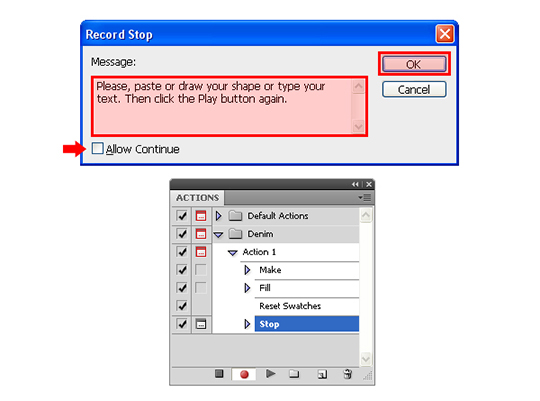
10) Now that you have the background ready, we will insert a Stop dialog window in the action to let the user knows that he can now draw or paste a shape or type a text. In order to do so, and in the Actions panel, click over the small menu icon, and from the dropdown menu select insert Stop.
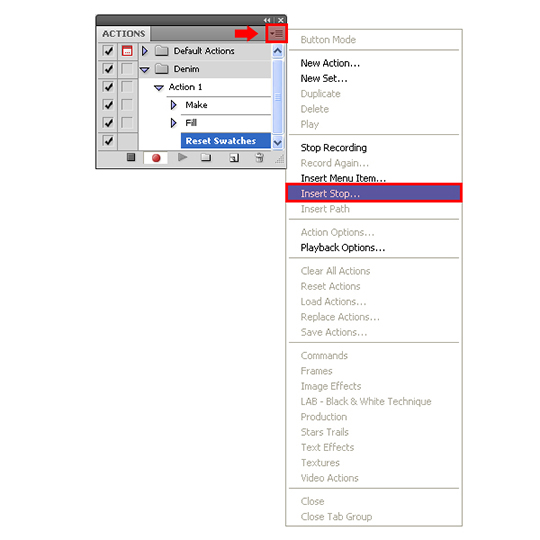
In the new dialog window, write your message. I will type "Please, paste or draw your shape or type your text. Then click the Play button again." Be sure to have the Allow Continue option unchecked and click OK.
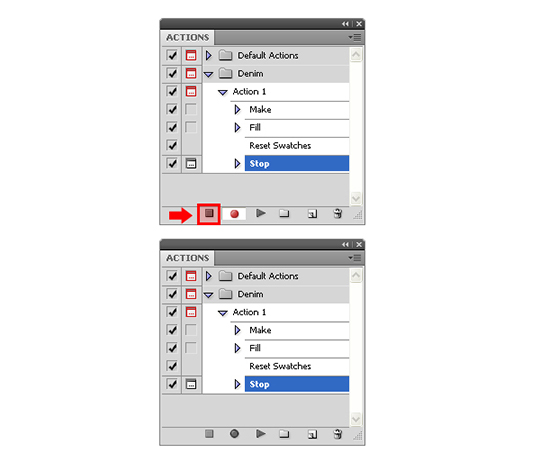
11) Click on the Stop recording button in the Actions panel. We do this in order to act as we are making the shape or text that the final user will do.
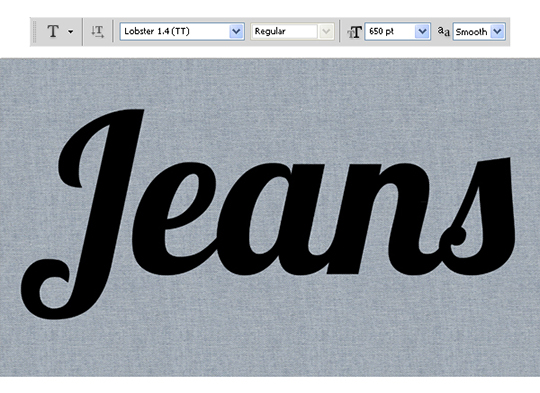
12) Select the Text tool (T), set the typeface to Lobster and the size to 650pt. Click over the canvas and type "Jeans".
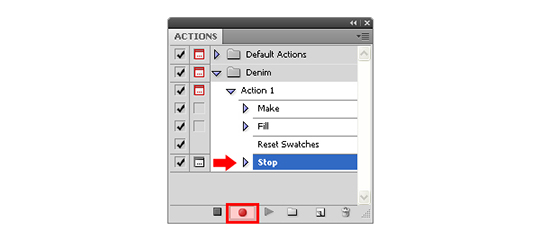
13) Now that we let the user set his text, we can keep recording our action. In the Actions Panel, be sure to have our last step selected "Stop" and click over the Record button.
14) Right-click (Control-click) over the text layer and from the dropdown menu select Layer Properties. In the dialog box, set the name to "Object" and click OK. We do this because the layer´s name may vary depending on what the user type, or even if he is pasting or drawing a shape.

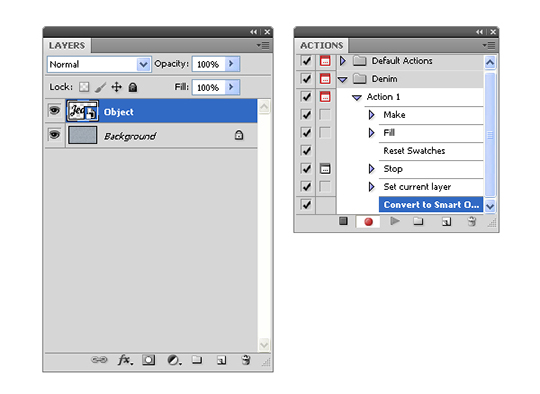
15) Go to Layer > Smart Objects > Convert to Smart Object.
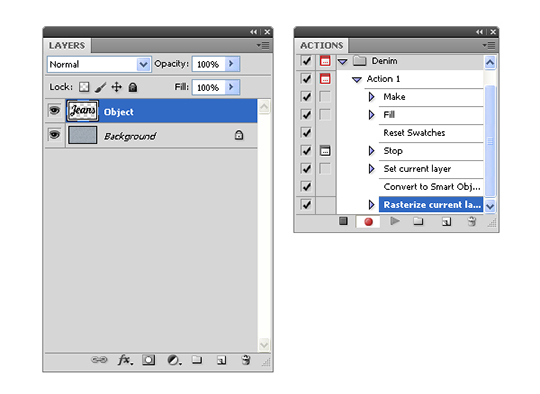
16) Go to Layer > Smart Objects > Rasterize.
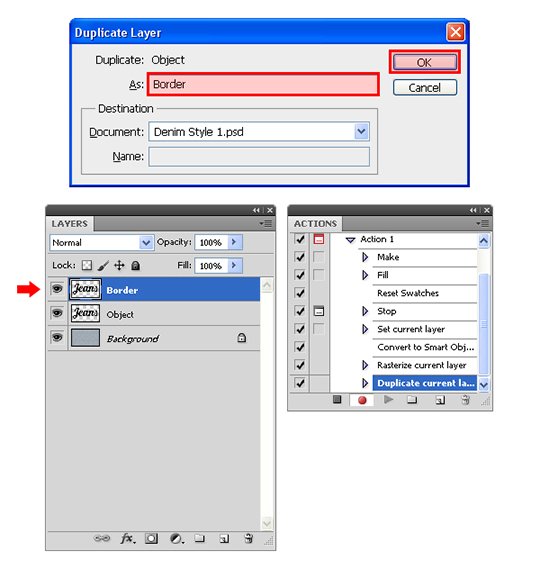
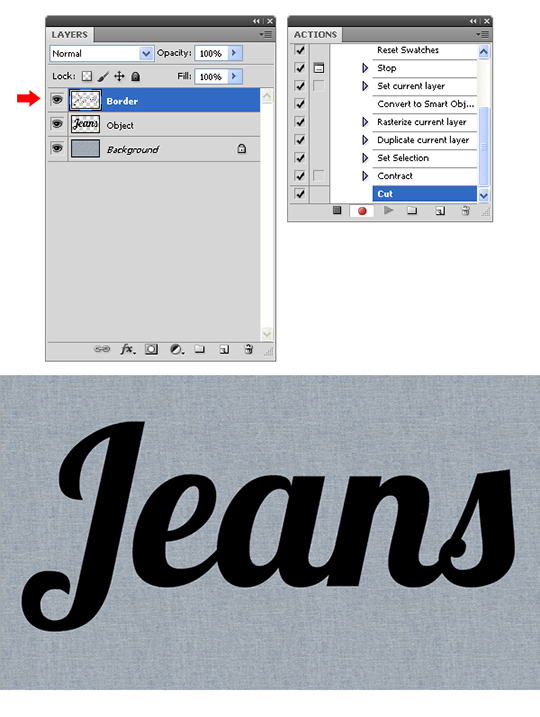
17) Go to Layer > Duplicate Layer. In the dialog window, set the name to "Border" and click OK.
18) With the Border layer selected, Control-click (Command-click) over the layer´s thumbnail in the Layer´s Panel to select the content.
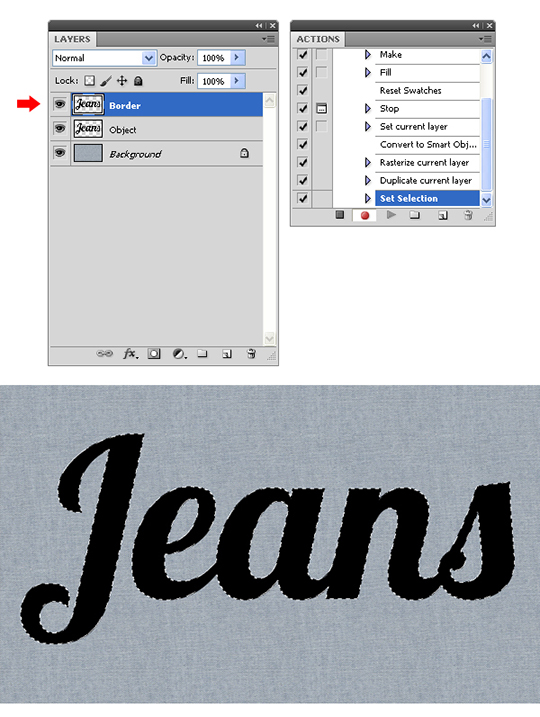
Go to Select > Modify > Contract and set the value to 10px. Click OK.
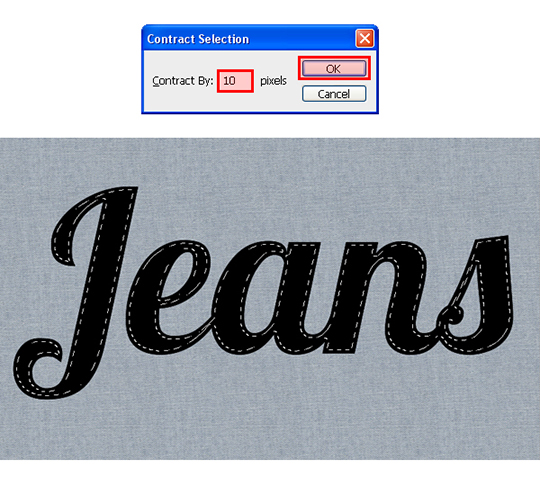
19) Go to Edit > Cut.
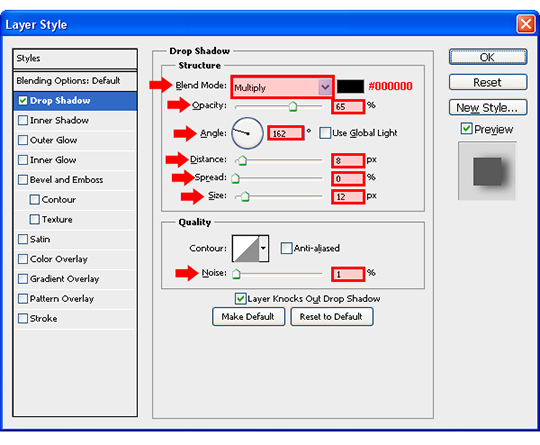
20) Select the layer "Object" and go to Layer > Layer Style > Drop Shadow and put the following values:
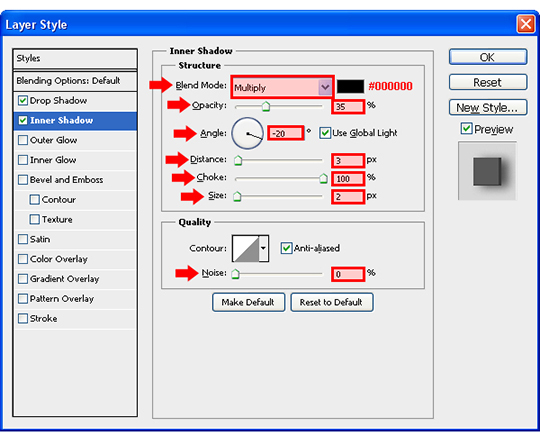
With the Layer Style window still active, select Inner Shadow option and apply these values:
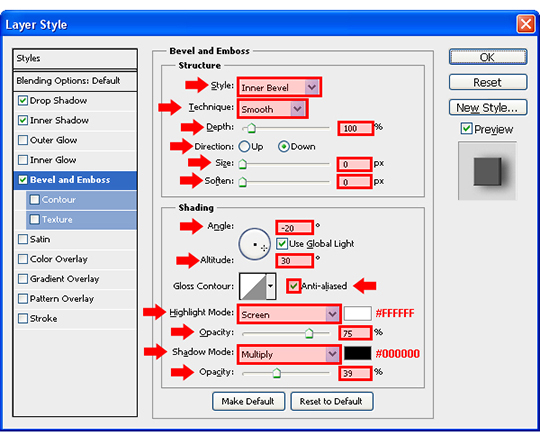
Now, select Bevel and Emboss and apply the following values:
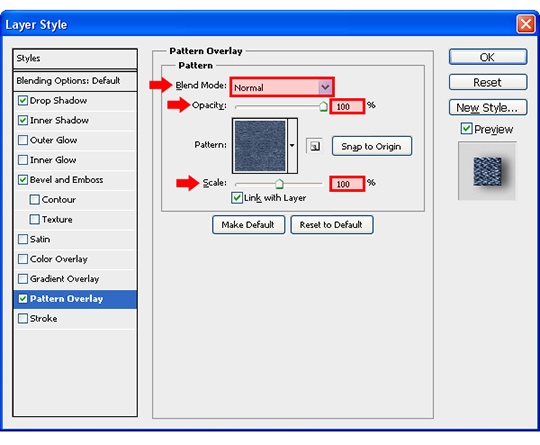
Select Pattern Overlay, and apply the following values:
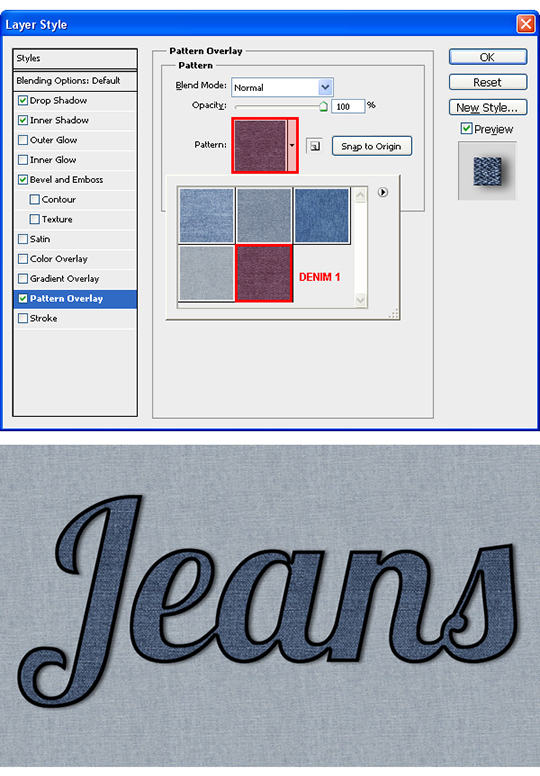
Click over the pattern thumbnail and from the pattern window select "denim1". Click OK.
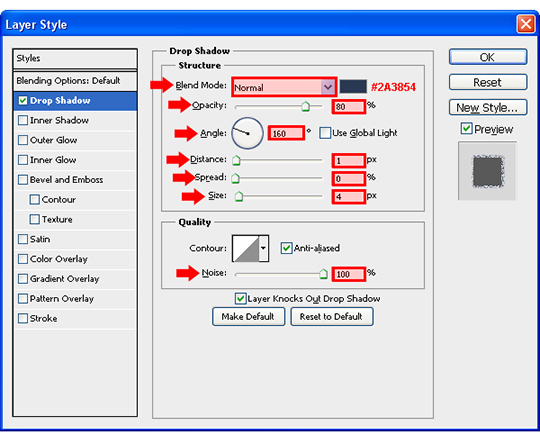
21) Select the layer "Border" and go to Layer > Layer Style > Drop Shadow and apply the following values:
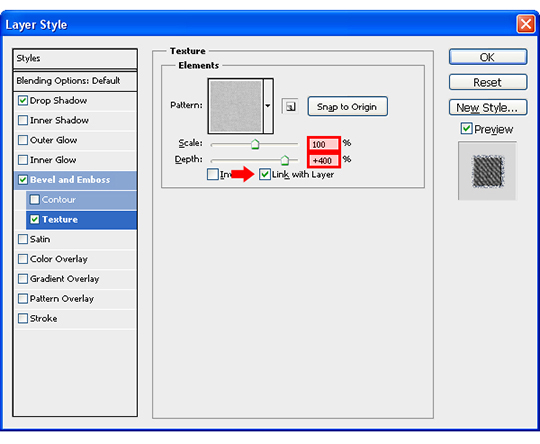
Check Bevel and Emboss option and apply the following values:

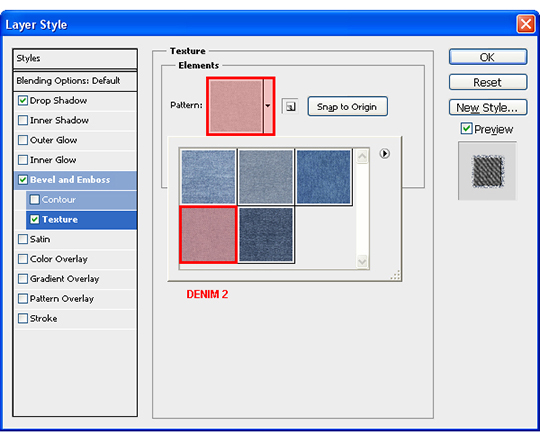
Next, check the Texture option and set these values:
Click over the pattern thumbnail and from the pattern window select "denim2". Click OK.
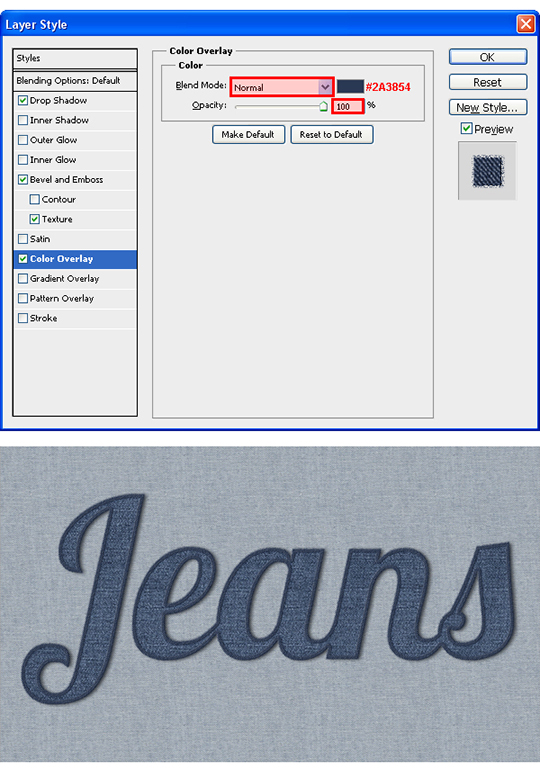
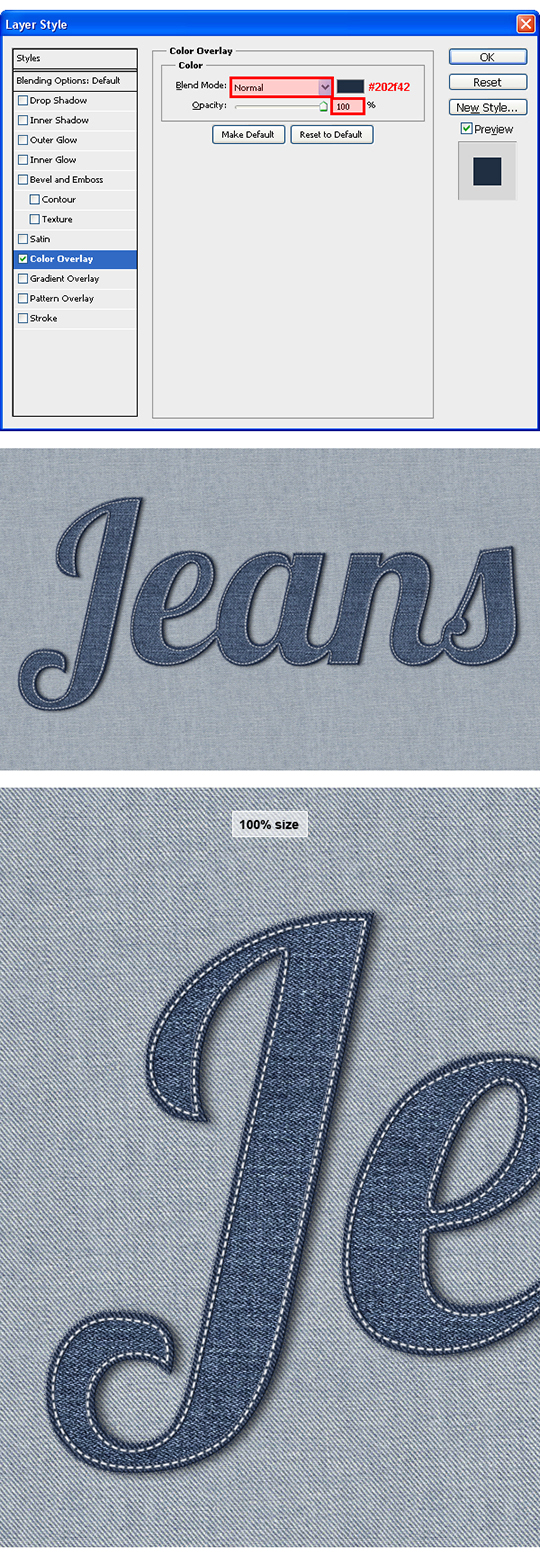
Select the Color Overlay option, apply these values and click OK.
22) Select the layer Object in the layer´s panel and Control-click (Command-click) over the layer´s thumbnail to select the content.
Go to Select > Modify > Contract and set the value to 7px. Click OK.

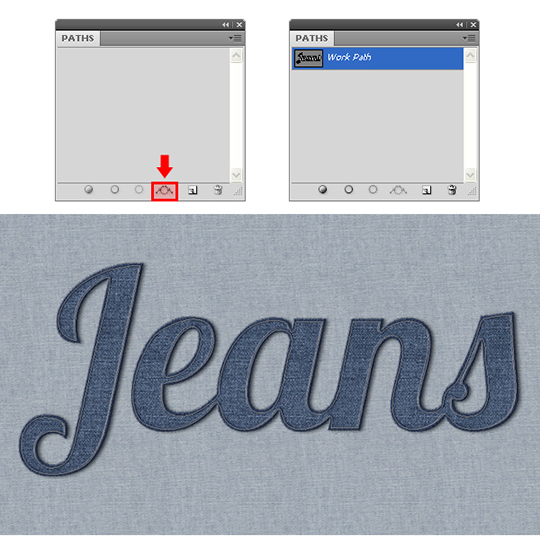
If you do not have the Paths Panel visible, go to Window > Paths. With the selection still active, click over the Make Work Path from Selection icon.
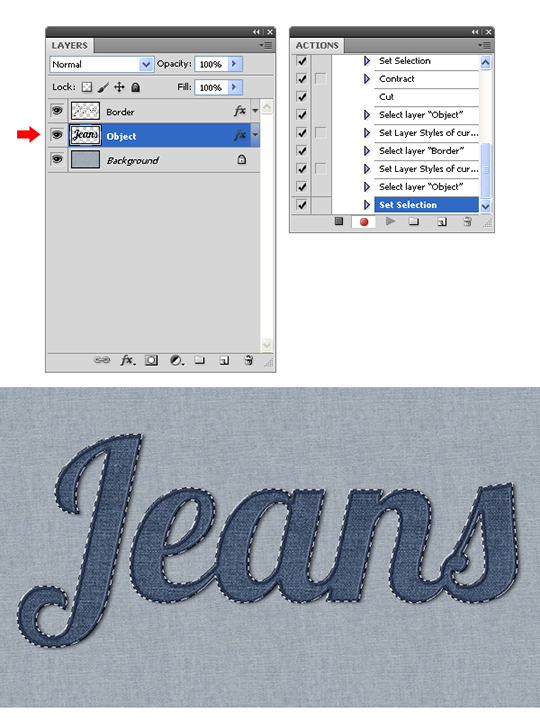
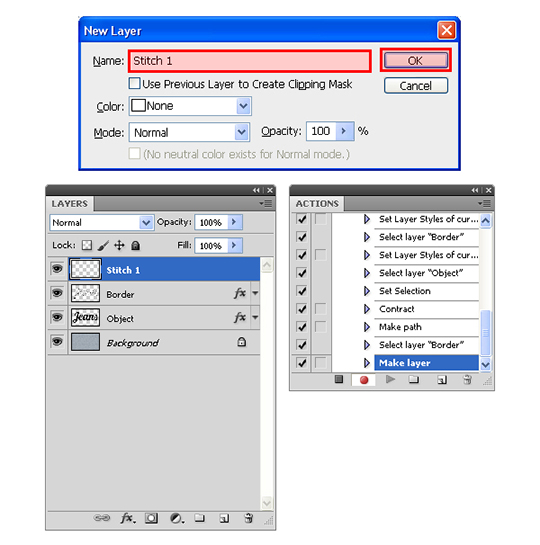
23) Select the Border layer in the Layer´s Panel and go to Layer > New > Layer. In the dialog window, set the name to "Stitch 1" and click OK.
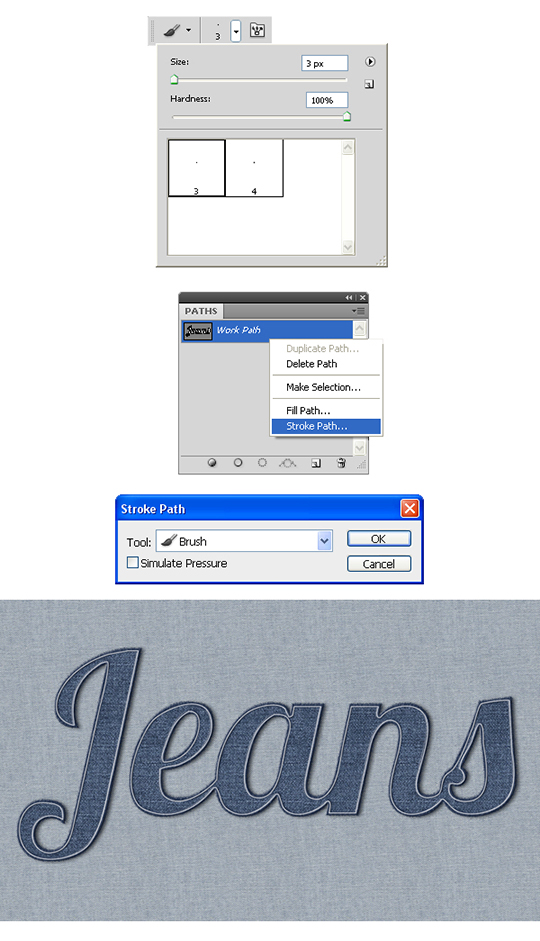
24) Select the Brush Tool (B) and from the Brush Preset Picker, select the brush named "3". Press "X" on your keyboard to exchange the swatches (this will set white as our Foreground color). Select the Pen Tool (P) and in the Paths Panel Right-click (Control-click) over the active path. From the dropdown menu select Stroke Path, and in the dialog box select from the dropdown menu "Brush", be sure to uncheck "Simulate Pressure" and click OK.
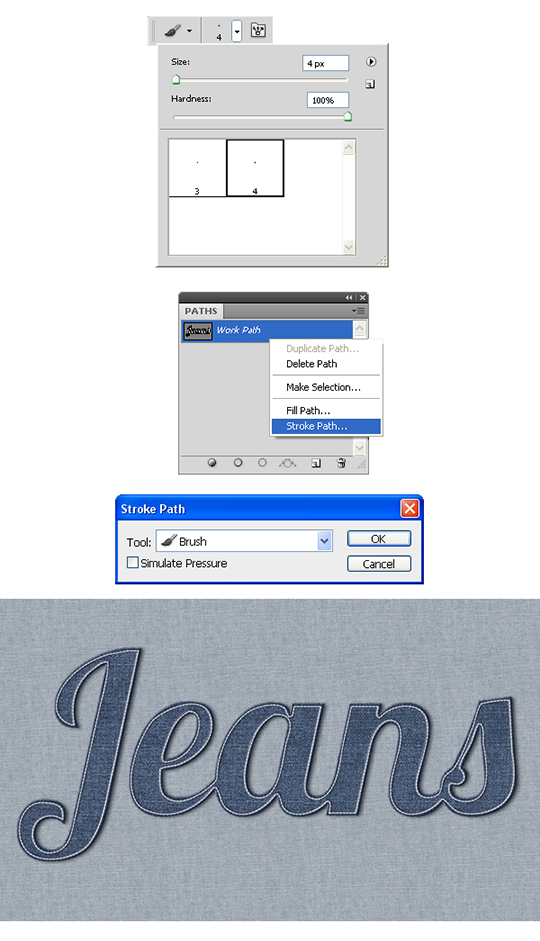
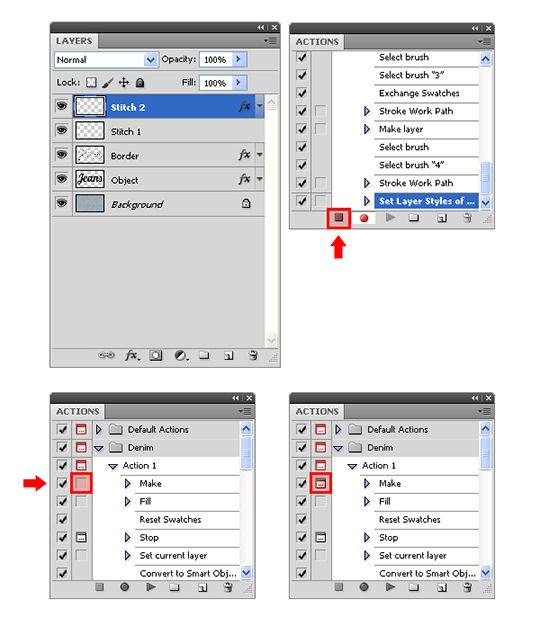
25) With the "Stitch 1" layer selected, go to Layer > New > Layer. In the dialog window, set the name to "Stitch 2" and click OK.

26) Again, select the Brush Tool (B) and from the Brush Preset Picker, select the brush named "4". Select the Pen Tool (P) and in the Paths Panel Right-click (Control-click) over the active path. From the dropdown menu select Stroke Path, and in the dialog box select from the dropdown menu "Brush", be sure to uncheck "Simulate Pressure" and click OK.
27) With the "Stitch 2" layer selected, go to Layer > Layer Style > Color Overlay and set the color to # 202f42. Click OK.
28) Finally, go to your Actions Panel and click over the "Stop Recording" button. Scroll to the top of the Action Panel, and click over the empty square in the first "Make" action; this will show the end user the "New Document" window to let him setup his own canvas size. If this option it´s turned off, then the user will always get a document of 1600px x 950px. You can now close all your opened documents and play the action.

My Avast antivirus is recognizing a threat of trojan virus on your site and the site “Layers Magazine” a few days …
Type of infection detected: JS: Iframe-LB [Trj]
I love the site and find it very instructive, so I’m reporting this problem.
Att
Maux
Hi guys, my virus checker shows that your site is infected. Apparently the virus is this one JS:Iframe-LB [Trj]. Please pass this on to your webmaster. The virus checker highlighted this while I went to browse the tutorial and the contact pages. I didn’t try to view any other pages.
I use Avast anti virus. In the past this software has highlighted a similar issue with the froknowsphoto site and after contacting them a few times they came back and verified that there was an issue with their site so I would think that this is a genuine issue.
Keep up the great work with the tutorials. Cheers, John
I can not watch the videos :S
Rarely consider using actions, but this was a catalyst for getting into it. Nice, detailed explanation. Some steps not available after completion in CS6. However, final image ok.
Recommend presenting more action tutorials. GLR
Nice little technique, bet there’s other applications for this too 😉
Great tutorial! Very well explained, everything worked perfect. Thanks Diego.