

Before starting the tutorial, please download and install the BPreplay free font.
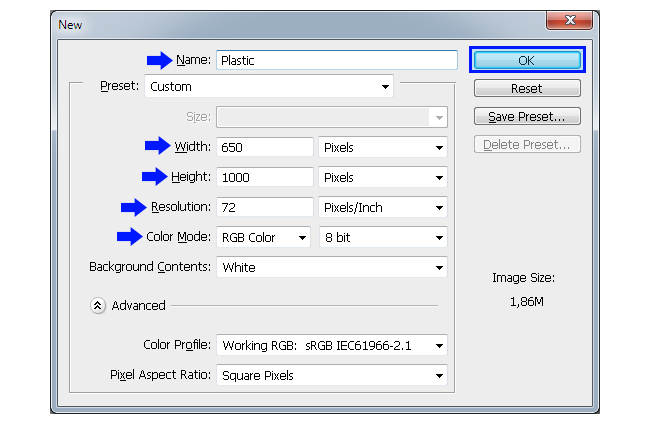
1. Open Photoshop and go to File > New. Set the name of the document to "Plastic". Set a Width of 650 px, a Height of 1000 px, the Resolution to 72dpi, the Color Mode to RGB and click OK.
2. Press "D" on your keyboard in order to reset the Foreground and Background Colors. Go to Edit > Fill and set the Contents to use the Foreground Color. Be sure to have the Mode set to Normal and the Opacity to 100%. Click OK.

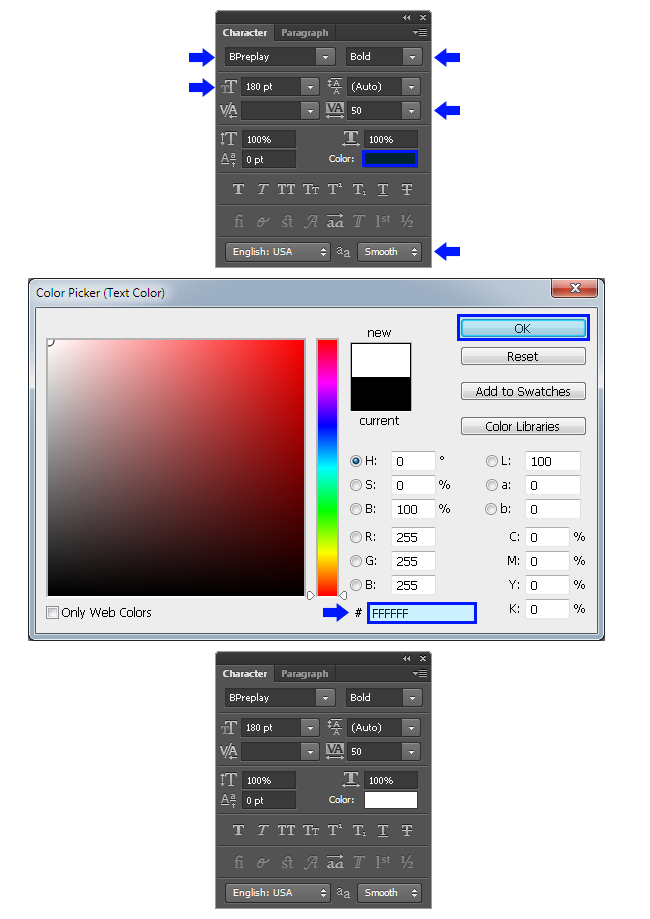
3. Press "T" on your keyboard to select the Text tool. Go to Window > Character; and in the settings window set the font family to "BPreplay"; the font style to "Bold"; a size of 180pt and the tracking to 50 and the anti-aliasing method to Smooth. Click over the color thumbnail and in the color picker window set the color to #FFFFFF. Click OK.
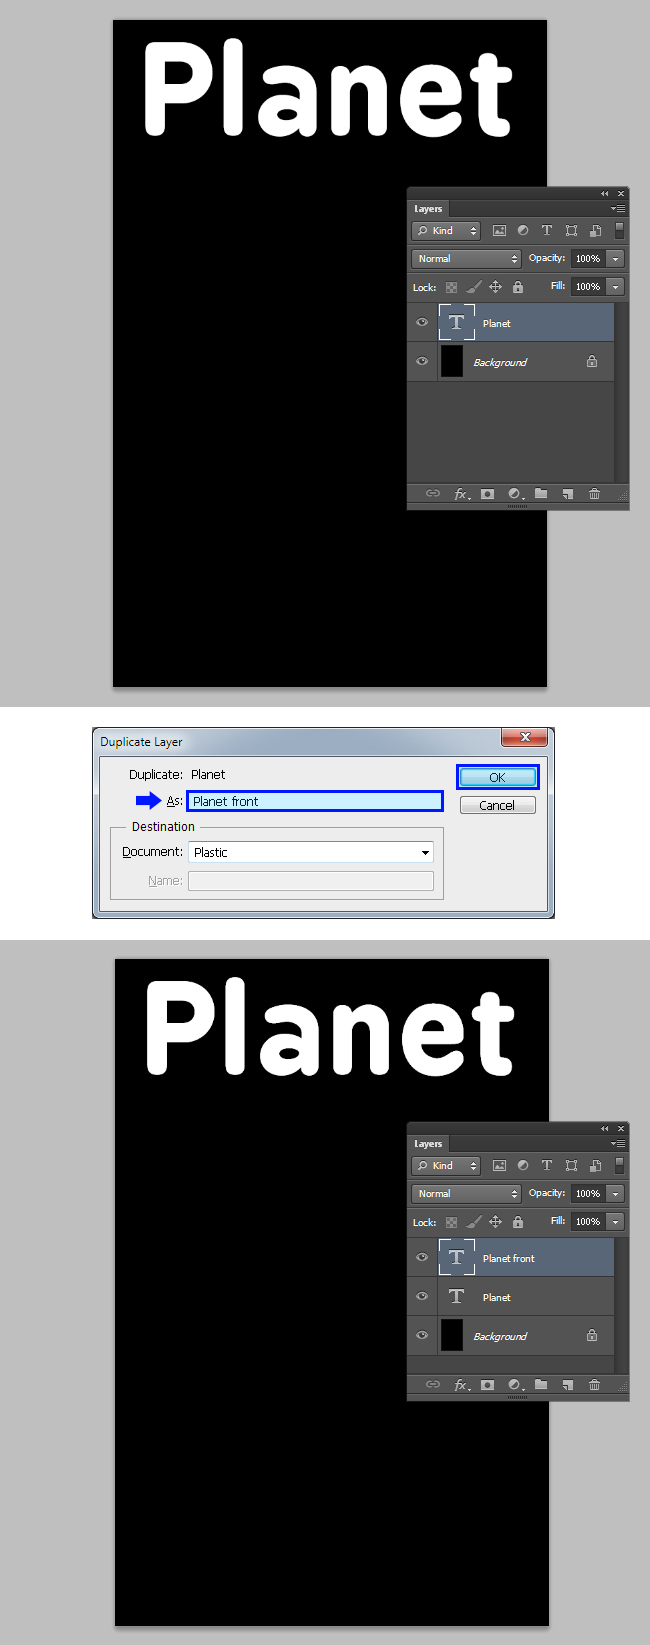
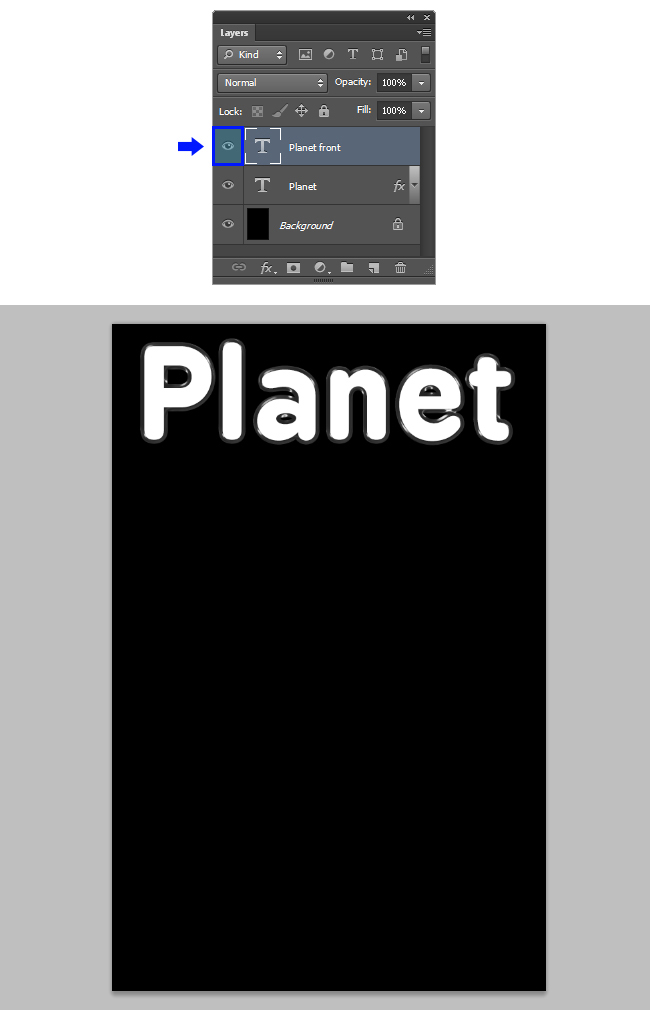
4. Click on the canvas and type "Planet". Go to Layer > Duplicate Layer and set the name to "Planet front". Click OK.
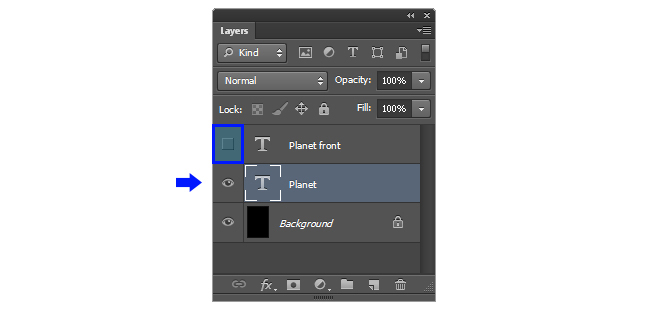
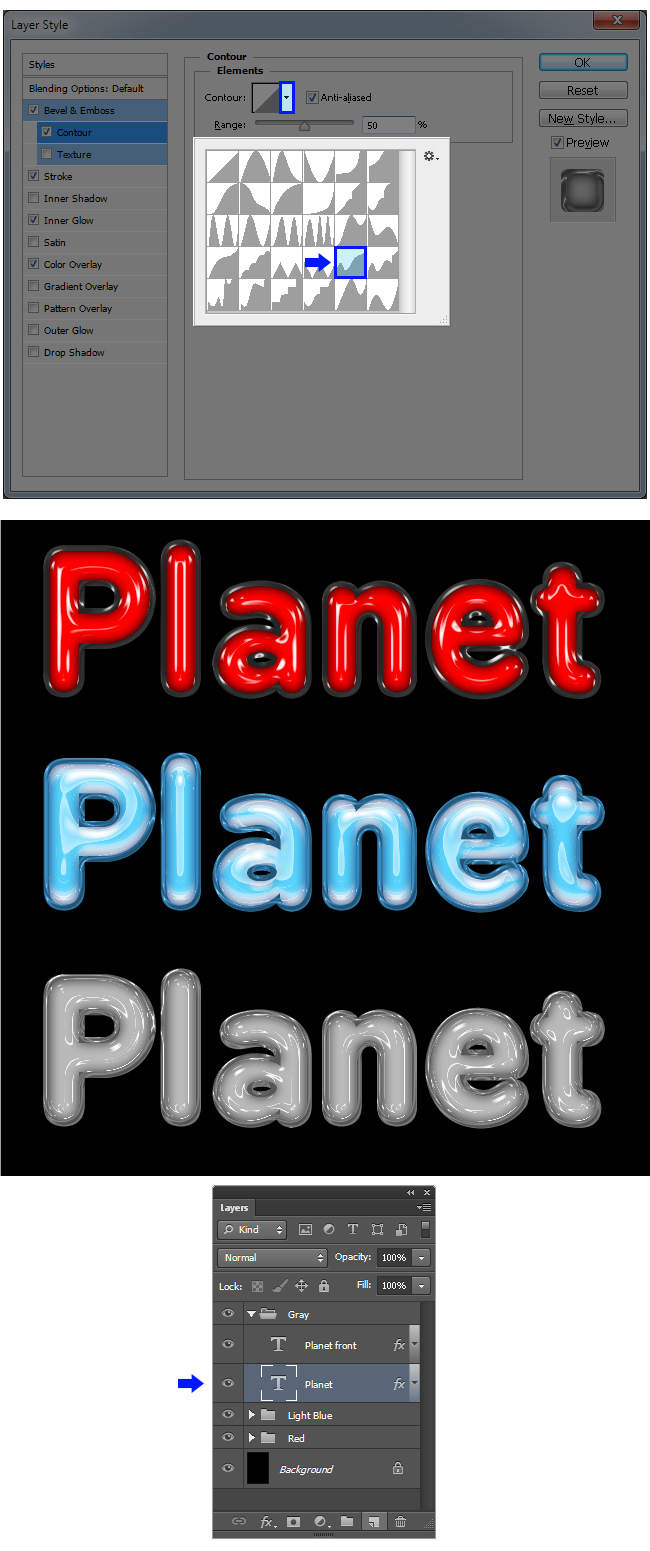
5. Hide the "Planet front" layer and select the "Planet" layer (we do this just to work more comfortable).
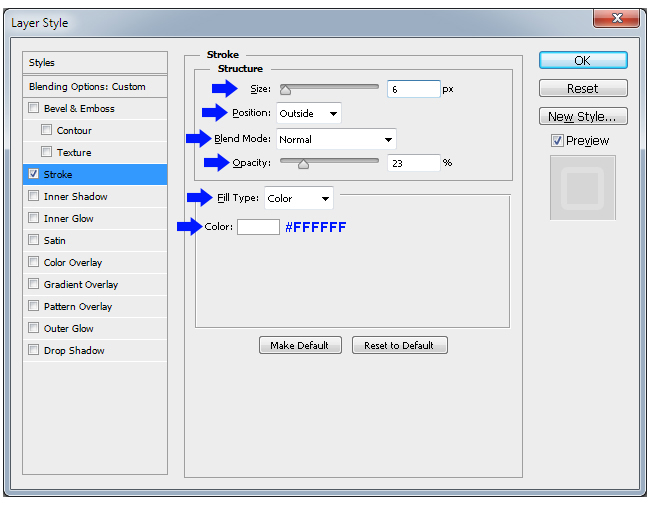
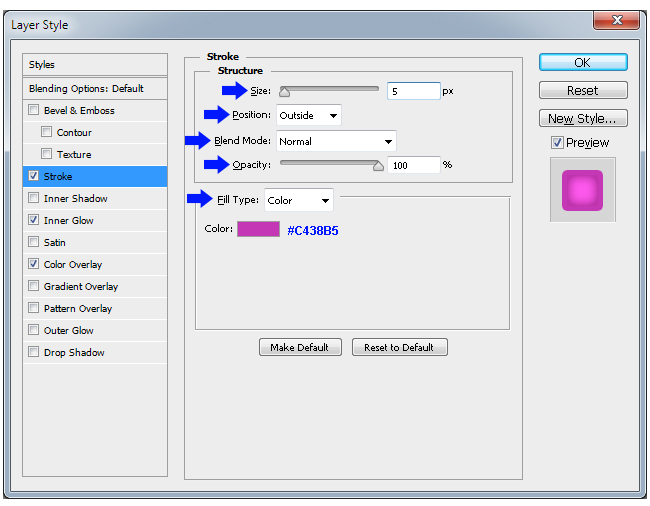
Go to Layer > Layer Style > Stroke and apply the following settings:
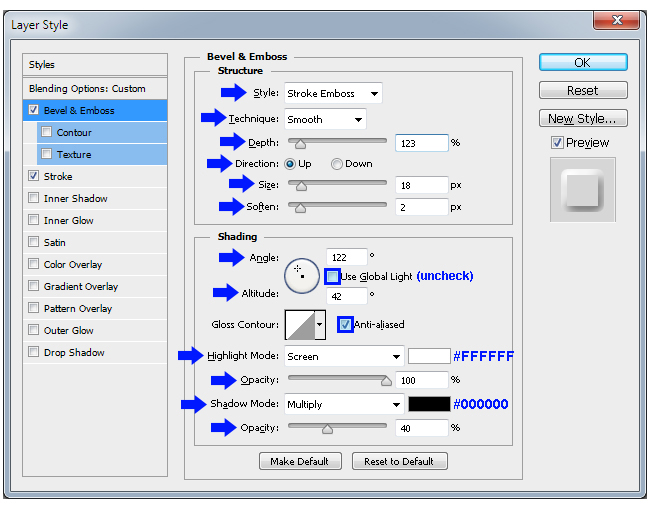
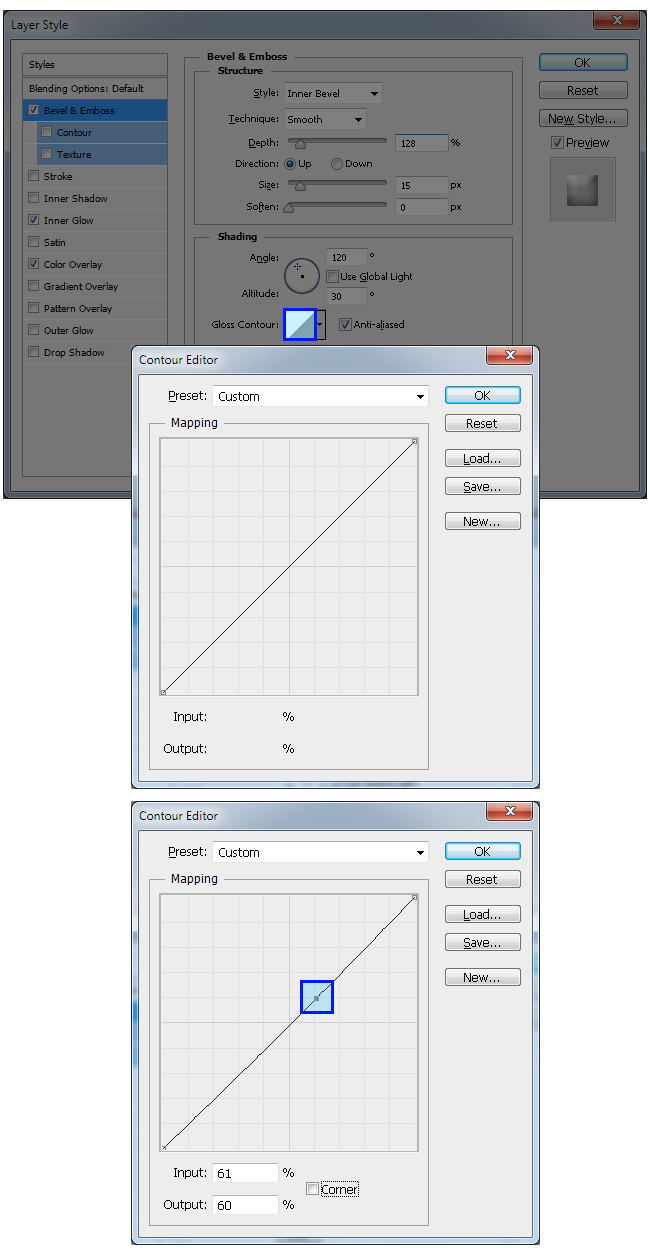
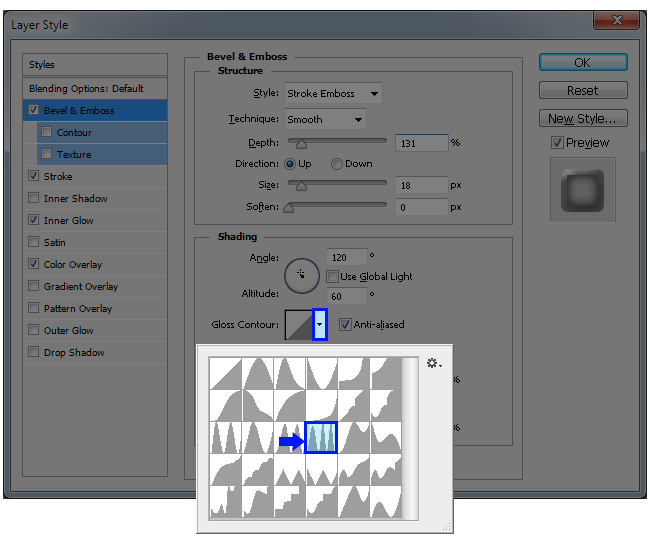
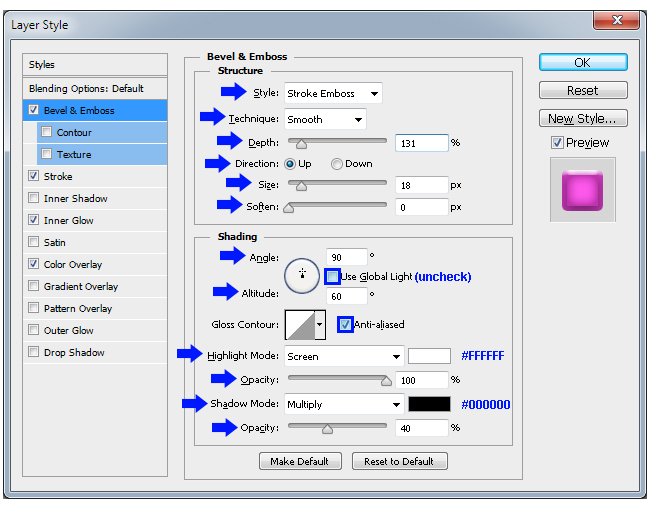
Check the "Bevel & Emboss" effect and apply the following settings:
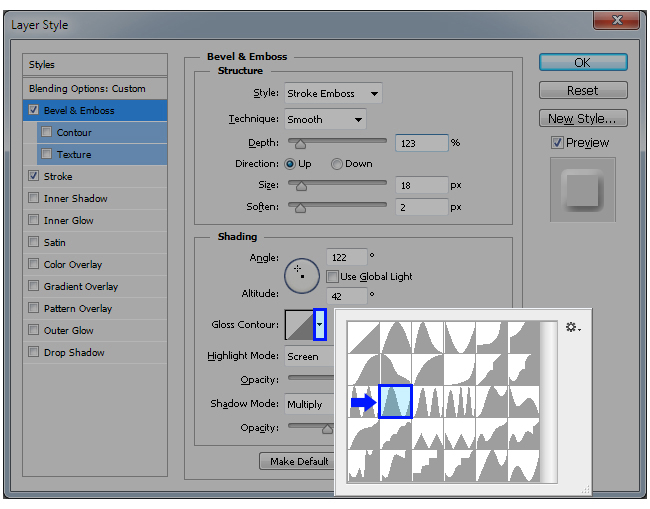
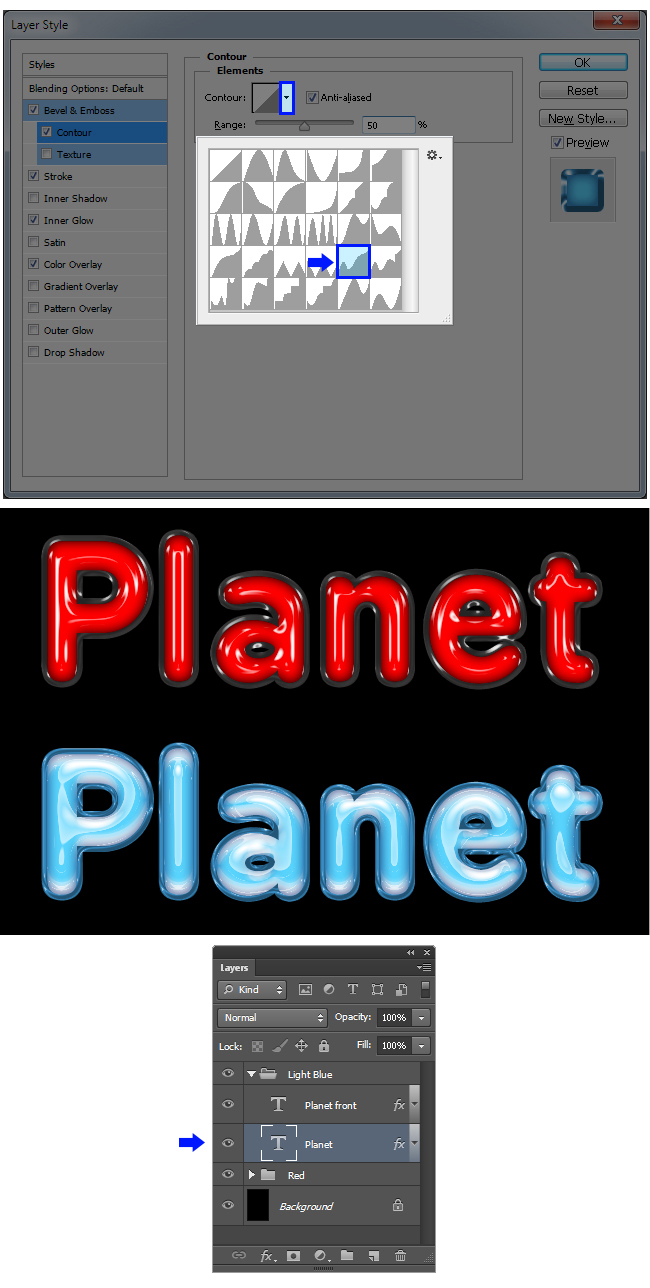
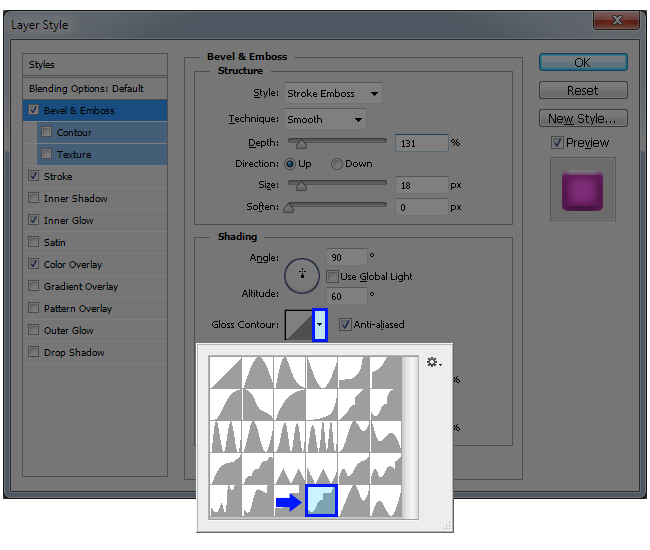
Still in the "Bevel & Emboss" settings, click on the small arrow next to the Gloss Contour thumbnail. From the thumbnail list, select the "Ring" contour.
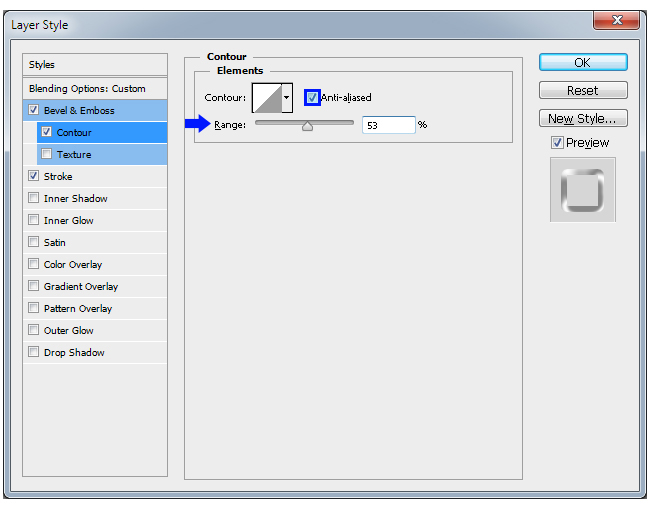
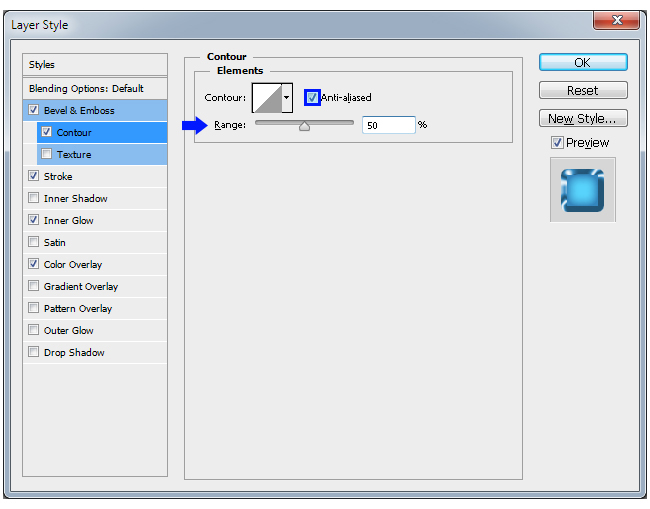
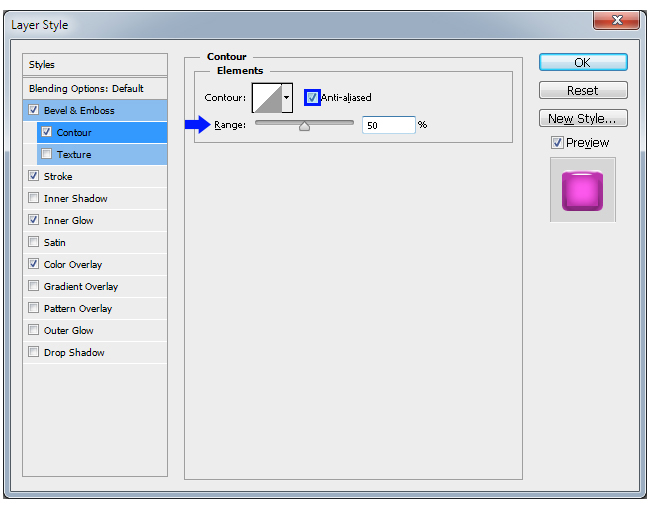
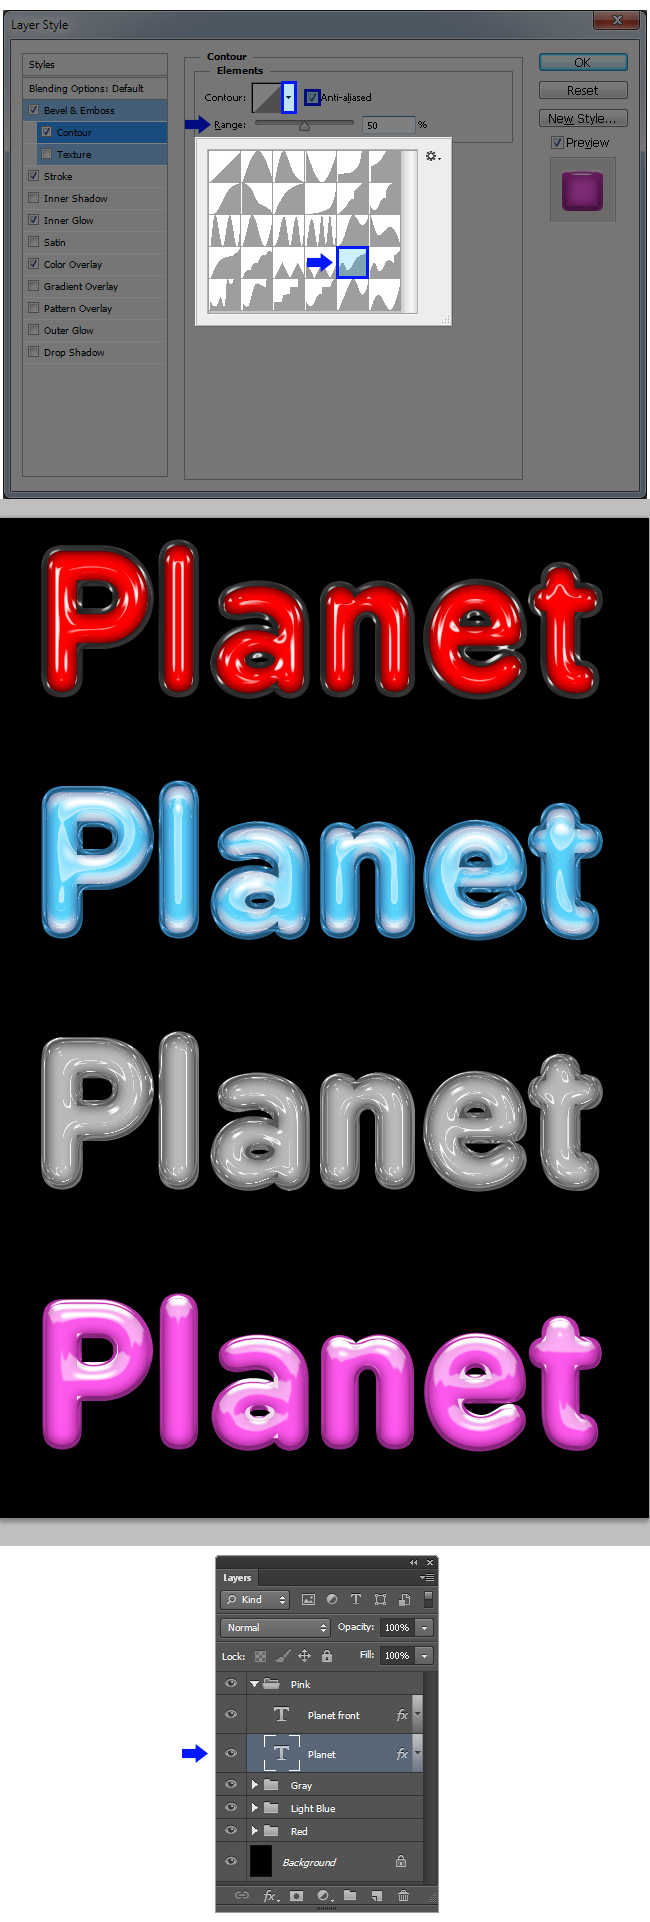
Now, check the Contour effect in the Layer Style window. Set the range to 53% and check the Anti-aliased box.
Click over the Contour thumbnail (this will show you the Contour Editor window).
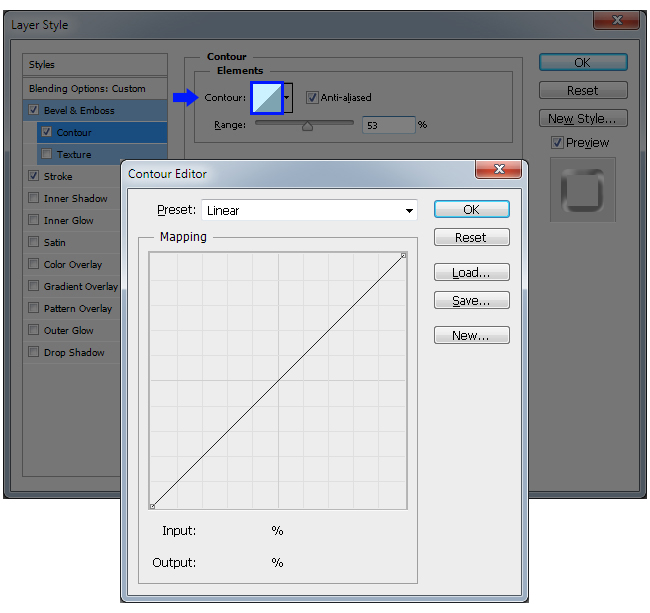
Click anywhere over the line in order to create a new point.
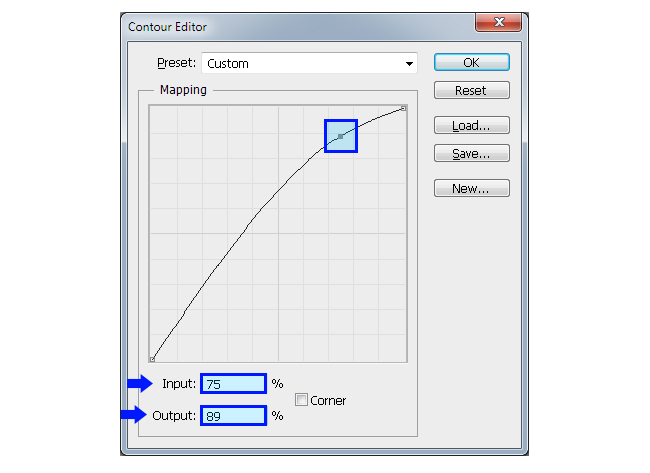
Set the Input value to 75% and the Output value to 89%
We will repeat this process two more times. Click anywhere over the line in order to create a new point and set the Input value to 50% and the Output value to 67%. Again, click over the line and set this new point to a Input value of 32% and a Output value of 77%. Click OK on the Contour Editor and once again, click OK in the Layer Style window.
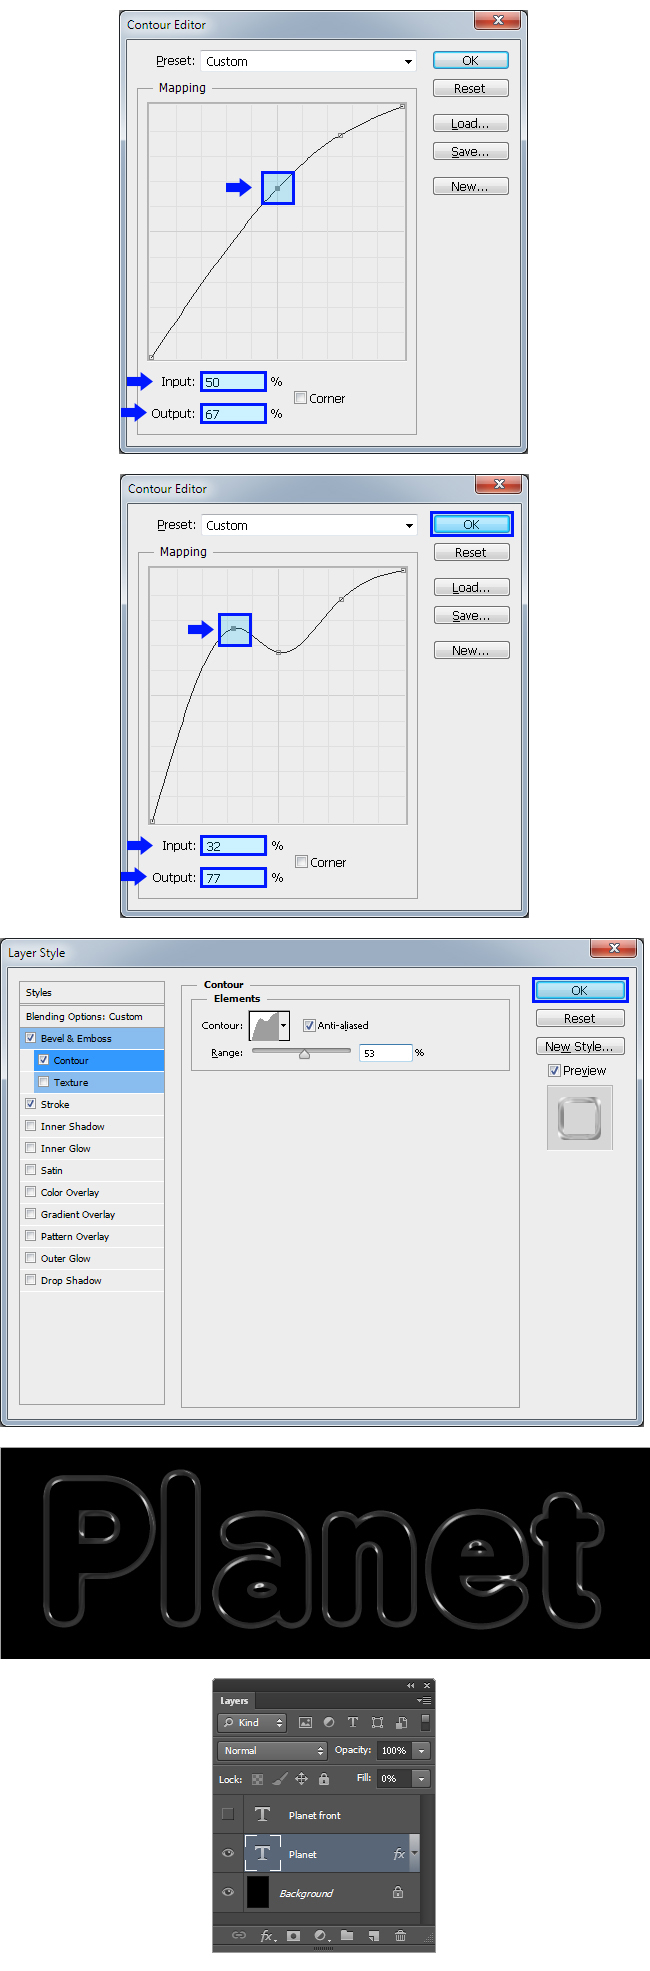
6. Select the "Planet front" layer and make it visible by clicking on the empty eye icon space next to the layer´s name.
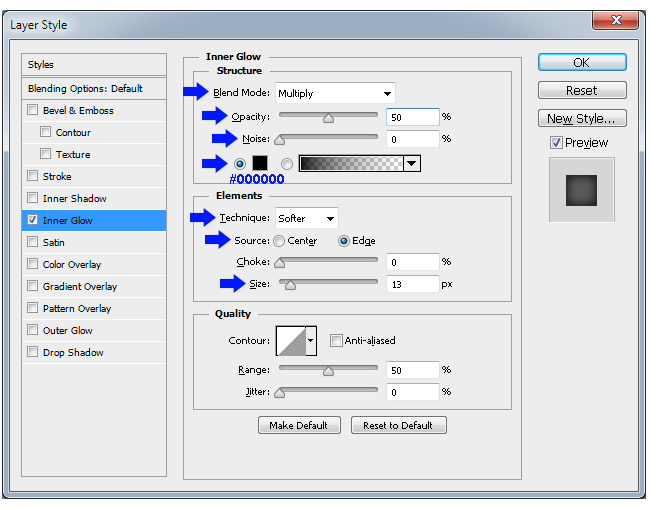
Go to Layer > Layer Style > Inner Glow and apply the following settings:
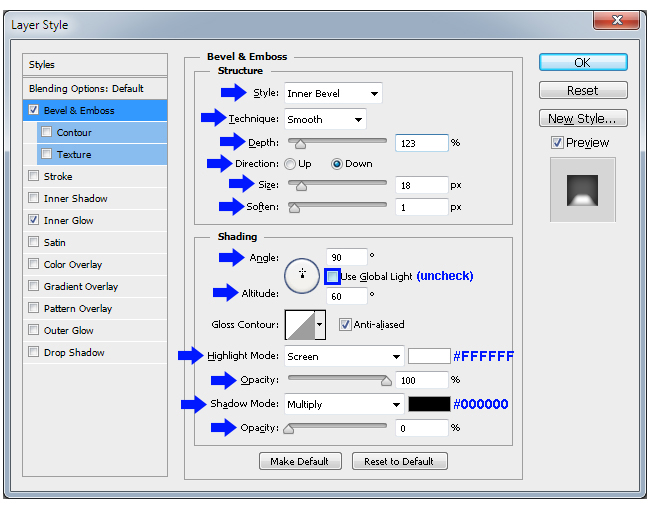
Now, check the Bevel & Emboss effect and apply the following settings:
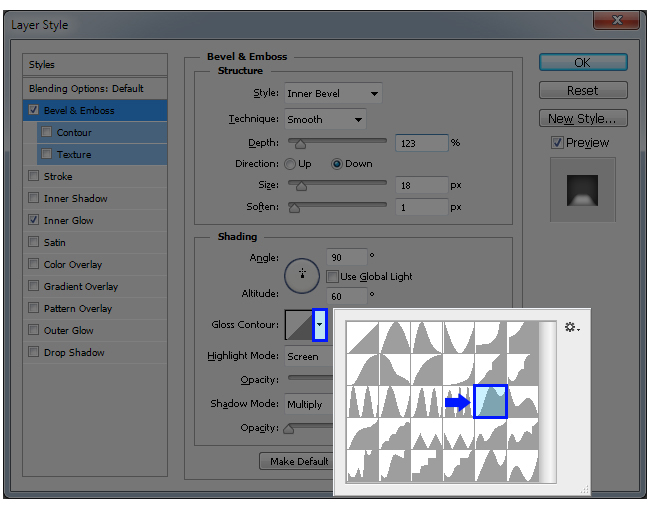
Still in the "Bevel & Emboss" settings, click on the small arrow next to the Gloss Contour thumbnail. From the thumbnail list, select the "Rolling Slope – Ascending" contour.
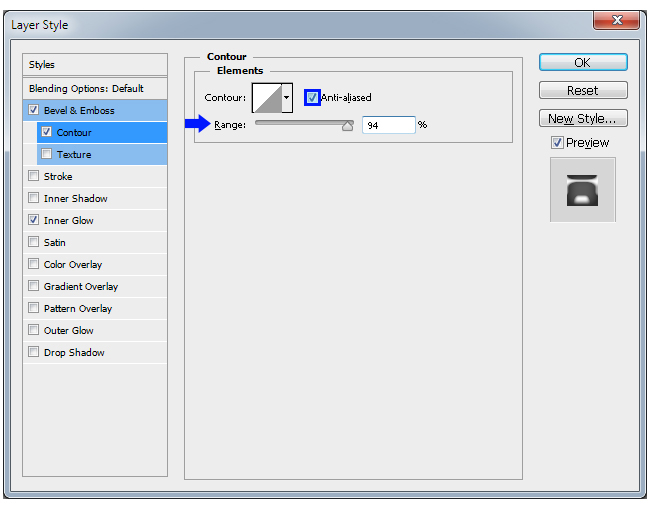
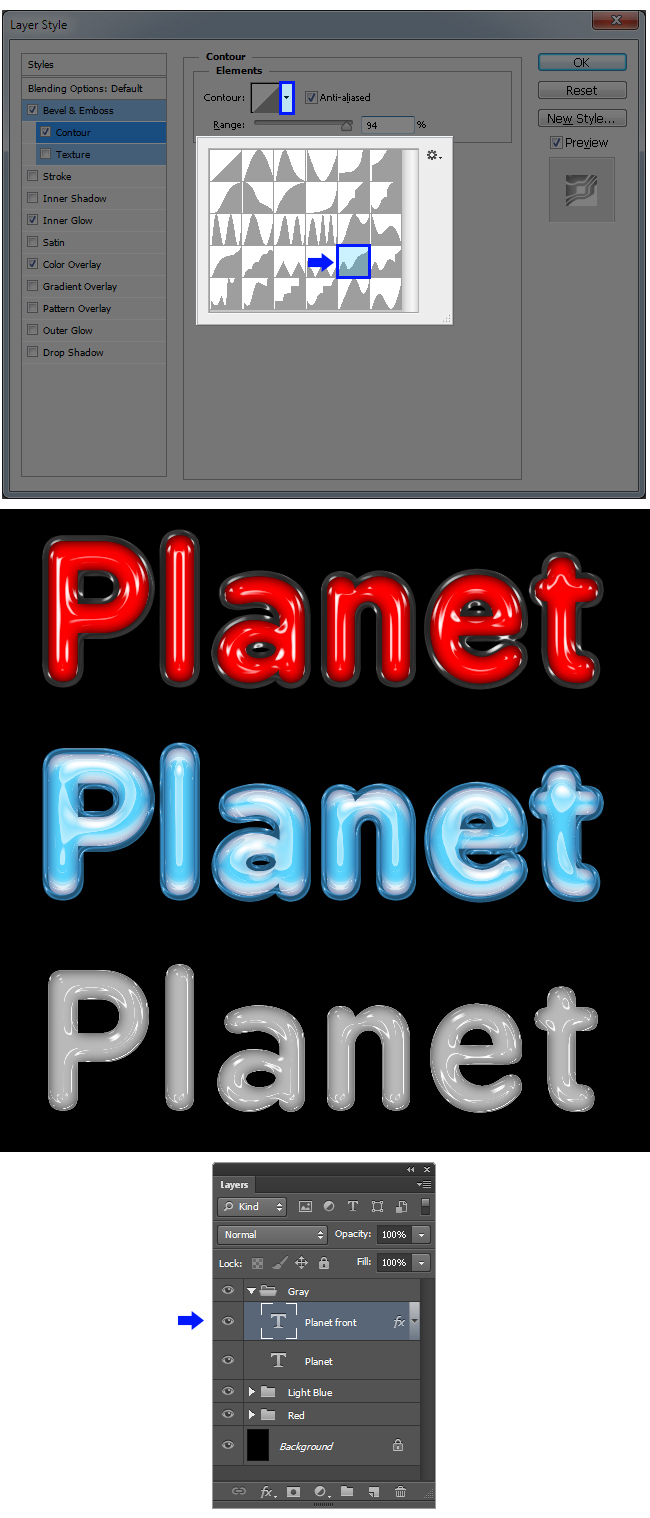
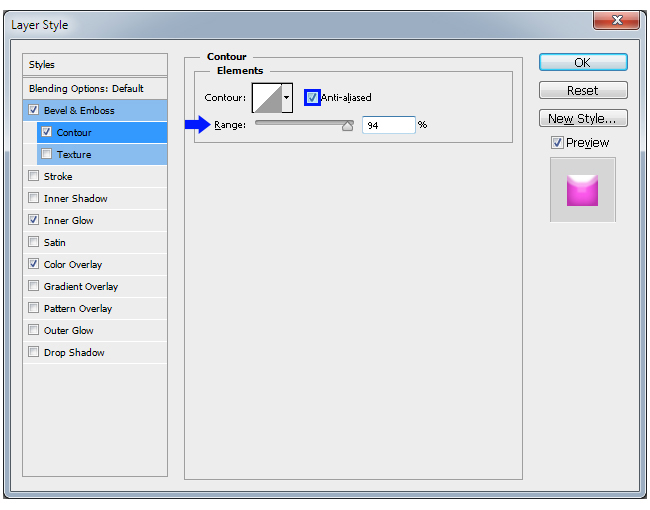
Now, check the Contour effect in the Layer Style window. Set the range to 94% and check the Anti-aliased box.
Click on the small arrow next to the Contour thumbnail and from the thumbnail list, select the "Valley – High" contour. Click OK.

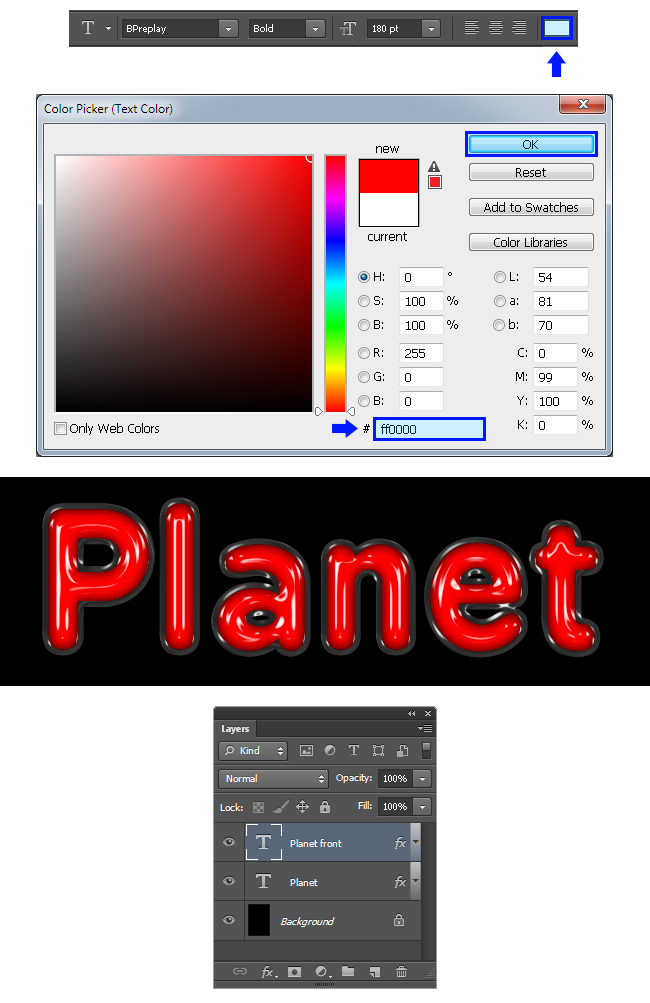
Select the Text Tool (T). Click over the color thumbnail in the text tool panel options and in the color picker window set the color to #FF0000. Click OK.
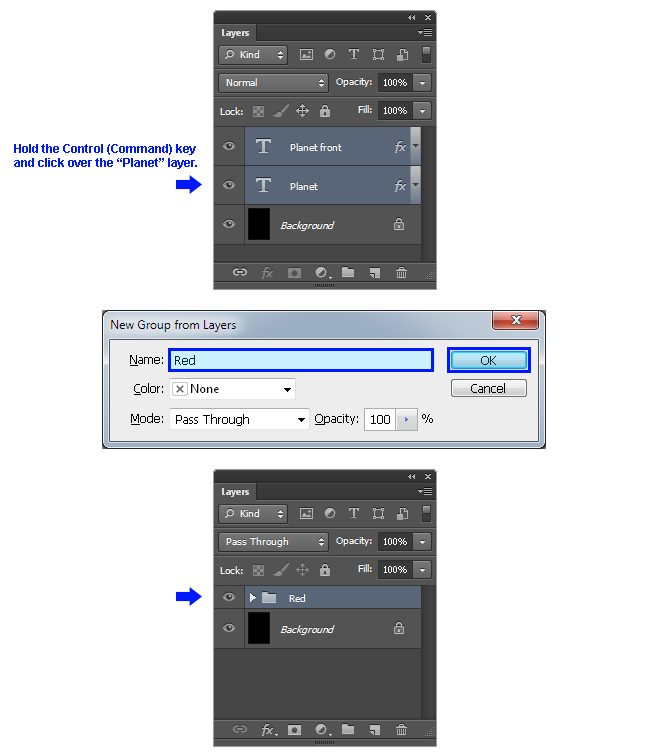
With the "Planet front" layer still selected, press and hold the Control (Command) key on your keyboard and click over the "Planet" layer. Go to Layer > New > Group From Layers and set the name to "Red". Click OK.
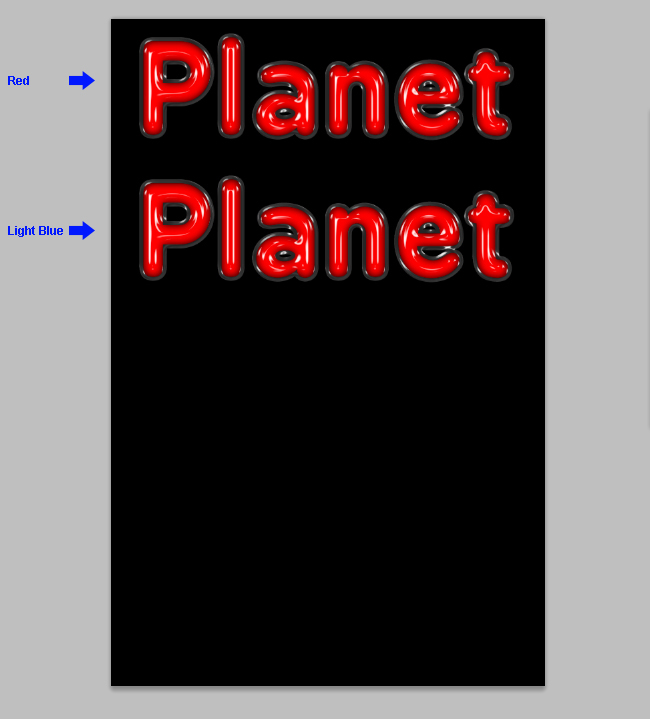
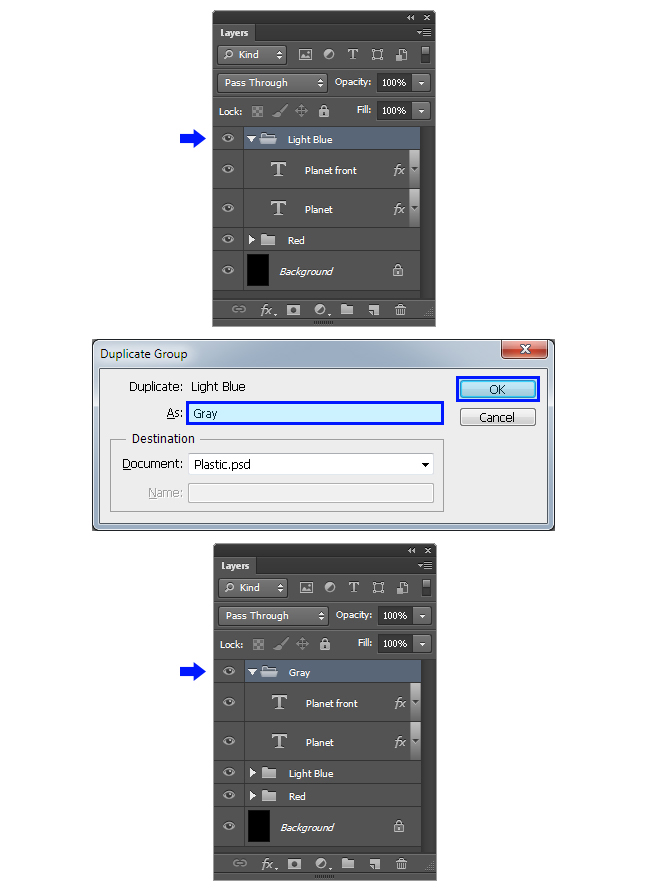
7. Go to Layer > Duplicate Group and set the name to "Light Blue". Click OK.
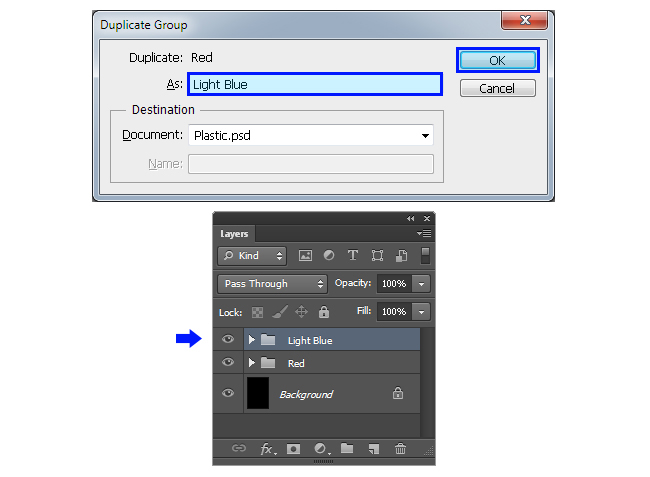
Click and drag over the canvas to place the new group below the "Red" group as shown.
Expand the Layer´s Group by clicking on the small arrow next to the group´s name.
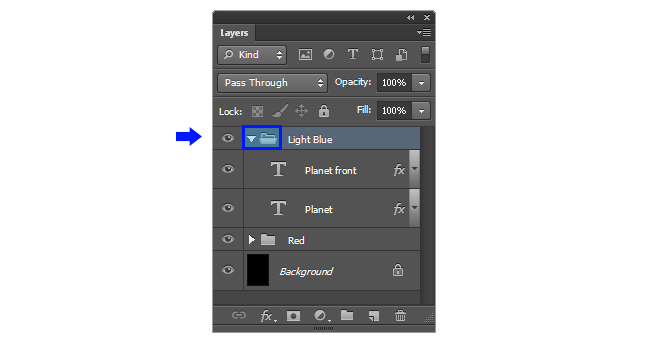
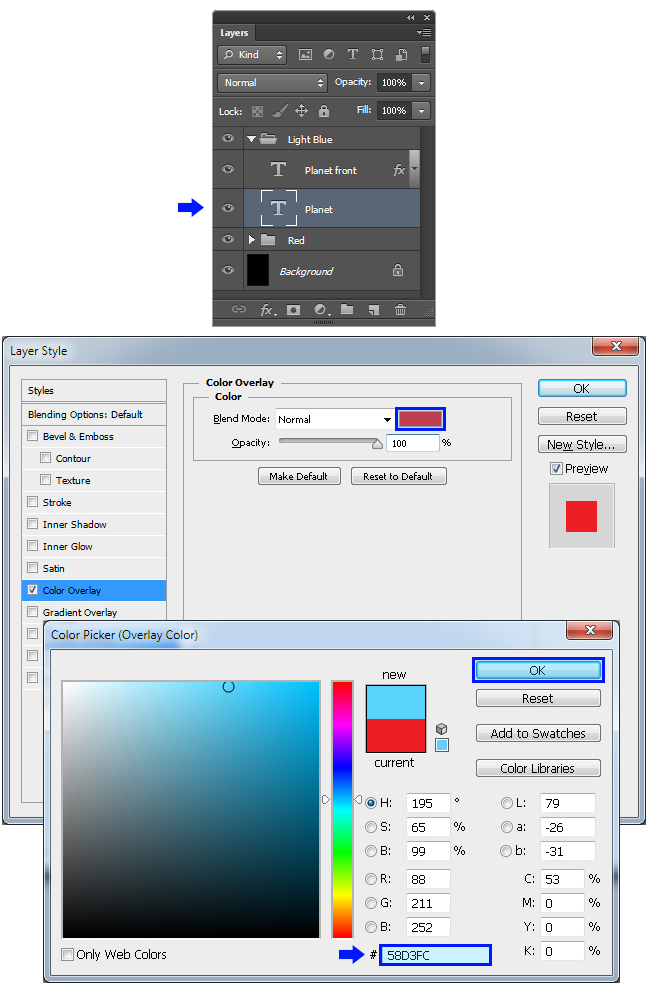
Click over the "Planet front" layer, hold the Control (Command) key on your keyboard and click over the "Planet" layer. Go to Layer > Layer Style > Clear Layer Style.
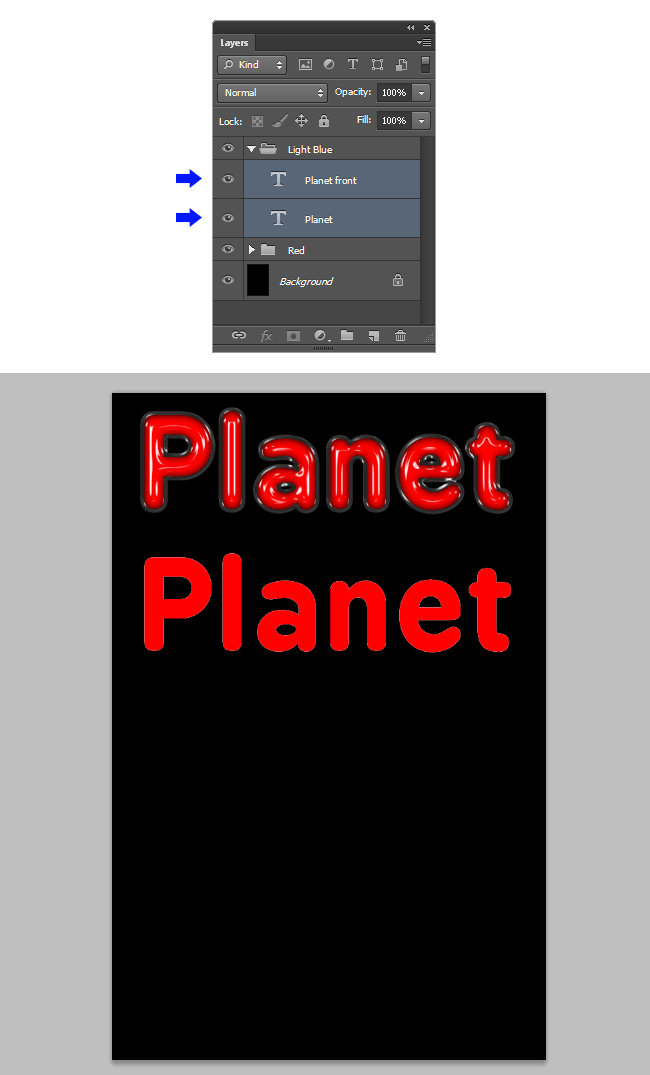
Click over the "Planet front" layer in order to select just this layer and go to Layer > Layer Style > Color Overlay. Click over the color thumbnail, and in the color picker window set the color to #58D3FC. Click OK.
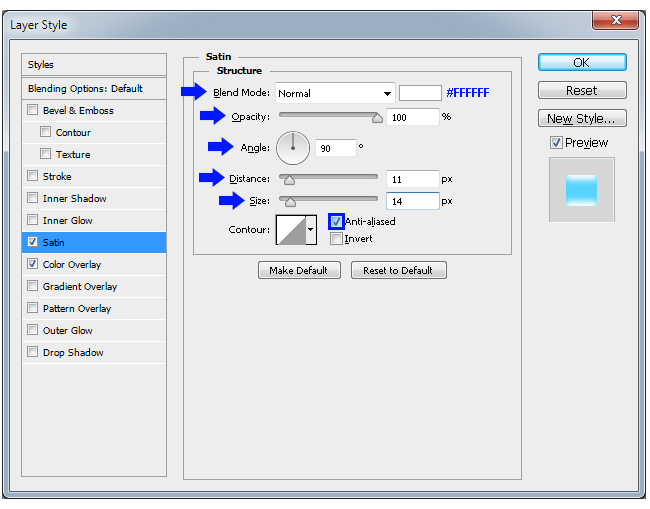
Still in the Layer Style window, check the Satin effect and apply the following settings:
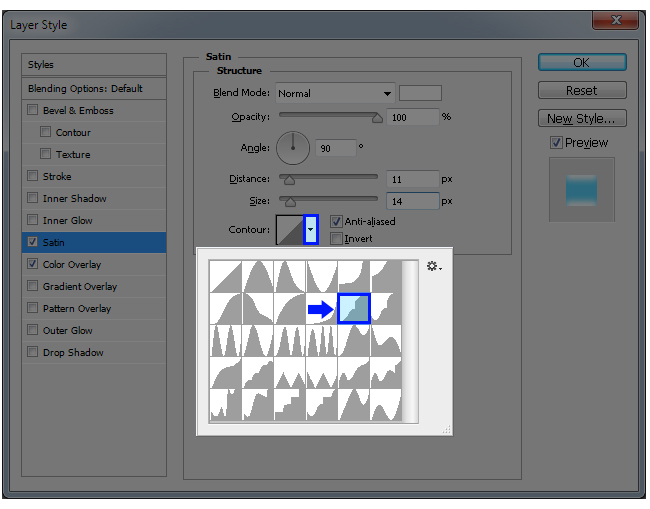
Now click over the small arrow next to the Contour thumbnail, and from the thumbnails list select the "Notched Slope" contour.
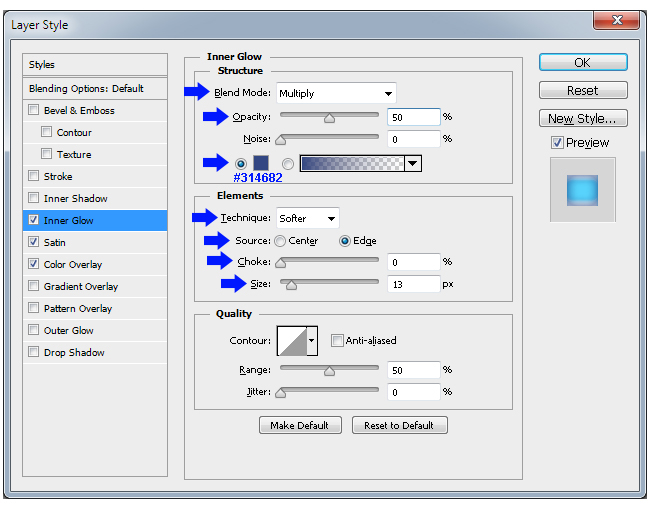
Check the Inner Glow effect in the Layer Style window and apply the following settings:
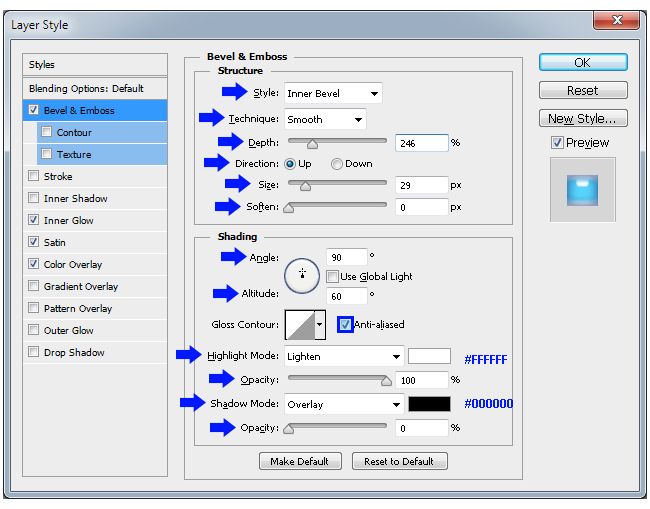
Now click over the Bevel & Emboss effect in the Layer Style window and apply the following settings:
Still in the Bevel & Emboss effect, click over the Contour thumbnail in order to open the Contour Editor. Click anywhere over the line in order to create a new point.
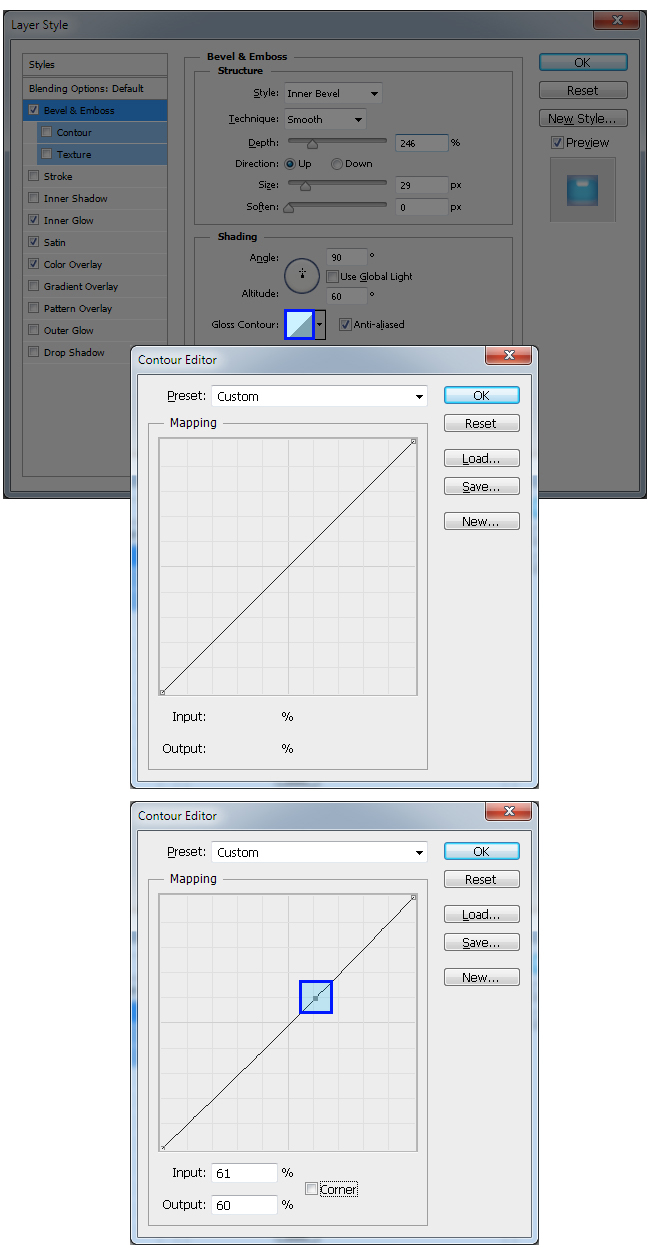
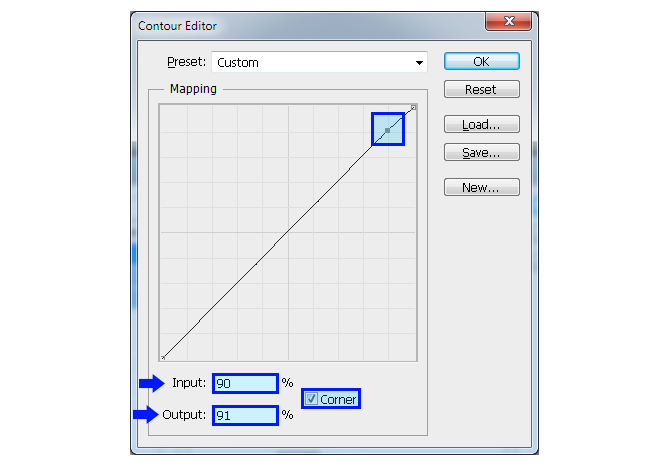
Set the Input value to 90% and the Output value to 91%. Check the "Corner" option.
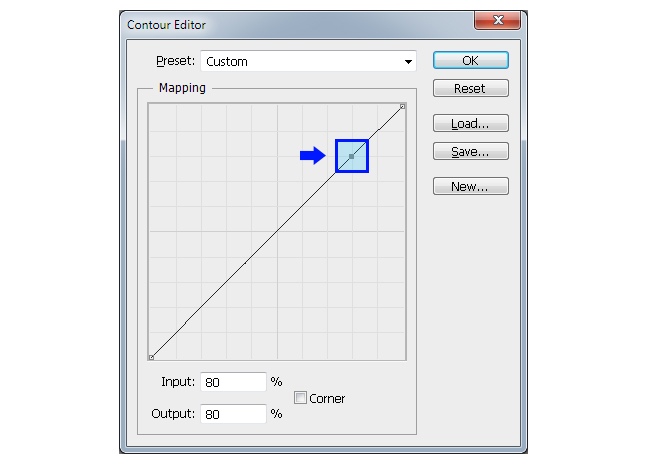
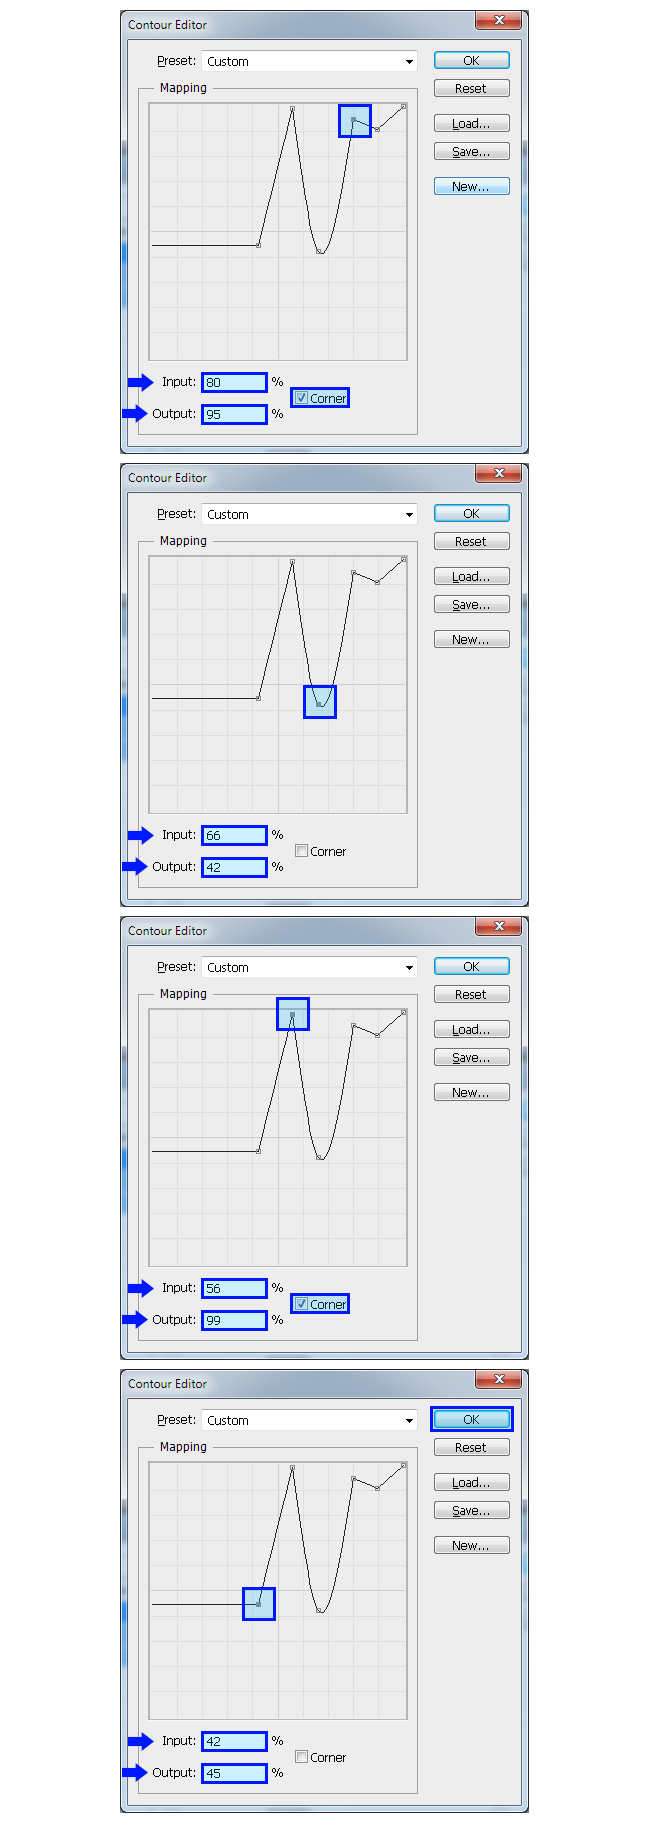
We will repeat this process a few more times. Click anywhere over the line in order to create a new point and set the Input value to 80%, the Output value to 95% and check the "Corner" option. Again, click over the line and set this new point to a Input value of 66% and a Output value of 42%. Again, click over the line and set the new point to a Input value of 56% and a Output value of 99% and check the "Corner" option. Now click over the bottom left point and set a Input value of 42% and a Output value of 45%. Click OK on the Contour Editor.
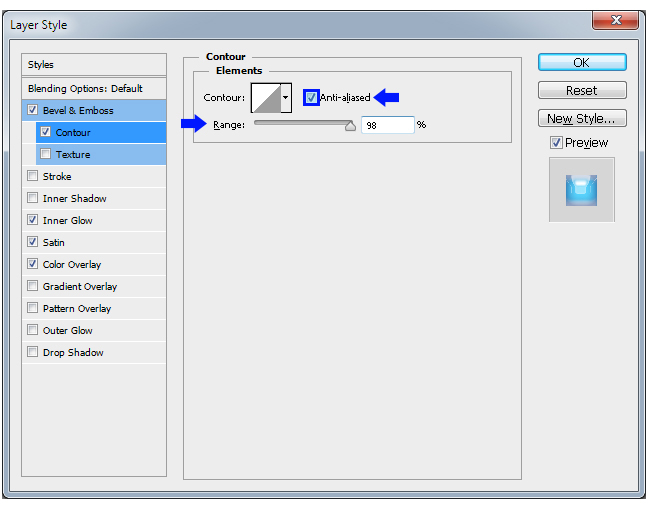
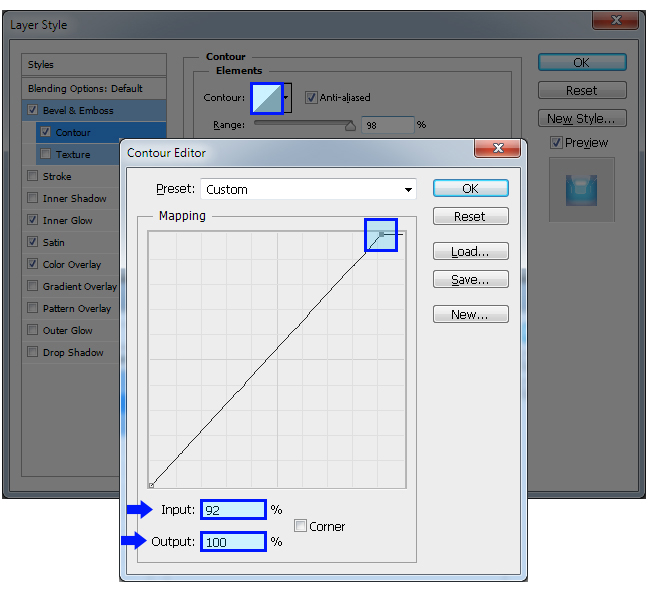
Check the "Contour" effect in the Layer Style window and apply the following settings:
We will now work on the Contour of this effect as we did in the last steps. To do so, click over the Contour thumbnail to open the contour editor. Click over the top right point and set the Input value to 92% and the Output value to 100%.
Just like we did before, we will repeat this process a few more times. Click anywhere over the line in order to create a new point and set the Input value to 74% and the Output value to 93%. Again, click over the line and set this new point to a Input value of 62% and a Output value of 82%. Again, click over the line and set the new point to a Input value of 50% and a Output value of 65%. Again, click over the line and set the new point to a Input value of 29% and a Output value of 44%. Again, click over the line and set the new point to a Input value of 25% and a Output value of 15%. Last time; click over the line and set the new point to a Input value of 13% and a Output value of 47%. Click OK on the Contour Editor. Click OK on the Layer Style window.

8. Click over the "Planet" layer to make it active. Go to Layer > Layer Style > Color Overlay. Click over the color thumbnail, and in the color picker window set the color to #58D3FC. Click OK.
Check the Inner Glow effect in the Layer Style window and apply the following settings:

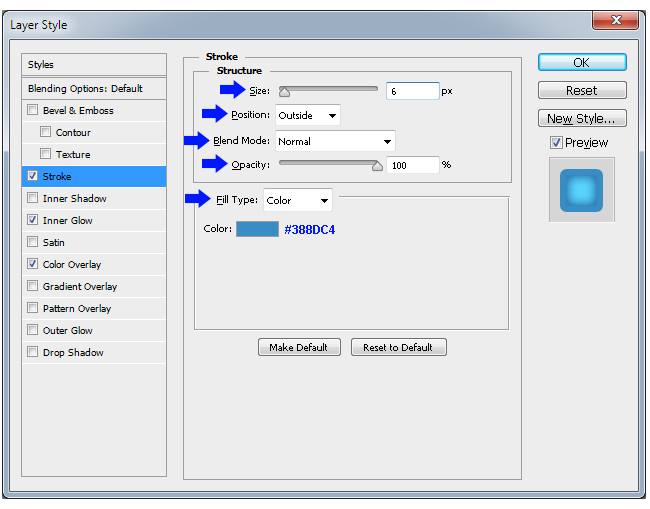
Check the Stroke effect and apply the following settings:
Now click over the Bevel & Emboss effect in the Layer Style window and apply the following settings:
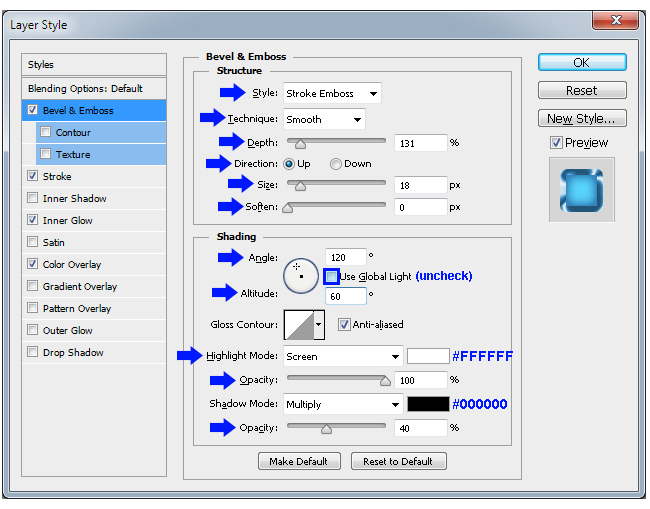
Still in the Bevel & Emboss effect, click over the small arrow next to the Gloss Contour thumbnail, and from the thumbnails list select the "Ring – Double" contour.

Check the "Contour" effect in the Layer Style window and apply the following settings:
Still in the Contour effect, click over the small arrow next to the Contour thumbnail, and from the thumbnails list select the "Shallow Slope – Valley" contour. Click OK.
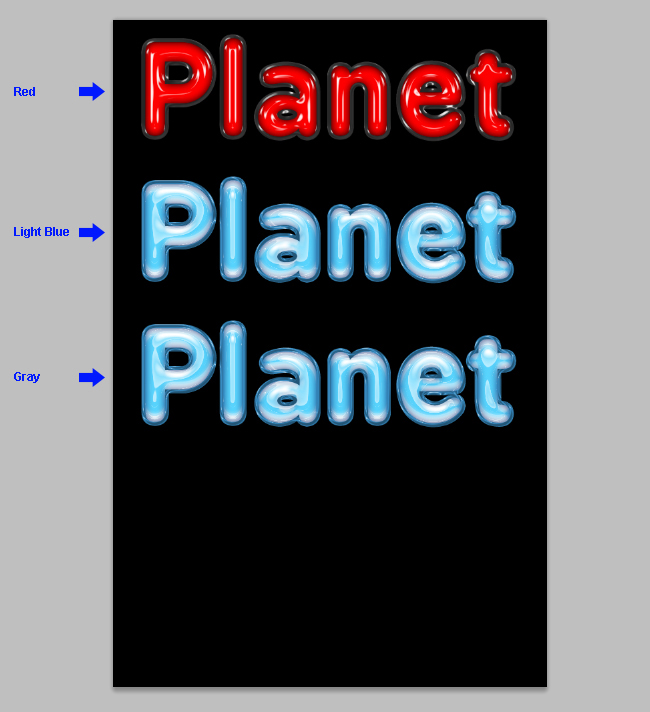
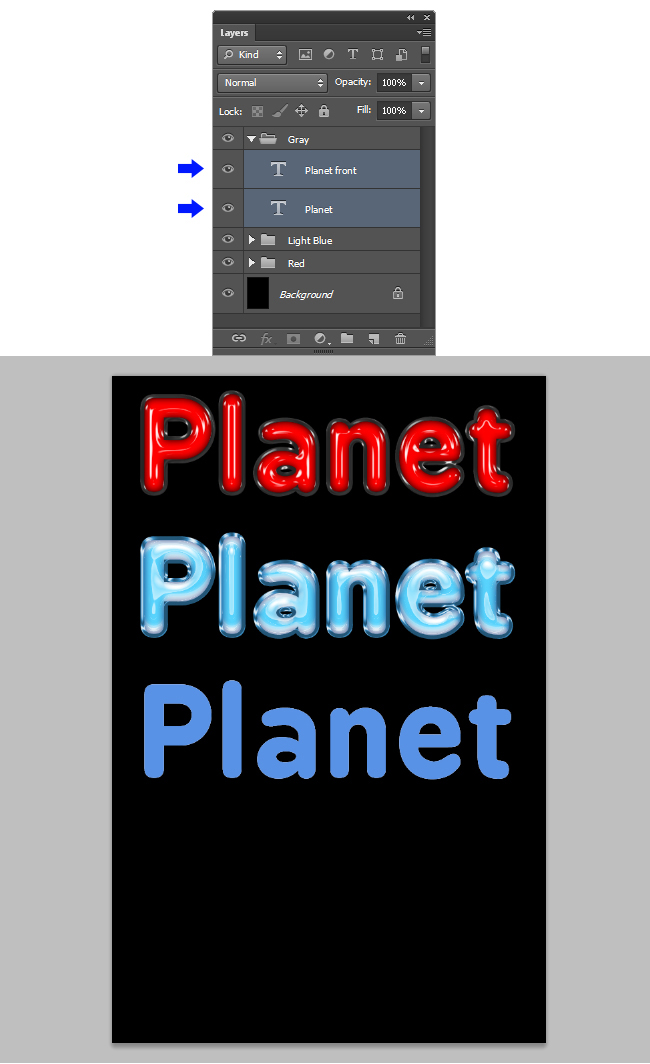
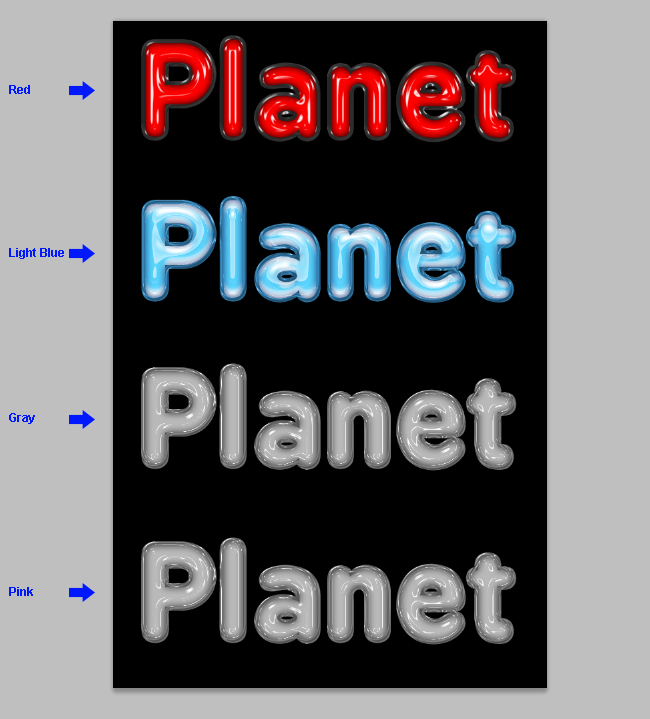
9. As you can see, making plastic styles in photoshop is easy when you know how to handle the Contour curves. We will now make two more styles changing the colors and the front text Contour curves. As we did it before, we will duplicate the Layer´s Group, clean the styles and apply new ones. So let´s start by clicking on the "Light Blue" group to select it and go to Layer > Duplicate Group. Set the name to "Gray" and click OK.
Click and drag over the canvas to place the new group below the "Red" group as shown.
Click over the "Planet front" layer, hold the Control (Command) key on your keyboard and click over the "Planet" layer. Go to Layer > Layer Style > Clear Layer Style.
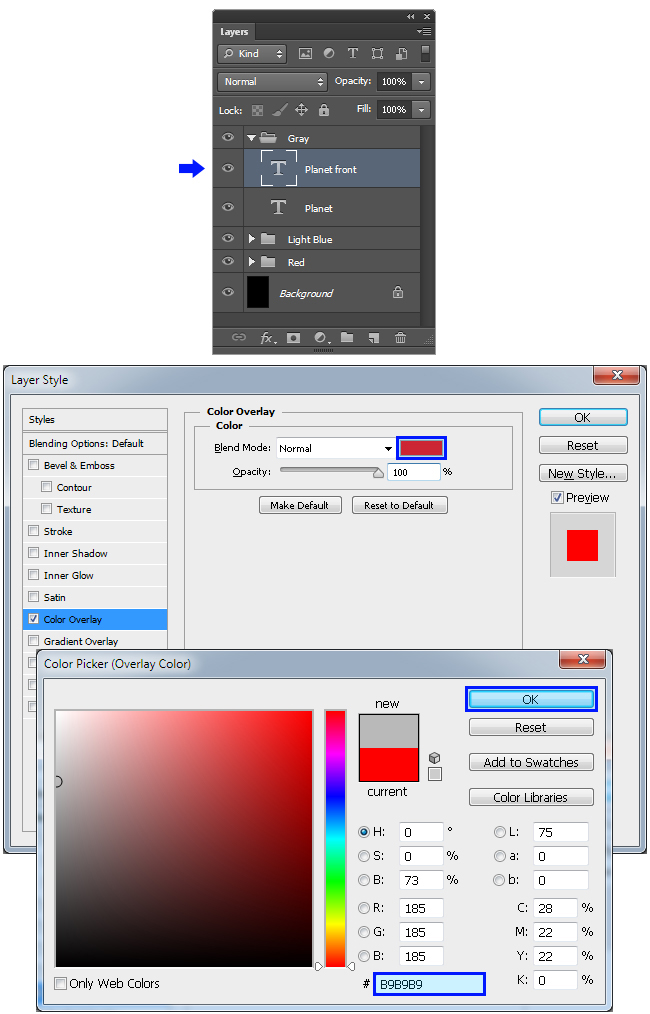
Click over the "Planet front" layer in order to select just this layer and go to Layer > Layer Style > Color Overlay. Click over the color thumbnail, and in the color picker window set the color to #B9B9B9. Click OK.
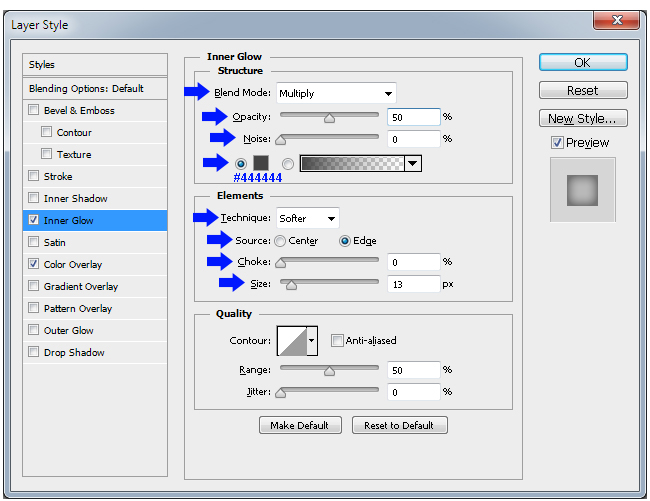
Check the Inner Glow effect in the Layer Style window and apply the following settings:
Now click over the Bevel & Emboss effect in the Layer Style window and apply the following settings:
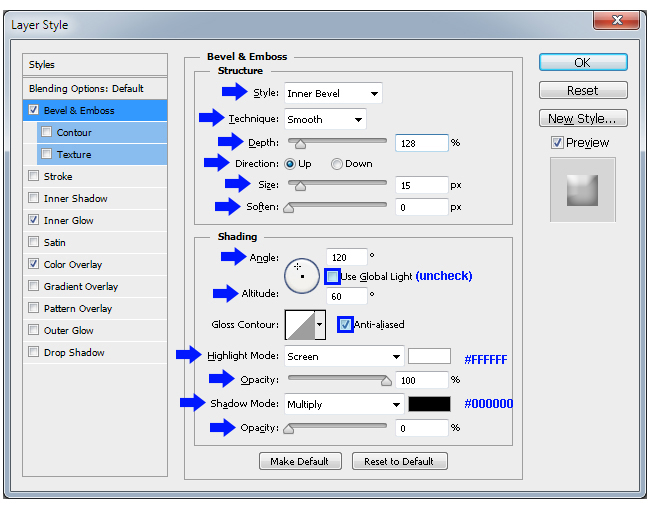
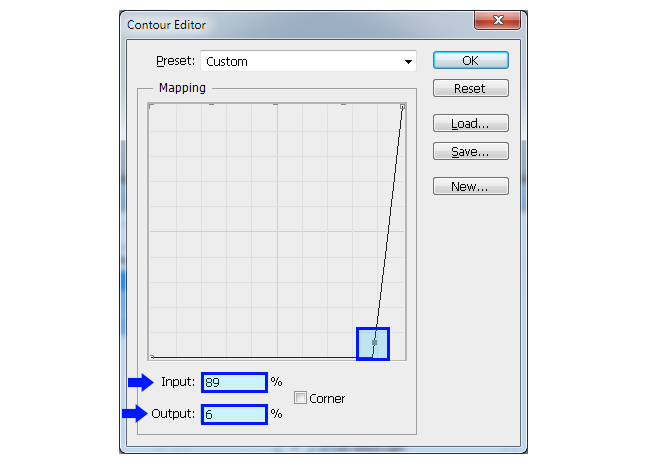
Still in the Bevel & Emboss effect, click over the Contour thumbnail in order to open the Contour Editor. Click anywhere over the line in order to create a new point.
Set the Input value to 89% and the Output value to 6%.
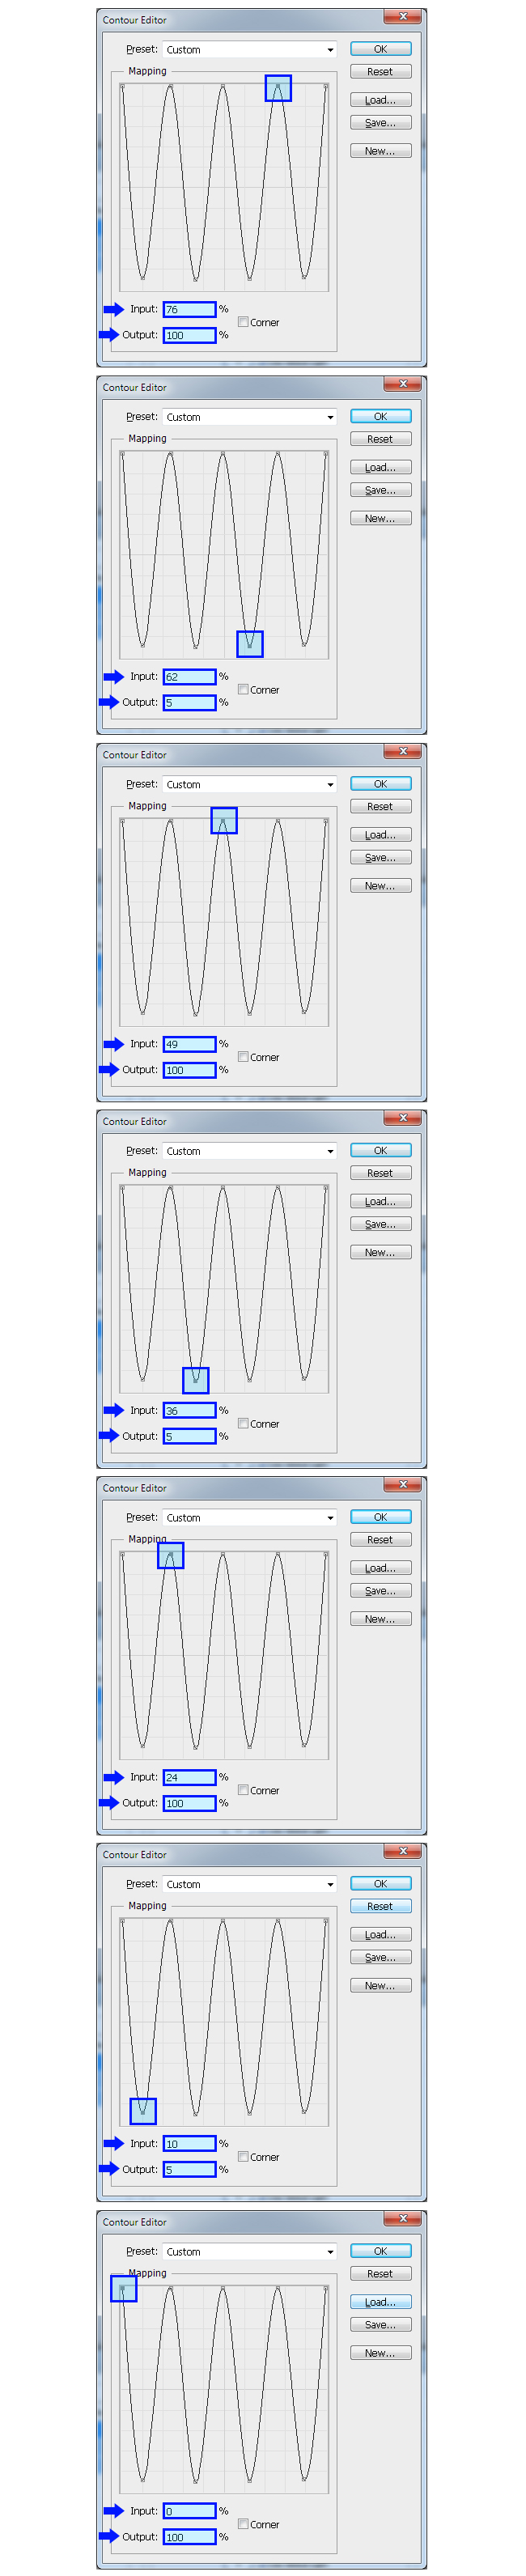
Again, we will repeat this process six more times. Click anywhere over the line in order to create a new point. Set the Input value to 76% and the Output value to 100%. Again, click over the line and set this new point to a Input value of 62% and a Output value of 5%. Again, click over the line and set the new point to a Input value of 49% and a Output value of 100%. Just three more times; click anywhere over the line in order to create a new point and set the Input value to 36% and the Output value to 5%. Again, click over the line and set this new point to a Input value of 24% and a Output value of 100%. Again, click over the line and set the new point to a Input value of 10% and a Output value of 5%. Now click over the bottom left point and set a Input value of 0% and a Output value of 100%. Click OK on the Contour Editor.
Check the "Contour" effect in the Layer Style window and apply the following settings:
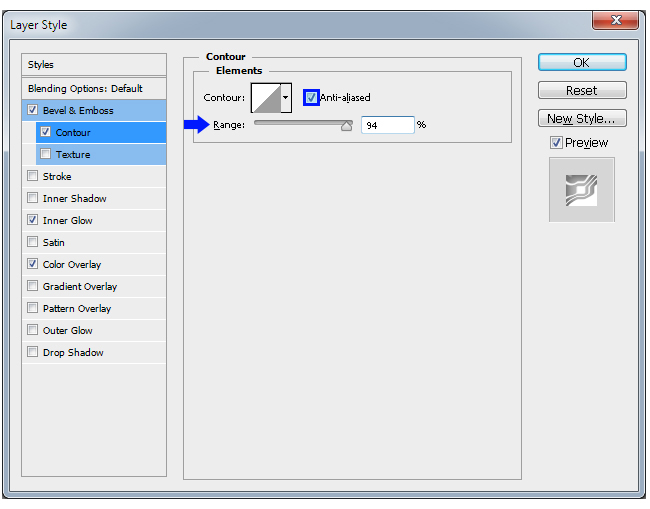
Still in the Contour effect, click over the small arrow next to the Contour thumbnail, and from the thumbnails list select the "Shallow Slope – Valley" contour. Click OK.
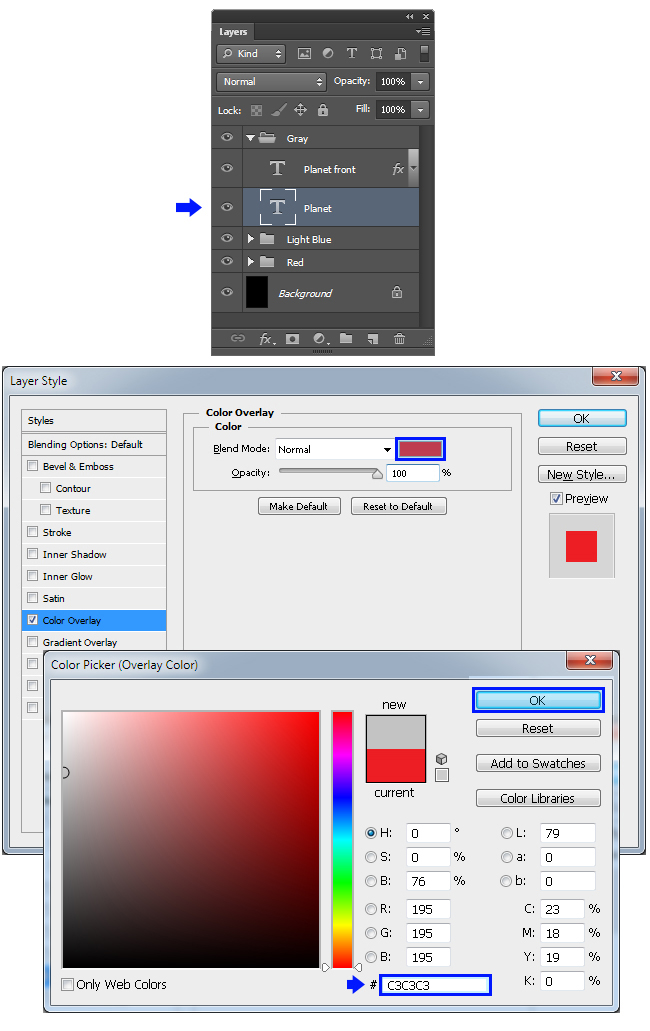
10. Click over the "Planet" layer to make it active. Go to Layer > Layer Style > Color Overlay. Click over the color thumbnail, and in the color picker window set the color to #C3C3C3. Click OK.
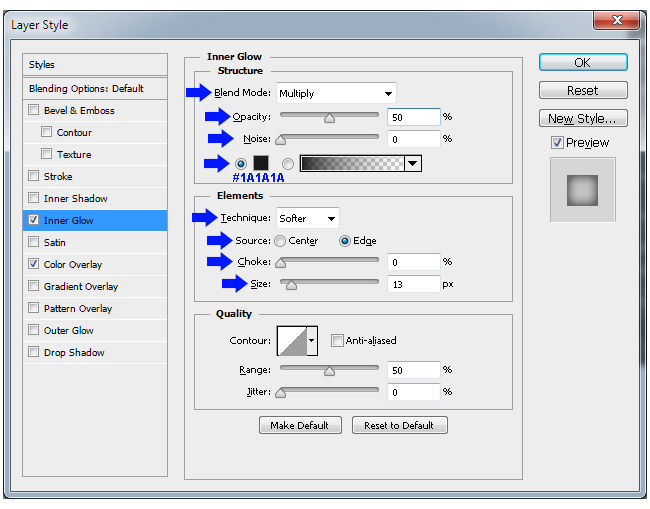
Check the Inner Glow effect in the Layer Style window and apply the following settings:
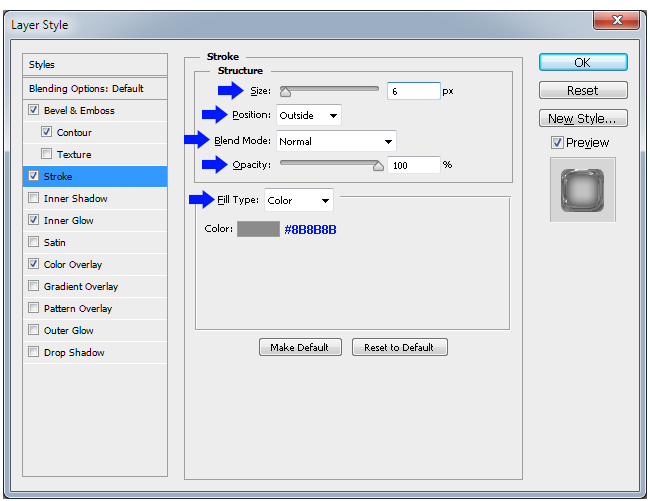
Check the Stroke effect and apply the following settings:
Now click over the Bevel & Emboss effect in the Layer Style window and apply the following settings:

Still in the Bevel & Emboss effect, click over the small arrow next to the Gloss Contour thumbnail, and from the thumbnails list select the "Ring – Triple" contour.
Check the "Contour" effect in the Layer Style window and apply the following settings:

Still in the Contour effect, click over the small arrow next to the Contour thumbnail, and from the thumbnails list select the "Shallow Slope – Valley" contour. Click OK.
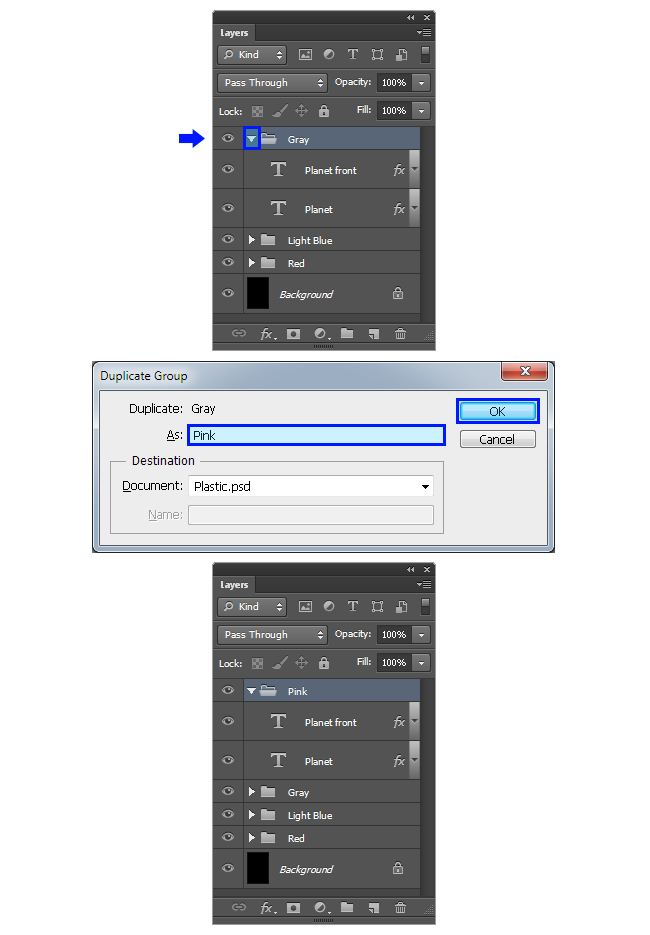
11. Now, we will make the last one by using only the predefined contours so you can see how to achieve a nice looking plastic effect with the default contours settings. Again, we will duplicate the Layer´s Group, clean up the styles and apply new ones. So let´s start by clicking on the arrow next to the "Gray" group name to collapse it and go to Layer > Duplicate Group. Set the name to "Pink" and click OK.
Click and drag over the canvas to place the new group below the "Gray" group as shown.
Click over the "Planet front" layer, hold the Control (Command) key on your keyboard and click over the "Planet" layer. Go to Layer > Layer Style > Clear Layer Style.
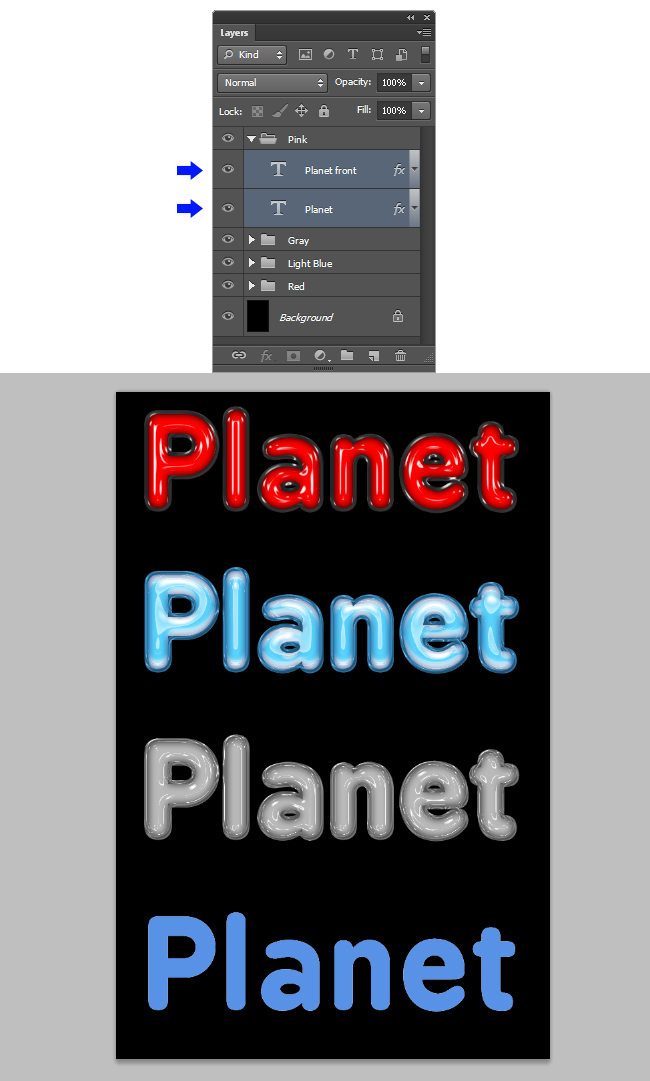
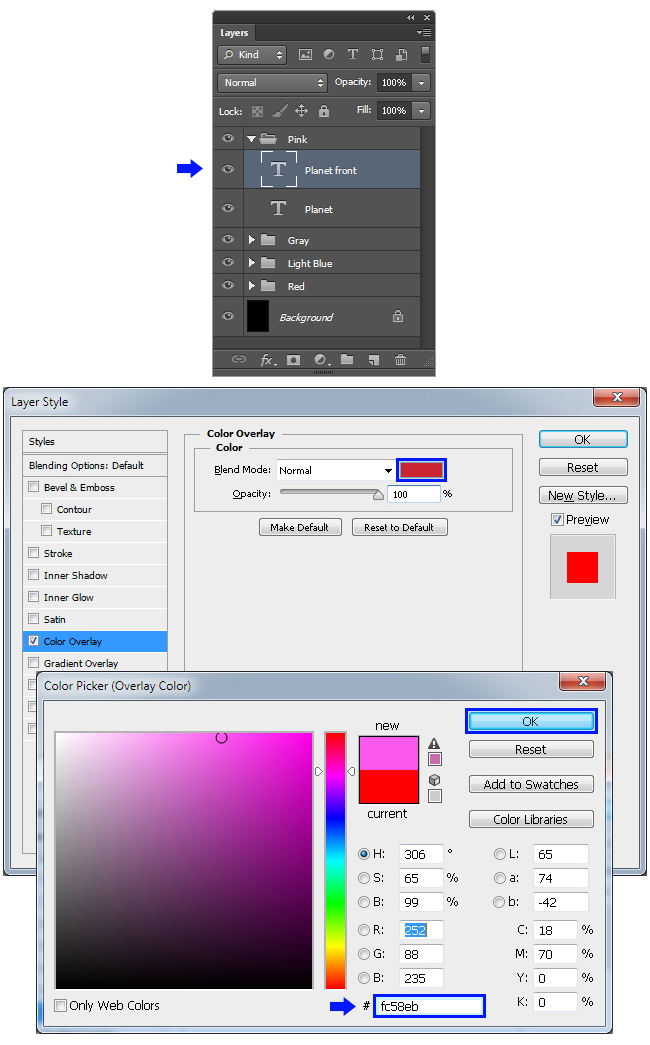
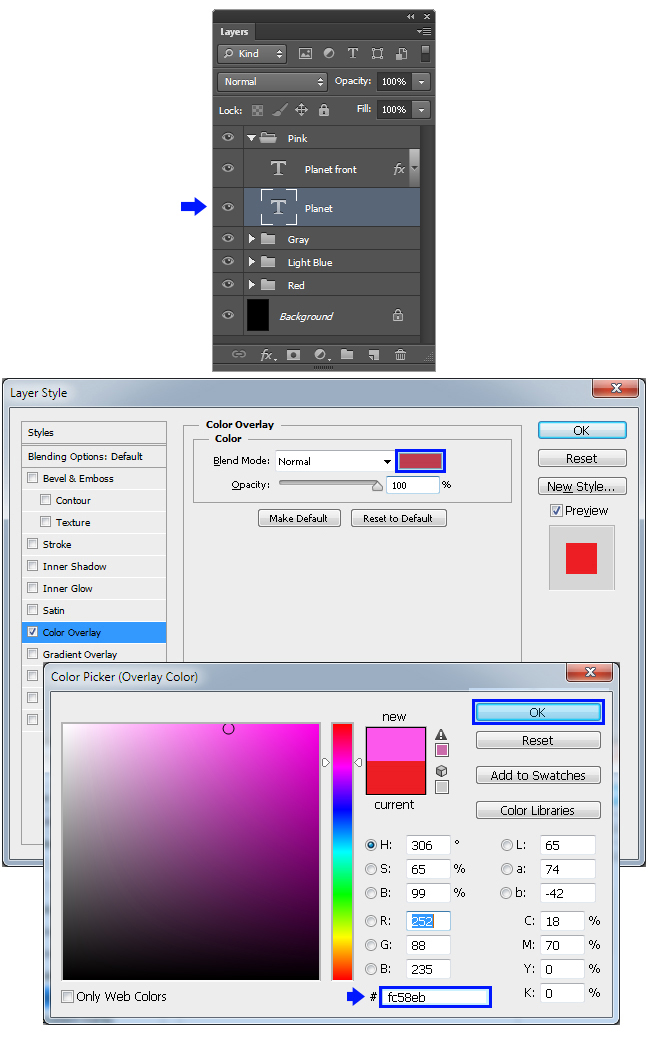
Click over the "Planet front" layer in order to select just this layer and go to Layer > Layer Style > Color Overlay. Click over the color thumbnail, and in the color picker window set the color to #FC58EB. Click OK.
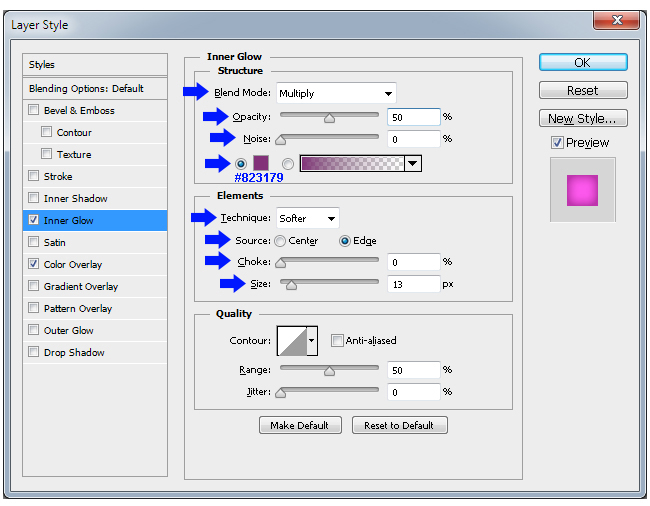
Check the Inner Glow effect in the Layer Style window and apply the following settings:

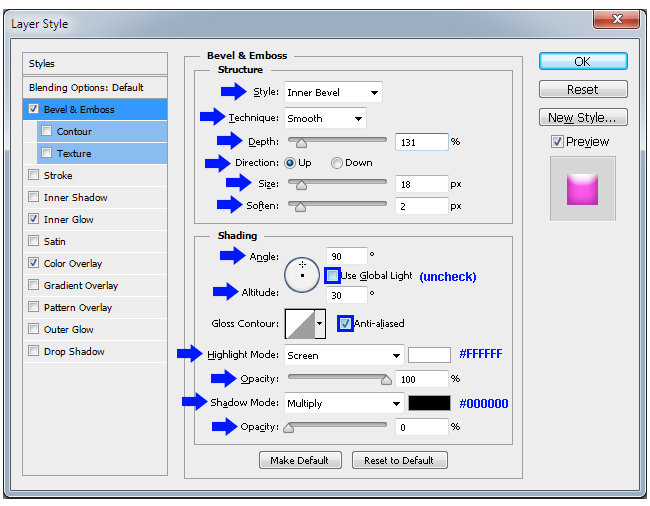
Click over the Bevel & Emboss effect in the Layer Style window and apply the following settings:
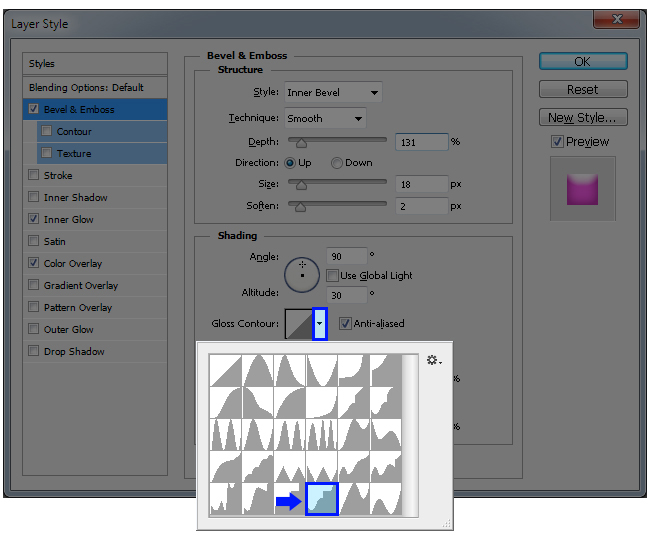
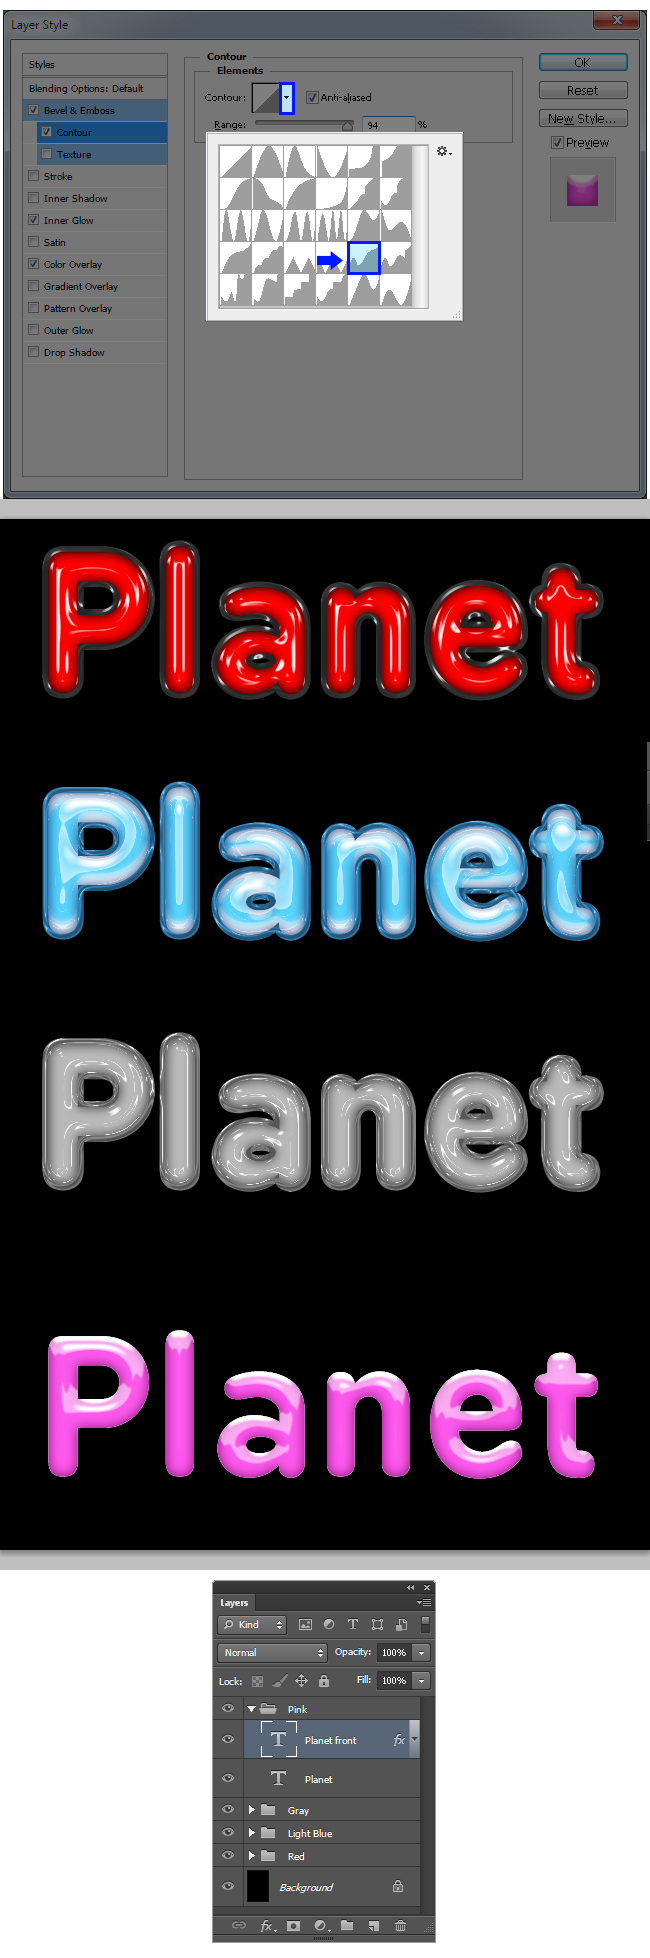
Still in the Bevel & Emboss effect, click over the small arrow next to the Gloss Contour thumbnail, and from the thumbnails list select the "Terraced" contour.
Check the "Contour" effect in the Layer Style window and apply the following settings:
Still in the Contour effect, click over the small arrow next to the Contour thumbnail, and from the thumbnails list select the "Shallow Slope – Valley" contour. Click OK.
12. Click over the "Planet" layer to make it active. Go to Layer > Layer Style > Color Overlay. Click over the color thumbnail, and in the color picker window set the color to #FC58EB. Click OK.
Check the Inner Glow effect in the Layer Style window and apply the following settings:
Check the Stroke effect and apply the following settings:
Now click over the Bevel & Emboss effect in the Layer Style window and apply the following settings:
Still in the Bevel & Emboss effect, click over the small arrow next to the Gloss Contour thumbnail, and from the thumbnails list select the "Terraced" contour.
Check the "Contour" effect in the Layer Style window and apply the following settings:
Still in the Contour effect, click over the small arrow next to the Contour thumbnail, and from the thumbnails list select the "Shallow Slope – Valley" contour. Click OK.
Now that you have learned how to modify the Contour curves, try to make some changes to the ones we have made to get brand new plastic styles.
