
This week let us learn a little technique I like to call the pixellated blur. I don’t really call it that, but I had to call it something for the purposes of this tutorial. Really, I don’t call it anything at all. Anyway, on with the tutorial.
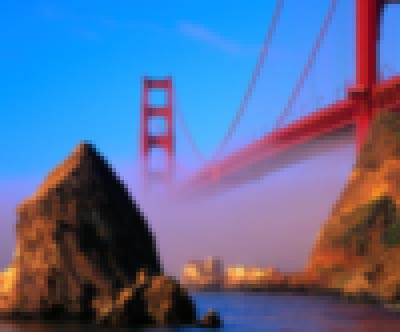
I want to have an image that is focus on a single point, but blurry and pixellated throughout the rest of the image. I am using a photo of the famous bridge in the famous city that we all know. You can see it below.

I want to focus on the top of the farthest tower over there. So the first thing I do is to duplicate the layer with my bridge photo on it. I do this by dragging my layer to the new layer icon at the bottom of the layers palette. It looks like a folded piece of paper. Once this is done, you should have three layers total. A background, and two of the bridge layers.
After that is done, we are going to select the upper layer. Now go Filter -> Blur -> Gaussian Blur. Give it a few pixels, until you are satisfied with the outcome. Look below for my version.

Now that looks like a blurry version of the first image right? Well, that’s because it is.
So let’s add some pixellation and really mess this perfectly good photo all up. Go Filter ->Pointilize ->Mosaic. Use the slider to give it some parameters on size. I used 4 here. I like the number 4. I also like most of the other numbers too. That’s another story though. Play around with your own favorite numbers and come up with what you like.
Ok, so now we have an image that looks… well… like garbage. So what are we going to do with this thing? Well, the first thing we are going to do is to add a layer mask to the top layer. Do this by hitting the Add Layer Mask button at the bottom of the layers palette. When this is done, select the gradient tool in the toolbar. I used a radial gradient on mine, but you can experiment with any gradient, or you can use a soft paintbrush with black pixels over the spot you want to show focused. Or you can use any shade of grey, or gray as some folks say to give it any level of clarity. So I swipe a radial gradient on mine from black to white starting at the far tower. I can do this as many times as I want until I get it right. I am so good, that I got it right the first time. That is… the first time after I did it about a dozen practice rounds. I call them practice, you can call them screwups. Either way, I still get paid the same. That’s what makes PS so cool, you can always revert back to before you screwed up the image. Try that with oil and canvas Degas!

So we learned a little sump’m sump’m today right? Repeat after me, ” I am a Photoshop masterrrrr. I am a Photoshop masterrrr”. Go meditate on this as your mantra. When you are done, you will be “one” with the pixel. Then try other combinations of this technique with other filters and get rich on you talents. Remember that the Zen is in living out your destiny. You ARE a Photoshop master! Talk at you in seven days.

Repeating: I am a Photoshop masterrrrr. I am a Photoshop masterrrr 😀
Tnx btw 🙂
I like the way the tutorial was presented more than what it actually wanted to teach us. 😛