
Excerpted from Layers: The Complete Guide to Photoshop's Most Powerful Feature, 2nd Edition
Let's face it. The designs you can create with Smart Object layers are not, from a visual aspect, any different from what you could create with regular layers. However, this is one of those tutorials that will blow your mind from an automation standpoint. The way that Smart Object layers can be used to create reusable templates is way cool and truly showcases the power of Smart Objects.
Step 1: Open A Photo That Will Be The Main Image For An Album Page
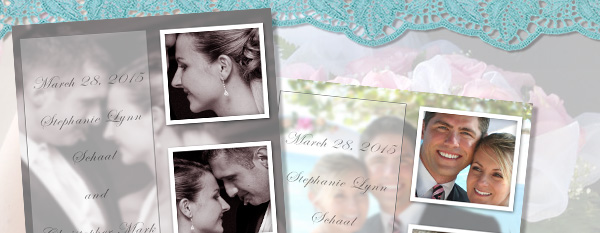
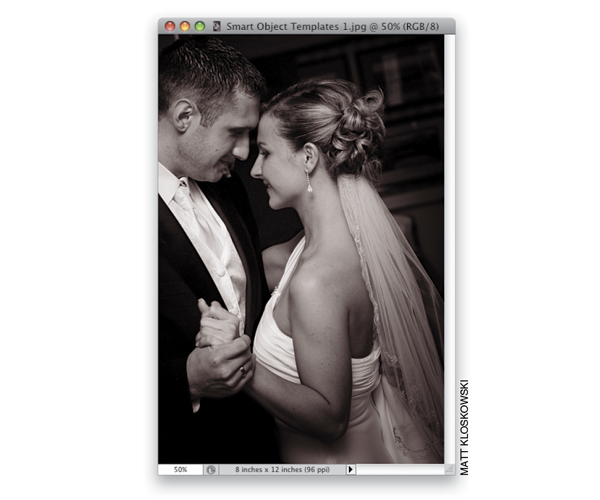
Open the main photo for this design. You'll see that the project here works great for creating reusable album pages. These files can be saved and opened later to easily swap out the photo. If you want to try this with the wedding image I used here, you can download it from the website I talked about in the book's introduction.
Step 2: Turn The Background Layer Into A Smart Object
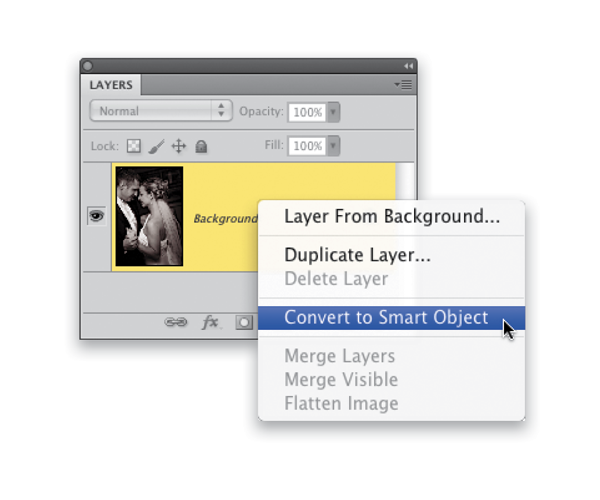
Start out by turning the Background layer into a Smart Object. In the last tutorial we just used File>Open as Smart Object, but you can turn any layer into a Smart Object, even after it's open. Just Right-click on the layer and choose Convert to Smart Object. Nothing will change visually in the image, but you'll now see the little Smart Object icon on the layer thumbnail in the Layers panel and the Background layer will be renamed "Layer 0."
Step 3: Duplicate The Smart Object Layer
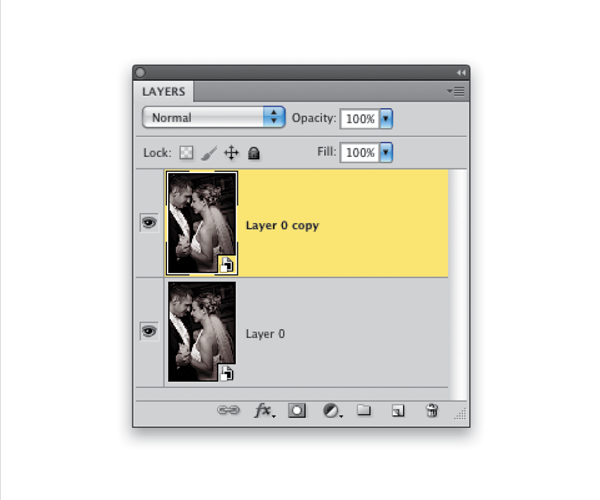
Press Command-J (PC: Ctrl-J) to duplicate the Smart Object layer, so now you have two Smart Object layers.
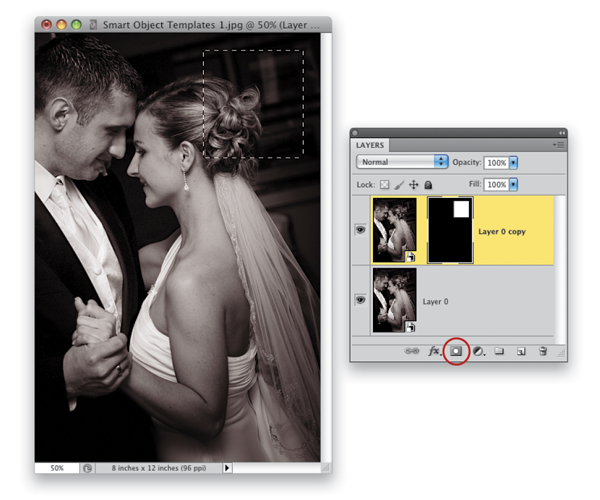
Step 4: Make A Square Selection And Add A Layer Mask To The Duplicate Layer
Select the Rectangular Marquee tool (M) and make a square sel-ection near the top right of the image. Make sure the duplicate copy of the Smart Object layer is the selected layer. Then click on the Add Layer Mask icon at the bottom of the Layers panel to turn the selection into a layer mask.
âƒ
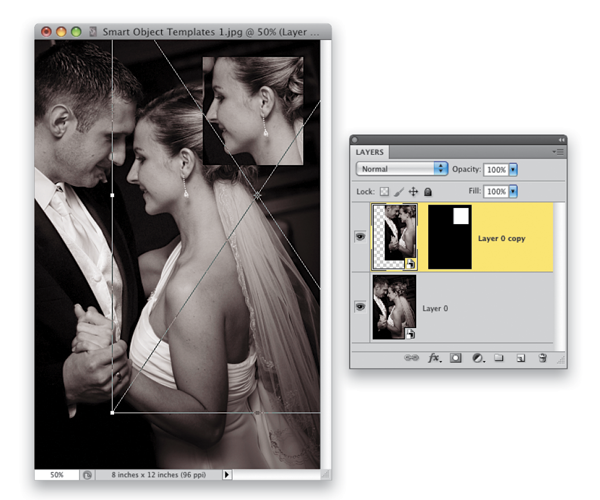
Step 5: Use Free Transform To Resize The Photo To Better Fit Into The Visible Square
Now let's resize the Smart Object layer to make it fit into the square area better. Click on the Smart Object image thumbnail in the Layers panel, and then click on the link icon in between the image thumbnail and layer mask (this unlinks the image and mask, allowing you to move and resize the image on its own). Click the Edit menu and choose Free Transform. Press-and-hold the Shift key and drag one of the corner points inward to reduce the size of the photo. Resize it enough so you can still fill the square with the bride. Move your cursor inside the Free Transform bounding box to move it around, then press the Return (PC: Enter) key to commit your transformation.
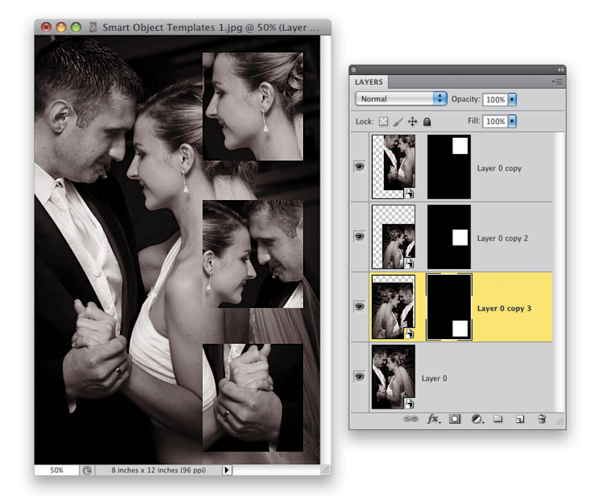
Step 6: Repeat Steps 3-5 Two More Times. Place The Duplicates Evenly Along The Right Side
Repeat Steps 3-5 twice. Duplicate the original Smart Object layer, make a selection, add a layer mask, and use Free Transform to reposition each one. Try to vary each photo so it showcases a different part of the photoâ”almost making it look like there are three different photos, even though they're actually the same one. When you make your selections, arrange them evenly along the right side of the image.
Note: I thought the image look-ed better flipped for the middle and bottom squares, so when I wastransforming them, I went to the Edit menu and chose Transform>Flip Horizontal.
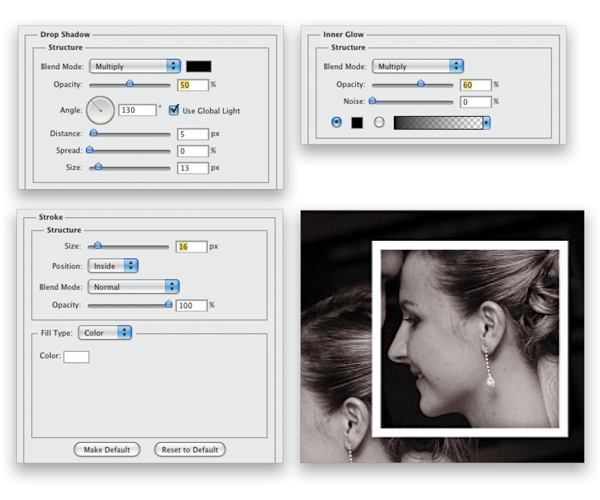
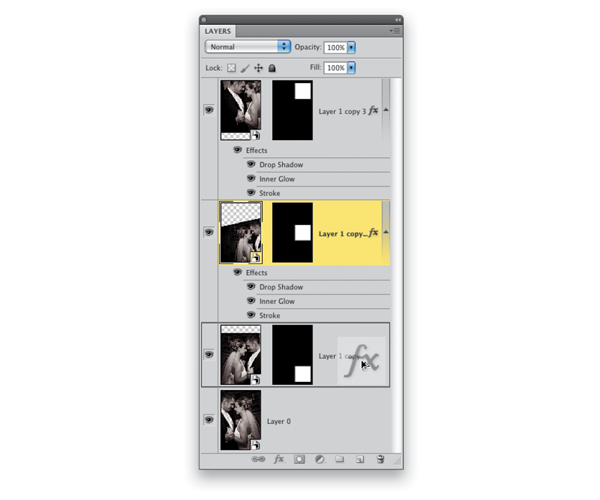
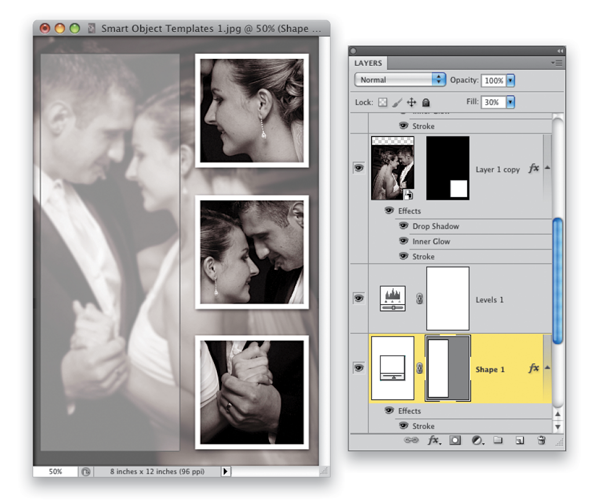
Step 7: Add Drop Shadow, Stroke, And Inner Glow Layer Styles
Double-click one of the small, square Smart Object layers you just created to open the Layer Style dialog. Add a Drop Shadow layer style, drop the Opacity to 50%, the Distance to 5, and increase the Size to 13. Then add an Inner Glow layer style, changing the color swatch to black, the Blend Mode pop-up menu to Multiply, and lowering the Opacity to 60. Finally, add a Stroke layer style. Set the Size to 16 px, Position to Inside, and set the Color to white. Click OK when you're done.
Step 8: Option-drag (pc: Alt-drag) To Duplicate The Layer Style To The Other Two Layers
Copy the layer style you just added to the other two square layers. To do this, press-and-hold the Option (PC: Alt) key and click-and-drag the layer style (fx) icon onto the other two layers to duplicate the three layer styles on those layers.
âƒ
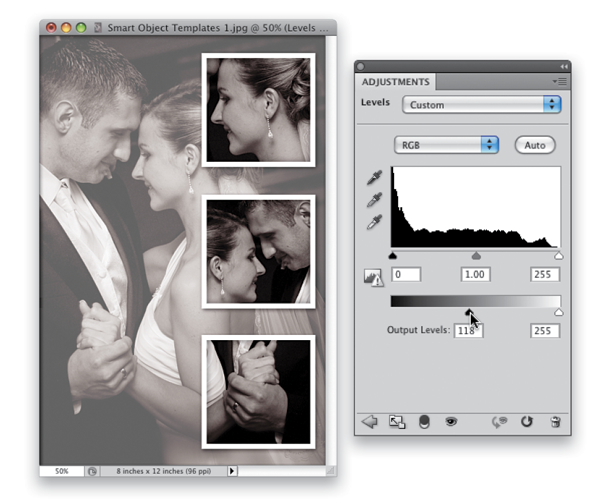
Step 9: Add A Levels Adjustment Layer On Top Of The Background
Click once on the bottom layer (the original Smart Object layer). Then, in the Adjustments panel (Window>Adjustments), click on the Levels icon (the second one from the left in the first row) to create a Levels adjustment layer. In the Levels options, drag the black Output Levels slider to 118 to screen the background photo and make it appear lighter than everything else.
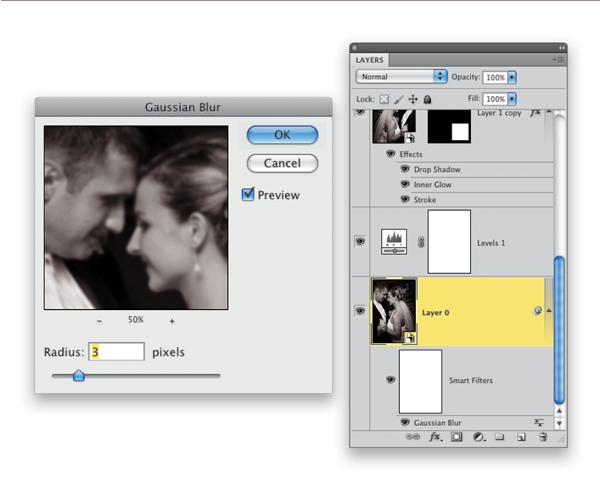
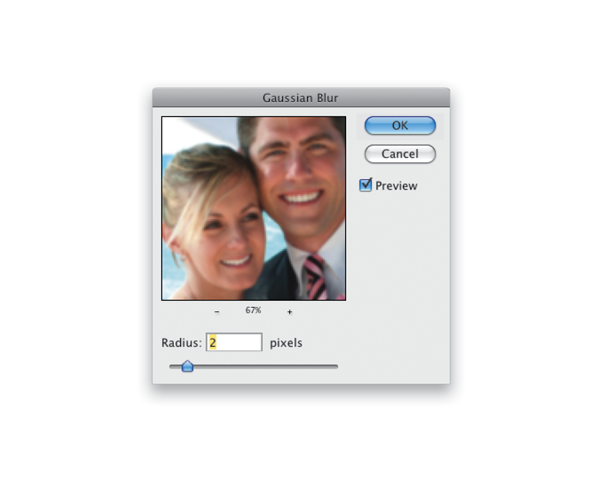
Step 10: Apply A Gaussian Blur Filter On The Background Photo
Click back on the bottom layer and let's add a blur to it to enhance its effect as a background design element and not a major player in the whole image. Since the layer is a Smart Object layer, we can take advantage of Smart Filtersâ”you know, the kind you can always come back and change. So, click the Filter menu and choose Blur>Gaussian Blur. Enter a setting of 3 pixels and click OK. Then take a look at the layer in the Layers panel. You'll see the Smart Filters sublayer appear right under it. We don't need to edit it right now, but we will in a moment and you'll see how easy it is.
Step 11: Add A White Rectangle Shape Layer On The Left
We're just about done. Now select the Rectangle tool (the Shape tool, not the Marquee tool; press U to get it). Press D, then X to set your Foreground color to white and draw a large rectangle over the left side of the image.
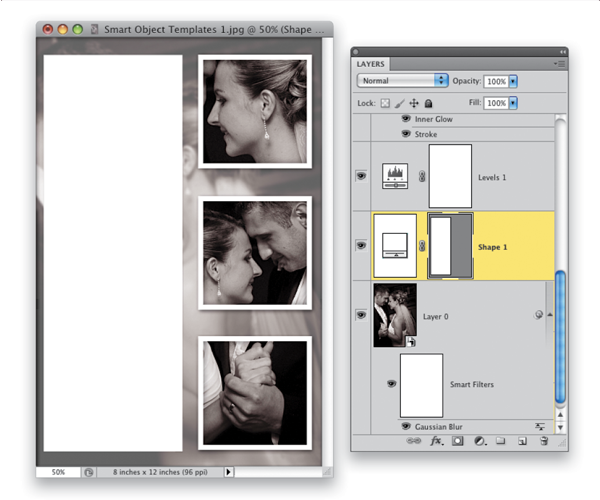
Step 12: Add A Stroke Layer Style. Change The Color To Black. Reduce The Fill Opacity
Double-click the Shape layer you just created and add a Stroke layer style. Change the Size to 2 px and the Color to black. Click OK to add the style and close the Layer Style dialog. Then, reduce the Fill of the layer (at the top right of the Layers panel) to 30%. This leaves the Stroke layer style at full opacity, but reduces the white from the layer so you can see through it.
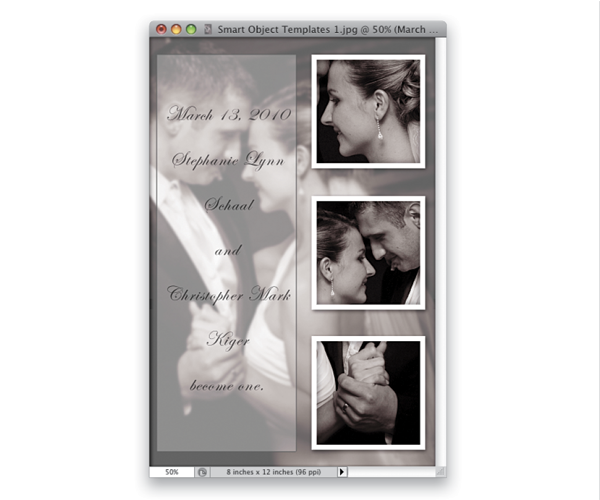
Step 13: Add Some Text On Top Of The Rectangle
Select the Type tool (T). Click-and-drag inside the white rectangle to create a large text box. Then add some text. I used Edwardian Script for the font and set the font size to 41 pt.
TIP: To increase the space between each line of text, go into the Character panel (Window>Character) and increase the leading amount to 90 pt.
âƒ
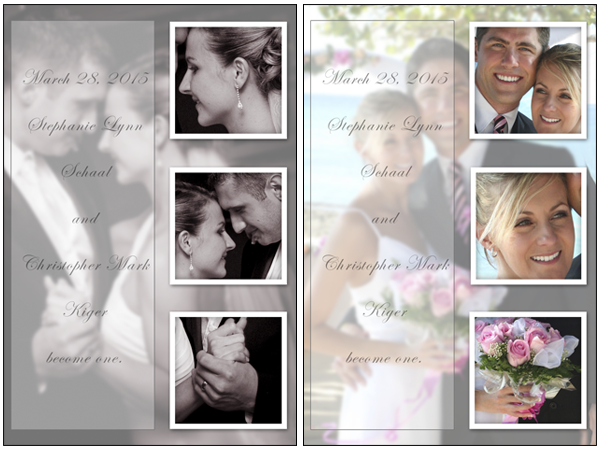
Step 14: Replace Any One Of The Smart Object Layers And They Will All Be Replaced
Now for the icing on the cake. What happens when the next project comes along and you have a photo of another couple? Just save this image as a PSD file. Then reopen it when the next project comes along. Click on any of the Smart Object layers, then click the Layer menu and choose Smart Objects>Replace Contents. Find another photo of similar size and orientation and click Place. All four photos are replaced. The size differences are maintained in each of them. The masks stay put. The layer styles carry over and even the Gaussian Blur is applied to the new photo. (You can applaud now.)

Step 15: Adjust The Position Of Any Photos And The Gaussian Blur Smart Filter
The thing that really brings this over the top is that you can move or resize any of the three smaller photos (remember, they're Smart Objects, so you can resize them without losing image quality). So if the new photo doesn't match perfectly, you can change it. Also, look at the Gaussian Blur Smart Filters sublayer. In the new photo it appears too blurry. No problem. Just double-click on Gaussian Blur and adjust the setting. I dropped it down to 2 pixels here and clicked OK. Now that is one heck of a flexible Photoshop document!
Learn how to do more from Layers: The Complete Guide to Photoshop's Most Powerful Feature, by clicking here
