
Colorizing Photographs

You know sometimes you just don’t want that photo you took to be a plain, old snapshot. Especially if you are hanging it on the wall or putting it online. You want to spice it up. One easy way to do this is to colorize it.
You’ve seen those old photos that are not black and white, but more like brown and white right? That brown and white tone is called Sepia tone. In Photoshop you can do these very easily with some of the basic tools the software provides for you. But you don’t have to have just brown, you can have any color you want. Whether it be brown, blue, green or purple, it’s very easy to do. I’ll show you how.
First thing is you need a photo. Any one will do, even a black and white shot. Color shots are just fine too. Bring your photo into Photoshop and do any cropping and adjusting you need to do to make it a perfect snap shot. Now we are going to colorize it. The first thing to do is to hit Image -> Adjust -> Desaturate. This will turn your color photo into a greyscale photo. Basically just black and white. Now hit Image -> Adjust -> Hue and Saturation. Look at the image below.
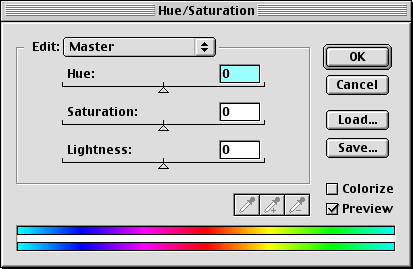
There are three sliders to work with. One adjusts the hue, the second adjusts the saturation and the third adjusts the brightness. In the lower right-hand corner is a checkbox that says Colorize. Click that now. Now you will have an image that is based on the color of the top slider. As you move the slider back and forth, you will see a color change throughout the image.
The saturation slider adjusts the amount of color that the image has. So the farther right the more color will be applied. As you move left of the center point, you will begin to see the image go back toward black and white or desaturation. Saturation means simply what it says. The higher the saturation, the more color. Think of a towel that you are soaking with liquid color. The more color you add, the more saturated the towel becomes.
The last slider will adjust how light or dark your image is. The middle is fairly neutral, and as you move left or right of that point, the lightness changes.
To demonstrate, I have taken a simple snapshot of some ladies watching the television. I brought the image into Photoshop and did some cropping. I also adjusted the levels to make it more balanced. When I was satisfied, I desaturated it and then added a nice brown Sepia tone. Take a look at the first image.

You can see that this is just a plain, old photograph. Now take a look at the finished product.

If you look closely, I also added some noise to the photograph to give it more weathered and old look. I simply hit Filter -> Noise -> Add Noise… I added a bit of Gaussian noise and voila, I’m done. Try doing this with some of your favorite photos and then printing them out on your laserjet. You can get some great wall photos out of this little trick. See ya next week.

using sepia isn’t colorizing………..
The first picture was better. I don’t even mind that the background is blown out.